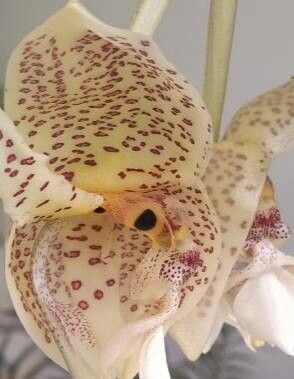
Hey there, fellow plant lovers! If you’ve ever marveled at the spectacular, pendulous blooms of a Stanhopea oculata, you’ve probably wondered how you could get more of these beauties for yourself. Trust me, I get it. Those incredible, often fragrant, flowers are truly something special, dangling their way out of the pot like nature’s own chandeliers.
Propagating Stanhopea oculata might sound a bit daunting, especially if you’re new to the orchid world. While they’re not the absolute easiest to start from scratch, with a little patience and the right approach, it’s a deeply rewarding endeavor. Watching a tiny piece of your beloved plant unfurl new roots and eventually bloom is a thrill I never get tired of.
The Best Time to Start
For Stanhopea oculata, the most successful propagation often happens right after the plant has finished flowering. This is when the orchid is transitioning into its active growth phase. You’ll see new pseudobulbs forming and hopefully, new root development. Trying to do this during a dormant period can be much less fruitful.
Supplies You’ll Need
To give your new Stanhopea cuttings the best start, gather these essentials:
- Sharp, sterilized pruning shears or a clean knife: For making neat cuts.
- Orchid potting mix: A coarse, well-draining mix is crucial. Think bark chips, perlite, and charcoal.
- Small pots or community trays: Whatever suits the size of your cuttings. Make sure they have drainage holes!
- Rooting hormone (optional, but helpful): A gentle one formulated for orchids can encourage quicker root formation.
- Sphagnum moss or perlite: To help retain a bit of moisture while allowing airflow.
- A humidity dome or plastic bag: To create a microclimate for your cuttings.
- A spray bottle: For misting.
- Bottom heat (optional, but beneficial): A heat mat can really speed things up.
Propagation Methods
Stanhopea oculata is typically propagated through division. While you might see other methods discussed for orchids, division is usually the most straightforward and successful for this genus.
Division: Bringing New Life to Your Orchid
- Wait for the right moment: As I mentioned, after flowering is your golden window. Look for signs of new growth at the base of the pseudobulbs.
- Gently remove the orchid from its pot: If it’s been growing for a while, you might need to carefully cut away the old pot or gently coax it out.
- Clean off excess potting mix: Use your fingers or a gentle stream of water to expose the root system and rhizome (the horizontal stem connecting the pseudobulbs).
- Identify natural breaks: Look for sections of the plant that have at least two to three healthy pseudobulbs and a good root system. You want to cleanly separate these divisions.
- Make your cut: Using your sterilized pruning shears or knife, make a clean cut through the rhizome to separate the division.
- Prepare the division: If the cut end of the rhizome looks very wet, you can let it air dry for a few hours to prevent rot. Some growers even dust the cut surface with a fungicide or cinnamon powder, though I find clean cuts and good air circulation usually suffice.
- Potting up: Plant your division in a new pot with fresh, coarse orchid mix. Ensure the pseudobulbs are sitting on top of the mix, and the roots are gently spread out. Don’t bury them too deep!
- Initial watering: Water sparingly at first. You want the mix to be lightly moist, not waterlogged. Too much moisture at this stage is the fastest way to invite rot.
The “Secret Sauce” (Pro Tips)
Now, here are a few things I’ve learned over the years that can really make a difference:
- Don’t overwater, ever! This is especially true for new divisions. They don’t have a robust root system yet, so giving them too much water is like drowning a baby. A light misting every few days is usually better than a heavy drenching.
- Warmth is your friend. Stanhopeas appreciate warmth, so if you can provide bottom heat from a heat mat, especially during the initial rooting phase, you’ll likely see faster results. Aim for a consistent temperature around 70-75°F (21-24°C).
- Patience with the roots. Stanhopea roots can sometimes be a bit slow to appear. If you’re anxious, resist the urge to constantly check. Instead, focus on providing consistent, bright, indirect light and good air circulation.
Aftercare & Troubleshooting
Once your division is potted up, place it in a location with bright, indirect light. Avoid direct sun, which can scorch the leaves. Maintain good air movement around the plant.
The most common issue you’ll face is rot, often caused by overwatering or poor air circulation. You’ll see the pseudobulbs shrivel and turn mushy, or the roots will develop black, slimy patches. If you spot this, act quickly. Remove the affected parts with your sterilized tool, and repot into fresh, dry medium. Sometimes, even with the best care, a division might not make it. Don’t get discouraged. It’s part of the learning process!
A Little Bit of Patience Goes a Long Way
Propagating Stanhopea oculata is a journey. It asks for a bit of planning and a lot of gentle care. But as you watch those new roots emerge and your plant grow stronger, you’ll feel an immense sense of accomplishment. So, dig in, be patient, and enjoy the magic of bringing more of these incredible orchids into your home! Happy growing!
Resource:
https://identify.plantnet.org/k-world-flora/species/Stanhopea%20oculata%20(Lodd.)%20Lindl./data