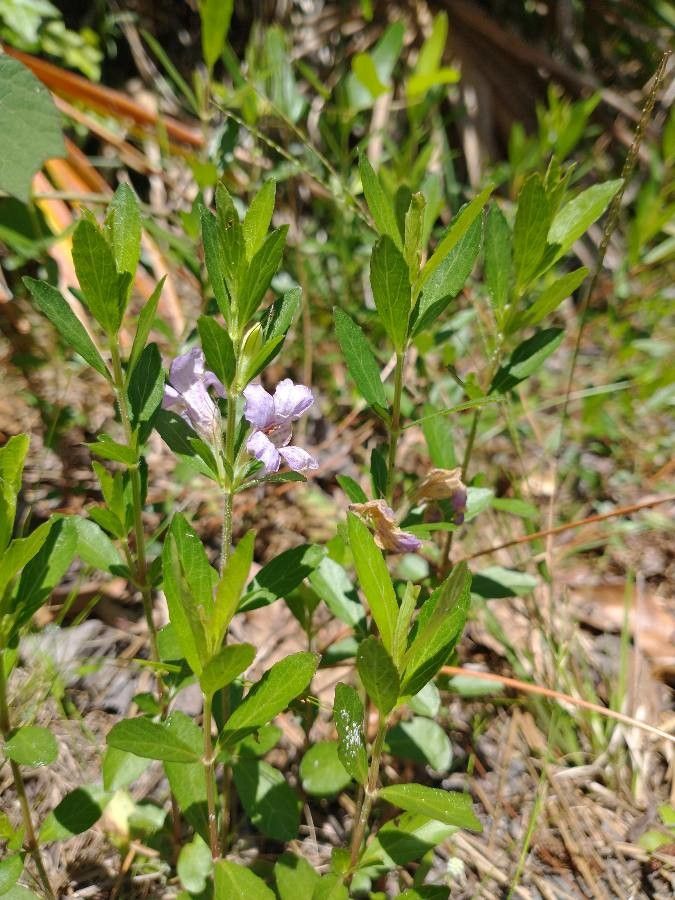
Hello, fellow garden enthusiasts! I’m always on the lookout for those special plants that bring a little something extra to our gardens, and Dyschoriste oblongifolia (often called Dwarf False Foxglove, though it’s not a true foxglove!) is one of them. With its lovely, delicate purple-blue flowers, it’s like a breath of fresh air, especially if you’re looking for something to fill in those slightly shadier spots or add a touch of woodland charm.
Now, why propagate it? Well, besides the joy of creating more of something beautiful for free, it’s a fantastic way to expand your collection or share the plant love with friends. I’ve found Dyschoriste oblongifolia to be quite forgiving, making it a great candidate for those of you just dipping your toes into the world of plant propagation.
The Best Time to Start
For the highest success rate with our Dyschoriste oblongifolia, I have found that spring is your absolute best friend. As the days begin to lengthen and the plant is actively pushing out new growth after its winter rest, it has all the energy it needs to root successfully. Look for stems that are still somewhat flexible but have started to firm up a bit – not floppy green shoots, but not old, woody growth either.
Supplies You’ll Need
To get these little beauties started, you won’t need a whole greenhouse full of fancy gadgets. Here’s what I generally have on hand:
- Sharp pruning shears or a clean knife: For making nice, clean cuts.
- Small pots or seed trays: Clean ones are key to preventing disease.
- A well-draining potting mix: I prefer a blend of equal parts peat moss or coco coir, perlite or vermiculite, and a bit of compost. You want something that holds moisture but doesn’t turn into a soggy mess.
- Rooting hormone (optional but recommended): This can give your cuttings a little extra boost. Look for one specifically for herbaceous cuttings.
- A plastic bag or propagation dome: To create a humid environment.
- Water mister or spray bottle: For keeping things moist.
- Gravel or pebbles (optional): For the bottom of your pots if you’re worried about drainage.
Propagation Methods
I find that stem cuttings are my go-to method for Dyschoriste oblongifolia. It’s reliable and you can usually get several plants from just one parent.
- Take Your Cuttings: Using your clean shears or knife, select healthy stems from your parent plant. Make a cut just below a leaf node (the point where a leaf attaches to the stem). Aim for cuttings that are 4-6 inches long.
- Prepare the Cuttings: Gently remove the bottom leaves from the cutting, leaving just a few at the top. This prevents them from rotting when buried in the soil. If the remaining leaves are very large, you can even cut them in half horizontally to reduce water loss through transpiration.
- Apply Rooting Hormone: If you’re using rooting hormone, dip the cut end of the stem into the powder or gel. Tap off any excess.
- Plant Your Cuttings: Fill your clean pots with your prepared potting mix. Make a small hole in the center of the soil with your finger or a pencil. Gently insert the cut end of the stem into the hole, ensuring the leaf nodes are buried. Firm the soil around the stem.
- Water Gently: Water the soil thoroughly until it’s evenly moist. You don’t want it soggy, just nicely hydrated.
The “Secret Sauce” (Pro Tips)
Here are a couple of things I’ve learned over the years that can really make a difference:
- Humidity is Your Friend, But Not Drowning: Once your cuttings are planted, cover the pots with a clear plastic bag or place them under a propagation dome. This creates a mini-greenhouse, keeping the humidity high, which is crucial for root development. However, make sure the leaves don’t touch the sides of the bag or the dome, as this can encourage fungal growth. If you see condensation building up too much, just lift the bag for a few minutes to let it air out.
- Warmth From Below: Dyschoriste oblongifolia roots are happiest with a little warmth. If you have a heated propagation mat, placing your pots on it can significantly speed up the rooting process. It mimics the gentle warmth of spring soil.
Aftercare & Troubleshooting
Once your cuttings are planted and tucked into their humid home, be patient! You won’t see roots overnight.
- Keep the Soil Consistently Moist: Check the soil regularly. It should feel damp to the touch, but not waterlogged. If it starts to feel dry, give it a gentle misting or water from the bottom by placing the pot in a tray of water for about 15-20 minutes.
- Signs of Rooting: The best indicator that your cuttings have rooted is new leaf growth appearing at the top. You might also feel a gentle tug when you carefully try to lift the cutting; it should offer some resistance. This usually takes anywhere from 3-6 weeks, depending on conditions.
- Troubleshooting – Rot: The most common problem you might encounter is rot. This usually happens if the soil is too wet and there isn’t enough air circulation. If you notice stems turning black and mushy, unfortunately, it’s probably too late for that cutting. Prevent this by ensuring good drainage and not overwatering. Remove any rotting cuttings immediately to prevent it from spreading.
A Encouraging Closing
Propagating plants is such a rewarding journey. It’s a beautiful dance with nature, and with a little patience and these tips, I have no doubt you’ll be successful with your Dyschoriste oblongifolia. Enjoy the process, celebrate every new leaf, and soon you’ll have a garden bursting with these lovely blooms! Happy propagating!
Resource: