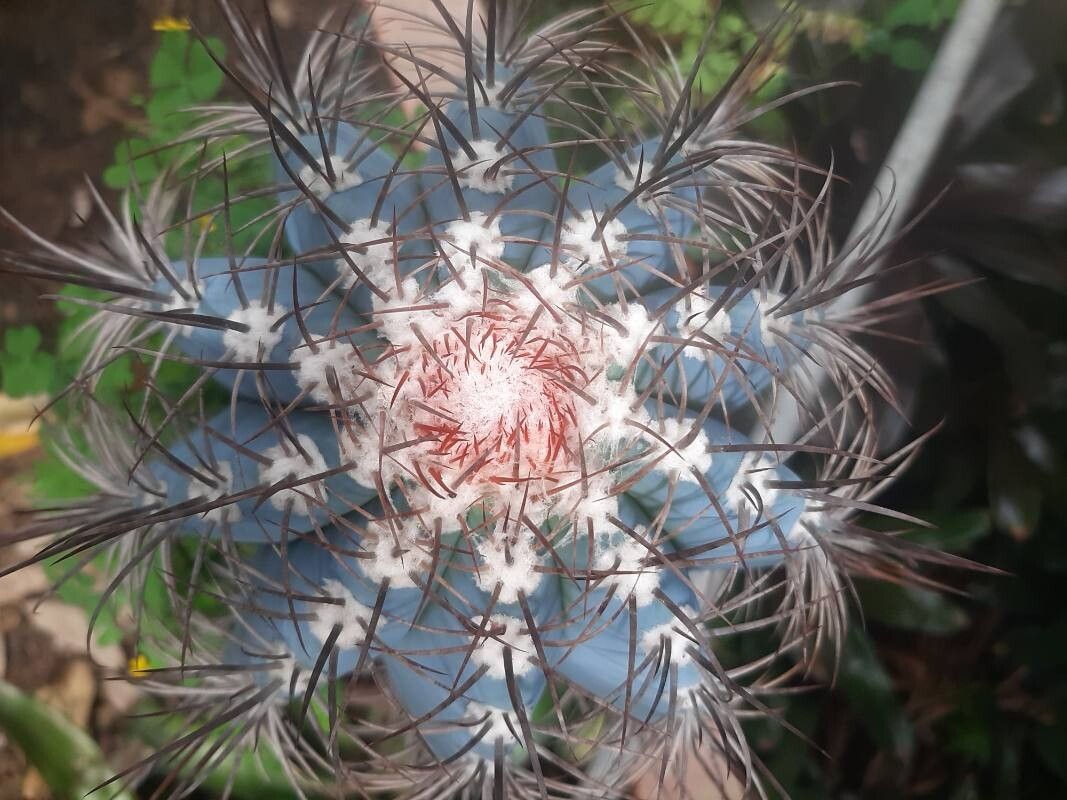
Hello, fellow plant enthusiasts! It’s your seasoned gardener friend here, ready to dive into something truly special today. We’re talking about Melocactus azureus, or as I affectionately call it, the “Blue Cactus.” Its striking blue-green body and captivating cephalium (that fuzzy, crown-like structure that eventually blooms) make it a showstopper in any collection. Propagating these beauties isn’t just about adding to your plant family; it’s about understanding a little bit of botanical magic.
Now, is Melocactus azureus a beginner-friendly plant to propagate? I’d say it’s for those who’ve got a bit of experience under their belt. It’s not the trickiest, but it does appreciate a careful hand and a good understanding of its needs. But don’t let that deter you! With a little patience and these tips, you’ll be well on your way.
The Best Time to Start
Generally, the spring and early summer are your golden ticket for propagating Melocactus azureus. This is when the plant is actively growing and has the most energy to bounce back and establish new roots. You’ll see new growth appearing, and those little pups or offsets will be more robust and easier to work with.
Supplies You’ll Need
To give your little blue babies the best start, gather these essentials:
- Well-draining Cacti & Succulent Potting Mix: This is non-negotiable! Think gritty, airy, and fast-draining. I usually mix coarse sand, perlite, and a good quality potting soil.
- Sharp, Sterilized Pruning Shears or a Clean Knife: For making clean cuts.
- Rooting Hormone (Powder or Gel): This is optional but highly recommended for cuttings to speed up root development.
- Small Pots or Seedling Trays: With drainage holes, of course!
- Gloves: To protect your hands from those gentle spines.
- Watering Can with a Fine Rose: For gentle watering.
- Optional: Heat Mat: Especially helpful if your room is on the cooler side.
Propagation Methods
For Melocactus azureus, the most common and successful methods are offset removal and, if you’re feeling adventurous, stem cuttings.
Offset Removal (The Easiest Route!)
Many Melocactus species produce offsets, or “pups,” around their base. These are essentially miniature versions of the parent plant.
- Inspect Your Cactus: Look for small plantlets emerging from the base of your mature Melocactus azureus. You’ll want them to be a decent size – at least an inch or two tall – and ideally have a few of their own tiny spines.
- Gently Wriggle and Twist: With clean hands or gloved fingers, gently try to wiggle the offset. Oftentimes, they will naturally detach with a slight twist. If it feels firmly attached, don’t force it!
- Use Your Tool (If Needed): If the offset isn’t coming away easily, it’s time to bring out your sterilized knife or shears. Carefully cut the offset away from the parent plant, making sure to get as much of its base as possible. Try to make the cut as clean as you can.
- Callus Over: This is crucial! Place the separated offset in a bright, dry spot, out of direct sun, for 2-5 days. You need the cut surface to dry out and form a protective callus. This prevents rot when you plant it.
- Plant It Up: Once callused, prepare your small pot with your well-draining cactus mix. Make a small indentation in the soil and gently place the offset’s base into it. You don’t need to bury it deeply; about a quarter to half an inch is fine, just enough to give it stability.
- Wait to Water: Resist the urge to water immediately! Wait another week after planting before giving it its first light watering. You want to encourage those roots to seek out the moisture.
Stem Cuttings (For the More Daring)
This is more challenging as Melocactus don’t always readily root from cuttings, but it’s not impossible! You’ll typically be taking a piece from a mature plant (not the cephalium).
- Select a Healthy Stem: Choose a mature, healthy section of your Melocactus that doesn’t include the fuzzy cephalium unless you’re intentionally propagating from a bloom stalk (which is less common and trickier).
- Make the Cut: Using your sharp, sterilized knife or shears, cut a section of the stem, ideally 2-4 inches long. Make a clean, angled cut.
- Let it Callus Thoroughly: Just like with offsets, this is critical! Place the cutting in a bright, dry spot for at least 1-2 weeks, or until the cut end is completely dry and callused over. This can take longer for stem cuttings.
- Optional: Dip in Rooting Hormone: Once callused, you can dip the cut end into rooting hormone powder or gel. Tap off any excess.
- Plant Your Cutting: Fill a pot with your well-draining cactus mix. Insert the callused end of the cutting about an inch into the soil. You might want to use a small stake to help keep it upright if it’s a bit wobbly.
- Be Patient with Watering: Again, hold off on watering for a week or two. Your cutting needs time to heal and develop roots before it can absorb water.
The “Secret Sauce”
Here are a few tricks I’ve learned over the years that can make a big difference:
- Don’t Overcrowd: When planting offsets or cuttings, give them a little breathing room. If they’re too close, they’re more prone to rot and less likely to get good air circulation. A small pot for each is best.
- Bottom Heat is Your Friend: If you’re struggling with root development or live in a cooler climate, a gentle bottom heat mat can be a game-changer. It mimics the warmth of summer soil and really encourages roots to form. Aim for around 70-80°F (21-27°C).
- Observe, Don’t Prod: When you think a cutting or offset might have roots, your instinct might be to tug on it. Resist the urge! Wait until you see visible root growth or new top growth before gently checking for resistance. Prodding can break delicate new roots.
Aftercare & Troubleshooting
Once your propagation has started to show signs of life – that’s usually new growth or a slight resistance when gently tugged – you can begin to water a bit more regularly, but still sparingly. Water only when the soil is completely dry. For offsets, you can keep them in their small pots for a while until they are well-established and larger. For cuttings, they might need to stay in their initial pot for several months before you consider repotting.
The biggest enemy here is rot. If you see your cactus getting mushy, discolored, or developing black spots, it’s likely rot. This usually happens from overwatering or insufficient aeration. If you catch it early, you might be able to cut away the rot and try to callus and replant the healthy part, but often, it’s a sign the attempt has failed. Good drainage and a light touch with the watering can are your best defense.
A Gentle Closing
Propagating Melocactus azureus is a journey, and like all good gardening adventures, it requires a bit of patience. Don’t get discouraged if your first few attempts don’t take. Each plant is an individual, and sometimes they just need the right conditions and a little bit of luck. Keep observing, keep learning, and most importantly, enjoy the process of bringing new life into your home. Happy propagating!
Resource: