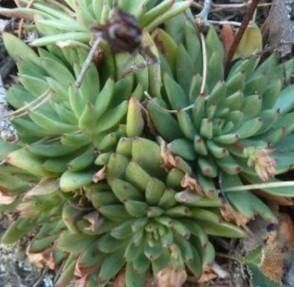
Oh, Echeveria calderoniae! If you’ve ever admired those gorgeous, plump rosettes of velvety leaves, you know exactly what I’m talking about. They’re like little succulent jewels, aren’t they? Propagating them is not only a fantastic way to multiply your collection (because who doesn’t want more of these beauties?), but it’s also incredibly satisfying. Seeing a tiny leaf transform into a whole new plant is pure gardening magic. And the best part? Echeveria calderoniae is generally quite good for beginners looking to dip their toes into the wonderful world of succulent propagation. You’ll likely have success with a little patience.
The Best Time to Start
For the highest success rates, I always aim to propagate my Echeverias, including calderoniae, during their active growing season. This typically falls in the spring and early summer. The days are getting longer, the temperatures are warming up, and the plants are just bursting with energy. They’re much more likely to root and thrive when they’re feeling a bit feisty and ready to grow. Trying to propagate during the cooler, dormant months can be a bit of a gamble; you might get lucky, but the odds are definitely stacked against you.
Supplies You’ll Need
Gathering your supplies beforehand makes the whole process much smoother. Here’s what I usually have on hand for propagating Echeveria calderoniae:
- Well-draining potting mix: A cactus or succulent mix is perfect. You can also mix your own by combining potting soil with perlite or pumice – a 50/50 ratio works well.
- Clean, sharp pruning shears or a sharp knife: For making clean cuts.
- A clean tray or pot: For starting your cuttings.
- Rooting hormone (optional but recommended): This can give your cuttings a helpful boost.
- A gentle watering can or spray bottle: For careful watering.
- A comfortable spot with bright, indirect light: Avoid harsh, direct sun initially.
- A little bit of patience!
Propagation Methods
There are a few ways to get more Echeveria calderoniae plants, and I find these two to be the most reliable:
Stem Cuttings
This is my go-to method because it’s fast and usually yields great results.
- Prepare your cutting: Using your clean shears or knife, cut off a healthy stem from your mature Echeveria calderoniae. Aim for a piece that has at least 3-4 leaves. You can also use the main rosette if you’re looking to prune a leggy plant.
- Allow it to callus: This is a crucial step! Let the cut end dry out and form a callus for at least 2-3 days. You can do this by setting the cutting on a dry paper towel in a warm, airy spot. This seals the wound and prevents rot when you plant it.
- Plant the cutting: Once callused, you can dip the callused end in rooting hormone (if using), then gently insert the cut end into your prepared well-draining potting mix. You don’t need to bury it too deep; just enough for it to stand upright.
- Water sparingly: Wait a few days after planting before watering for the first time. Then, water very lightly, just enough to moisten the soil. Overwatering at this stage is the quickest way to invite rot.
Leaf Cuttings
This method takes a bit longer, but it’s oh-so-rewarding to see tiny baby plants sprout from just a leaf!
- Select healthy leaves: Gently twist or cut off a plump, healthy leaf from the mother plant. Try to get the entire base of the leaf, where it attaches to the stem, intact.
- Let them callus: Just like stem cuttings, allow the cut end of each leaf to callus for 2-3 days.
- Lay them on soil: Once callused, simply lay the leaves on top of your dry, well-draining potting mix. You can place them directly on the surface or lightly press the callused end into the soil.
- Mist occasionally: Keep the soil lightly misted. You want it to be slightly humid, but not wet. Don’t let the leaves sit in standing water.
The “Secret Sauce” (Pro Tips)
After years of fussing over succulents, I’ve picked up a few tricks that seem to make all the difference.
- Don’t rush the roots! For leaf cuttings, it’s quite common for them to grow tiny roots before they even start to show a little baby rosette. Don’t be tempted to try and plant them until that little baby plant is clearly visible. And remember, if you’re water propagating (which isn’t my preferred method for Echeveria calderoniae, but some try it), never let the cut end of the leaf or stem touch the water. I always use props to suspend them so only the tiny roots can dip in.
- Bottom heat is your friend: If you’re propagating in a cooler environment, or just want to speed things up, consider using a seedling heat mat. It provides gentle warmth to the base of your cuttings, encouraging root development. Just make sure the soil doesn’t dry out too quickly with the added heat.
- Observe your cuttings daily: I find I catch problems much earlier this way. If a leaf starts to look mushy or discolored, it’s usually a sign of rot, and it’s best to remove it immediately to prevent it from spreading.
Aftercare & Troubleshooting
Once you see signs of roots on your stem cuttings (usually a gentle tug will reveal resistance) or tiny baby plants emerging from your leaf cuttings, it’s time to give them a bit more care.
- Increase watering slightly: You can start watering a little more regularly, but still, always err on the side of underwatering. Let the soil dry out completely between waterings.
- Gradually introduce light: Move your new babies into a spot with bright, indirect light. As they grow stronger, you can slowly acclimate them to brighter conditions, but never put a
- Watch for rot: This is the biggest enemy of succulent propagation. Signs of rot include mushy, dark, or blackening stems or leaves. If you see this, remove the affected parts immediately. Ensure your soil is excellent and you’re not overwatering.
- Pests: While less common on fresh cuttings, keep an eye out for common succulent pests like mealybugs. If you spot any, treat with a cotton swab dipped in rubbing alcohol.
A Encouraging Closing
Propagating Echeveria calderoniae is such a rewarding journey. Don’t be discouraged if a few don’t make it – it happens to even the most seasoned gardeners! Be patient, observe your little green friends, and enjoy the process of watching new life emerge. Happy propagating!
Resource:
https://identify.plantnet.org/k-world-flora/species/Echeveria%20calderoniae%20Pérez-Calix/data