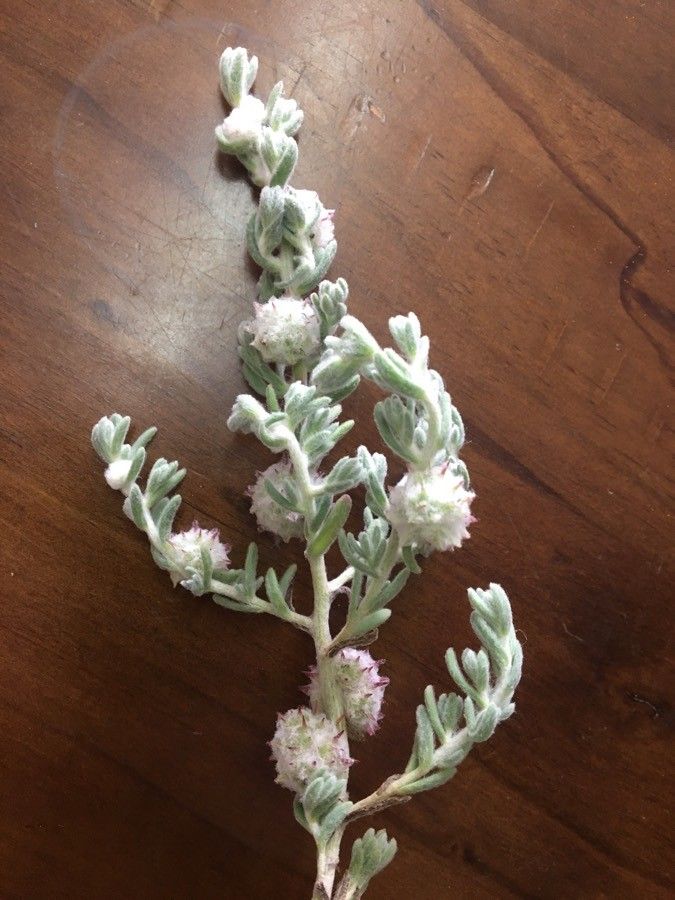
Oh, hello there! I’m so glad you’ve stopped by. Today, we’re diving into the world of Dissocarpus paradoxus, a plant that truly captures my heart with its quirky charm. You know, the kind of plant that makes you pause and say, “Wow, what is that?” Its unique form and understated beauty have been a quiet obsession of mine for years. And guess what? Propagating it is a deeply satisfying journey, a chance to create more of that magic for yourself or to share with fellow plant lovers. Now, some might ask if it’s a beginner-friendly plant to propagate. I’d say it leans a little towards the patient gardener, but with a few pointers, you’ll be well on your way!
The Best Time to Start
For Dissocarpus paradoxus, I’ve found the absolute best time to get propagating is during its active growing season. Think late spring through summer. This is when the plant is full of vigor, putting out fresh growth that’s eager to root. Trying to propagate when it’s dormant is just setting yourself up for disappointment, much like trying to have a deep conversation with someone who’s fast asleep!
Supplies You’ll Need
Let’s get our toolkit ready. Having the right gear makes all the difference, believe me.
- Sharp, clean pruning shears or a knife: For making clean cuts. No one likes a smashed stem!
- Rooting hormone (optional but recommended): A little boost can really help things along. I prefer a powdered form.
- A well-draining potting mix: Your standard succulent or cactus mix is usually perfect. You can also mix in some perlite or pumice for extra aeration.
- Small pots or propagation trays: Whatever you have on hand will do. Make sure they have drainage holes.
- A spray bottle: For gentle watering.
- Clear plastic bags or humidity domes: To create that steamy environment new cuttings love.
- Patience! This is the most important ingredient.
Propagation Methods
I’ve had the most success with stem cuttings for Dissocarpus paradoxus. It’s a straightforward process once you get the hang of it.
- Select your cutting: Look for healthy, mature stems that are new growth but not too soft. Aim for pieces about 4-6 inches long.
- Make the cut: Using your clean shears, make a sharp cut just below a leaf node. This is where the magic happens, where roots are most likely to form.
- Prepare the cutting: Gently remove any lower leaves that would end up below the soil line. If you’re using rooting hormone, dip the cut end into it now, tapping off any excess.
- Let it callus: This is crucial! Let your cuttings sit out in a dry, well-ventilated spot for a day or two. You want to see a dry, scab-like layer form over the cut end. This prevents rot.
- Plant your cuttings: Fill your small pots with your well-draining mix. Make a small hole with your finger or a pencil and insert the callused end of the cutting. Gently firm the soil around it.
- Water lightly: Give your cuttings a gentle misting. You don’t want to drench them.
- Create humidity: Cover the pots with a clear plastic bag or a humidity dome. This traps moisture, which is vital for callus development and eventual rooting. Make sure the leaves don’t touch the plastic if possible – a small stake can help.
- Placement: Place your pots in a bright spot that receives indirect sunlight. No direct sun, please!
The “Secret Sauce” (Pro Tips)
Here are a few things I’ve learned over the years that tend to make a big difference:
- Don’t rush the callus: Seriously, this is a big one. Skipping the callusing step is the most common reason for rot. Give it that time to seal itself up.
- Bottom heat is a game-changer: If you can, place your pots on a propagation mat set to a low temperature (around 70-75°F or 21-24°C). This gentle warmth encourages root development from below, like a warm hug for your cuttings.
- Airflow is key: Even though we’re creating humidity, good airflow is still important. Every few days, lift the plastic bag for a few minutes to let some fresh air in and prevent fungal issues.
Aftercare & Troubleshooting
Once your cuttings have started to show signs of new growth (tiny leaves, a bit of stretching), it’s a good sign roots are forming! At this point, you can gradually reduce the humidity. Instead of a full bag, poke a few holes in the bag or lift it for longer periods.
The most common issue you’ll encounter is rot. If a cutting turns mushy, black, or smells off, it’s likely rotted. Unfortunately, there’s no coming back from that. This usually happens if the cutting hasn’t callused properly or if the soil is staying too wet.
If you see no progress after several weeks, don’t despair. Sometimes they just need a little more time. You can gently tug on a cutting. If you feel a slight resistance, roots should be forming.
A Encouraging Closing
Propagating Dissocarpus paradoxus is a delightful process, a testament to nature’s resilience and your nurturing hands. Be patient with your little charges, celebrate every tiny sign of life, and don’t be discouraged if not every cutting makes it. Each attempt is a learning experience. Enjoy the journey, and soon you’ll have more of these fascinating plants to admire and share! Happy growing!
Resource: