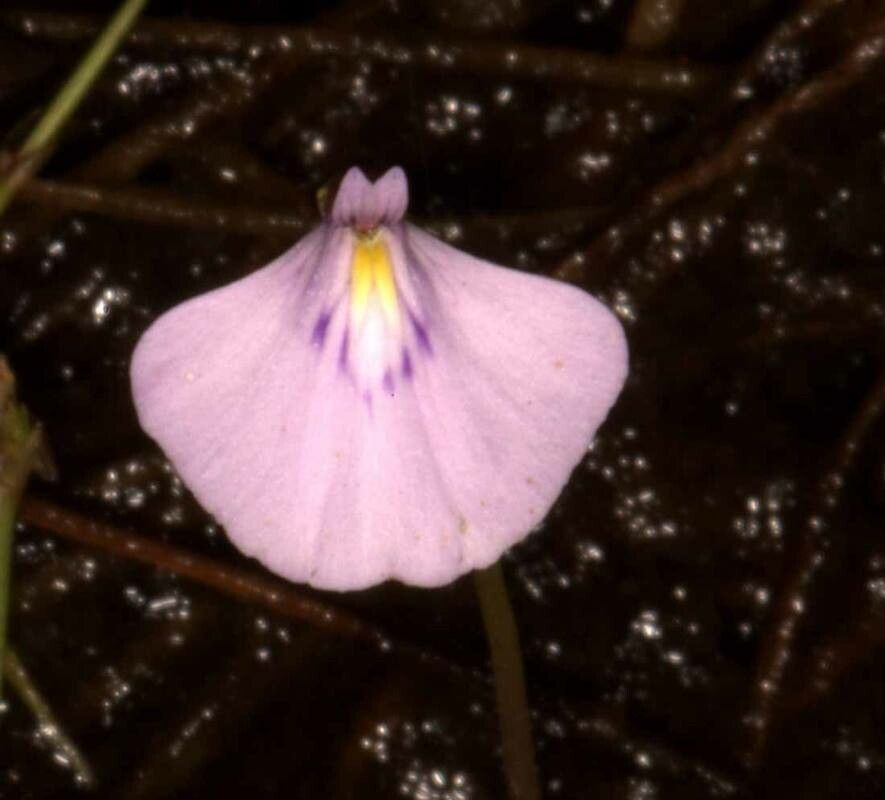
Oh, Utricularia hamiltonii! If you’re looking for a plant that’s a little bit wonder and a whole lot of charm, you’ve found it. These terrestrial bladderworts, with their delicate, often cheerful flowers, bring such a unique magic to any collection. And the best part? Propagating them is surprisingly rewarding, giving you a chance to share this magic with others (or just grow your own happy little army!). For beginners, I’d say it’s moderately easy – a little patience goes a long way, and once you get the hang of it, you’ll be hooked.
The Best Time to Start
When it comes to giving your Utricularia hamiltonii cuttings the best shot at life, spring and early summer are your golden windows. This is when the plant is actively growing, putting out lots of fresh, vigorous shoots. You’ll find they root much faster and more readily when they have that burst of energy from the warmer, brighter days. Waiting until the plant is showing strong, new growth is key.
Supplies You’ll Need
Here’s what you’ll want to have on hand:
- Sharp, clean pruning shears or a razor blade: For making those crucial, clean cuts.
- Well-draining potting mix: Think a mix meant for carnivorous plants or orchids. A good blend might be equal parts sphagnum moss (long-fibered is great), perlite, and peat moss.
- Small pots or seedling trays: Clean ones, of course! Small to medium sizes work best.
- Spray bottle: For keeping things nicely humid.
- Water: Distilled or rainwater is best for carnivorous plants.
- Optional: A propagation tray with a clear lid: This helps maintain humidity.
- Optional: Bottom heat mat: Can speed things up, especially if your home is on the cooler side.
Propagation Methods
Let’s talk about getting those new babies started! For Utricularia hamiltonii, stem cuttings are my go-to method, and it’s usually the most successful.
Stem Cuttings:
- Identify a healthy stem: Look for a part of the plant that has several nodes (where leaves or tiny root primordia emerge) and ideally a developing flower stalk or a few leaves. You want a stem that’s green and firm, not leggy or pale.
- Make the cut: Using your sterilized shears or razor, snip off a segment of the stem that’s at least an inch or two long. A clean cut is so important here – it prevents damage and reduces the risk of infection. I like to make my cuts just below a node.
- Prepare the cutting: Gently remove any lower leaves that might end up submerged in water or soil. You want to expose those nodes, as that’s where the roots will emerge.
- Planting the cutting:
- In Potting Mix: Gently press the prepared cutting into your well-draining mix. Make sure at least one or two nodes are buried. Don’t pack the soil too tightly. Just give it enough to hold the cutting upright.
- In Water (Less Common but Works): Some folks have success placing cuttings in a small amount of distilled water. Ensure only the cut end and maybe a node or two are submerged. This method can be a bit trickier for U. hamiltonii to transition from to soil later.
The “Secret Sauce”
Here’s a little something I’ve learned over the years that really helps:
- Snip, Snip – No Wiggling! Once you’ve placed your cutting in the pot, resist the urge to poke at it or move it around. Let that cut end settle undisturbed. Any jostling can break delicate new root hairs before they’ve even formed.
- Humidity is Your Best Friend: Utricularia hamiltonii loves a humid environment. If you’re using a propagation tray, keep the lid on. If not, misting regularly with distilled or rainwater is essential. The goal is to keep the leaves looking plump and happy, not dried out.
- Gentle Warmth Boosts Rooting: If you have a bottom heat mat, this is where it shines! Placing your pots on a gentle heat source (around 70-75°F or 21-24°C) can significantly speed up root development. It’s like a little spa treatment for your cuttings.
Aftercare & Troubleshooting
Once you start seeing tiny white nubs or your cutting looks a bit more robust, it’s a good sign roots are forming!
- Gradual Acclimation: If you were keeping your cuttings in a high-humidity environment, gradually introduce them to lower humidity over a week or so before treating them like mature plants. You can do this by opening the propagation tray lid a little more each day.
- Consistent Moisture: Continue to keep the potting mix consistently moist but not waterlogged. The tray method (keeping about a quarter to half an inch of distilled water in the bottom of the pot) works well for many terrestrial Utricularia.
- Light: Bright, indirect light is best. Too much direct sun can scorch those new, tender leaves.
Common Signs of Failure:
- Wilting and Browning: Often a sign of too little humidity or the cutting drying out. Double-check your misting or humidity dome.
- Soft, Mushy Base: This is usually too much moisture and lack of air circulation, leading to rot. Make sure your potting mix is airy enough and that you’re not drowning the cutting. Sometimes, a cutting can just be a dud, and that’s okay! Don’t get discouraged.
A Little Patience Goes a Long Way
Propagating Utricularia hamiltonii is a wonderful way to witness the life cycle of these fascinating plants up close. It takes a bit of tending, a watchful eye, and yes, sometimes a bit of waiting. But when you see those first roots reaching out, or even better, a wee little plantlet forming, the reward is immense. Enjoy the process, learn from each attempt, and soon you’ll have a beautiful collection of your own. Happy growing!
Resource:
https://identify.plantnet.org/k-world-flora/species/Utricularia%20hamiltonii%20F.E.Lloyd/data