Oh, hello there! Come on in, pull up a chair. I’ve just brewed a fresh pot of coffee, and I’m so excited to chat with you about one of my absolute favorite shrubs: Phlomis fruticosa, or as we often call it, Jerusalem Sage.
Beautiful, Resilient, and So Rewarding to Grow!
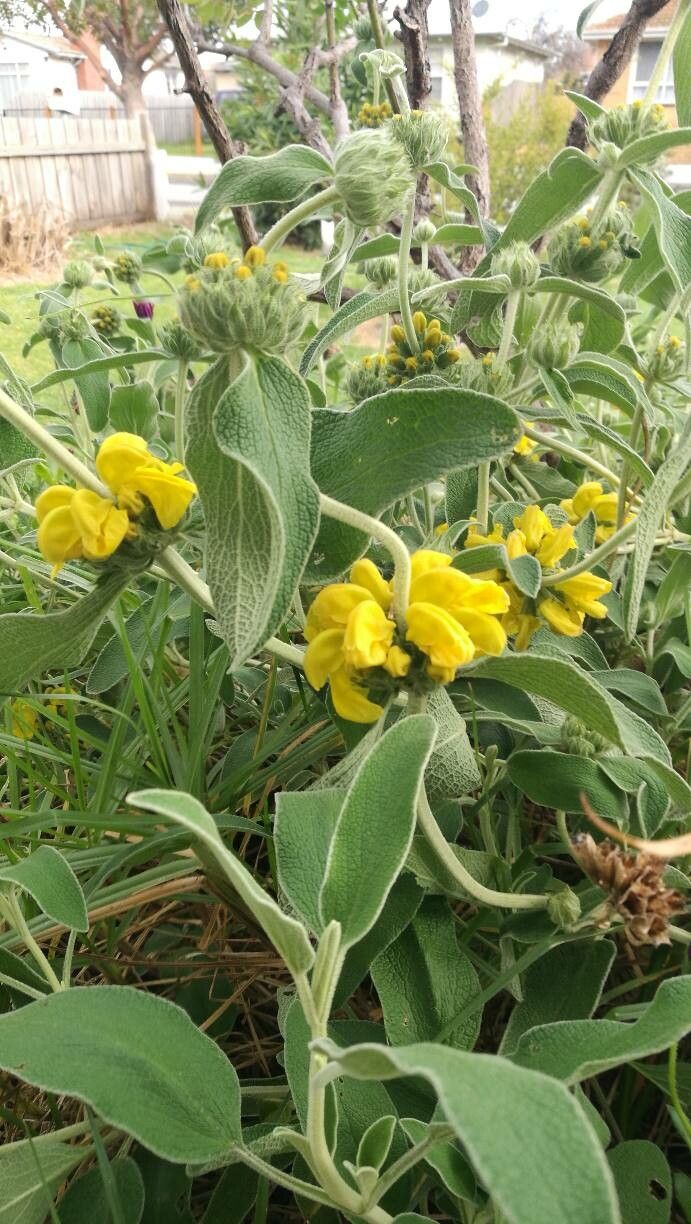
There’s something so utterly charming about Jerusalem Sage. With its fuzzy, silver-green foliage and cheerful yellow flowers that seem to bloom for ages, it brings a touch of Mediterranean sunshine to any garden. It’s tough, drought-tolerant once established, and adds wonderful texture. And the best part? It’s surprisingly easy to propagate! Even if you’re just starting out with plant propagation, give this one a go. You might be surprised at how rewarding it is to watch a tiny cutting transform into a whole new plant.
When’s the Sweet Spot for Starting?
For Jerusalem Sage, I find the late spring to early summer is your golden window. This is when the plant is actively growing and has plenty of pliable, semi-hardwood stems available. These stems have usually hardened off a bit from the new growth but haven’t become woody and old. It’s that perfect stage where they’re full of energy and ready to root.
Your Propagation Toolkit
Before we dive in, let’s gather our supplies. Having everything ready makes the process so much smoother:
- Sharp Pruning Shears or a Clean Knife: Essential for making clean cuts.
- Rooting Hormone (Optional but Recommended): A powder or gel that encourages root development.
- Well-Draining Potting Mix: I like a mix of equal parts peat moss or coco coir, perlite, and a bit of coarse sand. This prevents waterlogging, which is crucial.
- Small Pots or Seed Trays: Clean pots are a must to prevent disease.
- Labels and a Marker: So you don’t forget what you planted where!
- A Watering Can or Mister: For gentle watering.
- A Plastic Bag or Propagation Dome: To create a humid environment.
- Bottom Heat (Optional): A seedling heat mat can speed things up.
Giving New Life: Stem Cuttings
This is my go-to method for Jerusalem Sage, and it’s where I see the most success.
- Take Your Cuttings: Head out to your plant in late spring or early summer. Look for stems that are about 4-6 inches long and still have some flexibility. Avoid the very floppy new growth or the old, woody stems. Using your sharp shears or knife, take a clean cutting just below a leaf node (where a leaf attaches to the stem).
- Prepare the Cuttings: Gently remove the lower leaves from the cutting, leaving just a few at the top. This prevents them from rotting in the soil and encourages the plant to focus its energy on rooting. If your cuttings are very long, you can even cut them in half to create more potential plants.
- Dip in Rooting Hormone (If Using): Dip the cut end of each stem into your rooting hormone powder or gel. Tap off any excess.
- Pot Them Up: Fill your clean pots with your prepared potting mix. Make a small hole in the center with your finger or a pencil, and carefully insert the cutting. Gently firm the soil around the base of the cutting to ensure good contact.
- Create a Humid Environment: Water the soil thoroughly but gently. Then, cover the pot with a clear plastic bag or place it under a propagation dome. This traps humidity, which is vital for cuttings to root. You can secure the bag with a rubber band around the pot.
- Find a Cozy Spot: Place your pots in a bright location but out of direct, harsh sunlight. A little morning sun is usually fine. If you’re using bottom heat, set the mat to about 70-75°F (21-24°C).
My “Secret Sauce” for Success
Here are a couple of things I’ve learned over the years that really make a difference:
- The “Wipe Test”: Once you’ve taken your cuttings, gently wipe off any excess rooting hormone that clumps onto the leaves. Sometimes, that extra powder can actually hinder rooting by forming a barrier.
- Don’t Drown Them: When you water, make sure the soil is moist but never soggy. Roots need oxygen, and sitting in waterlogged soil is a fast track to rot. If you see water pooling, that’s a sign you’ve overdone it.
- Think “Tent”: If you’re using a plastic bag, make sure the leaves aren’t directly touching the plastic. This can cause mold and rot. You can use small stakes or chopsticks to prop up the bag if needed, creating a little tent.
Nurturing Your New Sprouts
You’ll start to see little roots forming in about 4-8 weeks, sometimes a bit longer. You can gently tug on a cutting. If you feel resistance, you’ve got roots!
- Acclimatize Gradually: Once you see roots, it’s time to introduce your new plants to the outside world. Start by opening the plastic bag for a few hours each day, gradually increasing the time. This helps them adjust to lower humidity.
- Watering: Continue to water when the top inch of soil feels dry.
- Troubleshooting: The most common issue is rot. If your cuttings turn black and mushy, they’ve probably succumbed to too much moisture or a fungal issue. Don’t get discouraged! Just clean your pot and start again. Sometimes, a lack of rooting indicates the cutting wasn’t quite ready or the conditions weren’t ideal.
There you have it! Propagating Jerusalem Sage is a wonderful way to expand your collection or share these lovely plants with friends. Be patient with the process, enjoy the anticipation, and celebrate each tiny root that appears. Happy gardening!
Resource:
https://identify.plantnet.org/k-world-flora/species/Phlomis%20fruticosa%20L./data