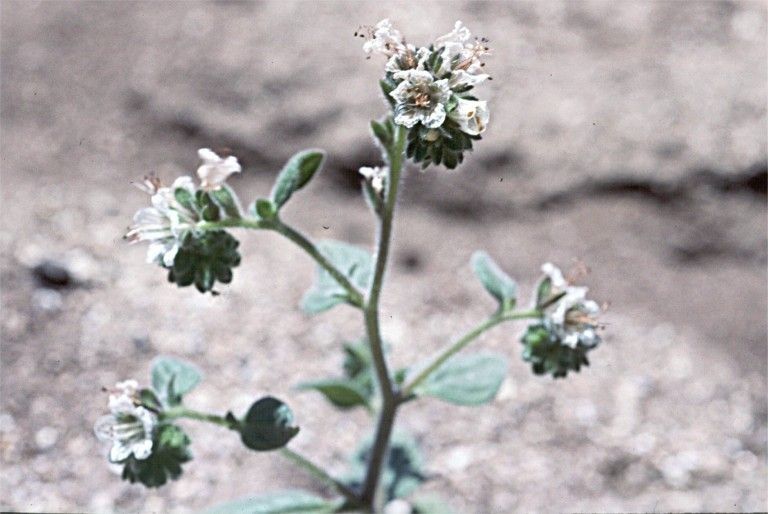
Oh, Phacelia grisea! What a beauty. Those silvery, fuzzy leaves and those stunning, often purple-tinged bells that attract every bee and butterfly in the neighborhood. If you’ve ever admired this California native, you’re probably itching to get more of it in your garden. And let me tell you, the feeling of success when you see a little cutting transform into a thriving plant you grew yourself? It’s pure magic.
For Phacelia grisea, I’d say this is a moderately easy plant to propagate. It’s not quite as foolproof as, say, a succulent, but with a little attention, you’ll likely be rewarded with plenty of new plants to share or expand your own collection.
The Best Time to Start
The sweet spot for propagating Phacelia grisea is late spring to early summer. This is when the plant is actively growing and has plenty of energy to put into forming new roots. You want to take cuttings when the stems are still somewhat pliable, not tough and woody. Think of it as gathering new growth before it gets too old and settled.
Supplies You’ll Need
Here’s what I always have on hand for my propagation projects:
- Sharp, clean pruning shears or a sharp knife: Essential for making clean cuts.
- Small pots or seed trays: Anything clean that will hold soil and allow for drainage.
- A well-draining potting mix: I like a blend of equal parts peat moss or coco coir, perlite, and a little bit of good quality compost. It needs to breathe!
- Rooting hormone (optional but recommended): The powdered or gel kind helps encourage root development.
- A small watering can or spray bottle: For gentle watering.
- Plastic bags or a propagation dome: To create a humid environment.
- Labels and a marker: So you don’t forget what you planted where!
Propagation Methods
Phacelia grisea is a star for stem cuttings. It’s my go-to method for this plant.
From Stem Cuttings:
- Select your parent plant: Choose a healthy, vigorous Phacelia grisea. Look for stems that are actively growing but not flowering heavily.
- Take your cuttings: Using your clean shears, snip off a stem that is about 4-6 inches long. Make the cut just below a leaf node (the point where a leaf grows from the stem).
- Prepare the cuttings: Gently remove the lower leaves from the cutting, leaving just a few at the top. This prevents them from rotting in the soil.
- Apply rooting hormone (if using): Dip the cut end of the stem into the rooting hormone, tapping off any excess.
- Pot them up: Fill your small pots with your pre-moistened potting mix. Make a small hole in the center with your finger or a pencil.
- Insert the cuttings: Place the cut end of each stem into the hole, and gently firm the soil around it.
- Provide humidity: Water the soil gently. Then, cover the pots with a plastic bag or place them in a propagation dome to maintain high humidity. Make sure the leaves aren’t touching the plastic. You can use skewers to prop up the bag if needed.
- Find a bright spot: Place the pots in a location that receives bright, indirect light. Avoid direct sun, which can scorch tender new cuttings.
The “Secret Sauce” (Pro Tips)
Here are a couple of things I’ve learned over the years that really seem to make a difference:
- Don’t drown your cuttings: While humidity is key, we don’t want soggy soil. The mix should be consistently moist but not waterlogged. If you see water pooling on the surface after watering, tip the pot slightly to let excess drain.
- Bottom heat is your friend: If you have a seedling heat mat, placing your pots on it can significantly speed up root formation. It mimics the soil warmth plants crave during the growing season. Just be sure the heat isn’t too intense; it should feel slightly warm to the touch.
- Patience with the leaves: Resist the urge to tug on your cuttings to see if they have roots! Wait until you see new growth appearing at the top, which is a sure sign that roots are forming below.
Aftercare & Troubleshooting
Once your cuttings have developed a good root system – you’ll know because they’ll resist a gentle tug and you might even see roots peeking out the drainage holes – it’s time to transition them to a slightly larger pot. Continue to keep them consistently watered but not soggy. As they grow stronger, you can gradually acclimate them to less humid conditions.
The most common issue you’ll face is rot. If your cuttings turn black and mushy, it’s usually a sign of too much moisture and not enough air circulation. Don’t be discouraged by a few failures; they happen to all of us! Just clean your pots thoroughly and try again. Yellowing leaves without new growth can sometimes indicate not enough light.
A Encouraging Closing
Growing your own plants is such a rewarding journey. Propagation, in particular, feels like a little bit of garden alchemy. Be patient with your Phacelia grisea cuttings, give them the consistent care they need, and enjoy the process of watching them transform. Happy propagating!
Resource:
https://identify.plantnet.org/k-world-flora/species/Phacelia%20grisea%20A.Gray/data