Hello fellow plant lovers! Today we’re going to dive into the wonderfully rewarding world of propagating Pemphis acidula. If you’ve ever admired this plant’s delicate, silvery foliage and its ability to take on gorgeous bonsai-like forms, you’ll be thrilled to know you can easily create more of your own. It’s a joy to watch a tiny cutting transform into a thriving new specimen. While Pemphis acidula can be a bit fussy for absolute beginners, with a little guidance, you’ll find propagating it to be a truly achievable and satisfying endeavor.
The Best Time to Start
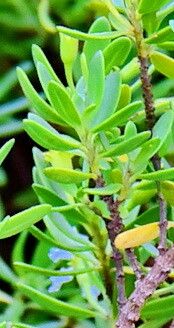
Timing is everything in the garden, and for Pemphis acidula, the sweet spot is during its active growing season. Think late spring through summer. This is when the plant has the energy to root and establish itself quickly. You’ll want to select cuttings that are firm but not yet woody – think of them as young, vibrant shoots.
Supplies You’ll Need
Gathering your supplies beforehand makes the whole process smoother. Here’s what I always have on hand:
- Sharp Pruning Shears or a Craft Knife: Clean cuts are crucial for preventing disease.
- Rooting Hormone (Optional but Recommended): This can significantly boost your success rate. I prefer a gel or powder form.
- Well-Draining Potting Mix: A gritty mix is key. I often combine equal parts perlite or pumice, coarse sand, and a good quality potting soil.
- Small Pots or Propagation Trays: Clean, sterile containers are a must.
- Plastic Bag or Dome: To create a humid environment for your cuttings.
- Watering Can with a Fine Rose: Gentle watering is important.
Propagation Methods
Pemphis acidula is most commonly propagated from stem cuttings, and it’s a rewarding technique to master.
Stem Cuttings:
- Select Your Cuttings: Look for healthy, non-flowering stems that are about 4-6 inches long. Make a clean cut just below a leaf node (where a leaf attaches to the stem).
- Prepare the Cuttings: Gently remove the lower leaves, leaving about 2-3 leaves at the top. This prevents them from rotting in the soil.
- Apply Rooting Hormone: If you’re using it, dip the cut end of each cutting into the rooting hormone, tapping off any excess.
- Potting Up: Fill your small pots or trays with your well-draining potting mix. Make a small hole with your finger or a pencil.
- Insert the Cuttings: Place each cutting into the hole, ensuring it’s firm in the soil. You can gently firm the soil around it.
- Water Gently: Water thoroughly but avoid waterlogging the soil.
- Create Humidity: Cover the pot with a plastic bag or a clear propagation dome. This traps moisture, which is essential for root development. Make sure the leaves aren’t directly touching the plastic.
The “Secret Sauce” (Pro Tips)
Now, for a couple of tricks I’ve learned over the years that can make a big difference:
- Bottom Heat is Your Friend: If you have the space, placing your propagation tray on a seedling heat mat provides gentle warmth from below. This encourages root growth and can significantly speed up the process. It’s like giving your cuttings a cozy incubator!
- Avoid Overwatering, but Don’t Let Them Dry Out: This is a delicate balance. The soil should be consistently moist, like a wrung-out sponge, but never soggy. Check the moisture level by gently poking your finger into the soil. If it feels dry an inch down, it’s time to water.
Aftercare & Troubleshooting
Once your cuttings have roots, you’ll notice them resisting a gentle tug. You can also look for new leaf growth as a sign of success.
- Gradual Acclimation: Once roots are established (usually after 4-8 weeks), gradually remove the plastic covering over a few days. This helps them adjust to normal humidity.
- Transplanting: Once they are strong enough to handle, you can transplant them into slightly larger pots with their regular soil mix.
- Signs of Trouble: The most common issue is rot. If your cuttings turn yellow, mushy, or black, it’s usually a sign of too much moisture and not enough air circulation. Unfortunately, if rot sets in, it’s often difficult to save them. If you see the leaves wilting heavily and the soil is completely dry, they might just be thirsty, but check for firmness first.
Happy propagating! Remember, gardening is a journey, and each cutting is a learning opportunity. Don’t be discouraged if not every one succeeds right away. Patience and a watchful eye are your best tools. Enjoy the magic of creation!
Resource: