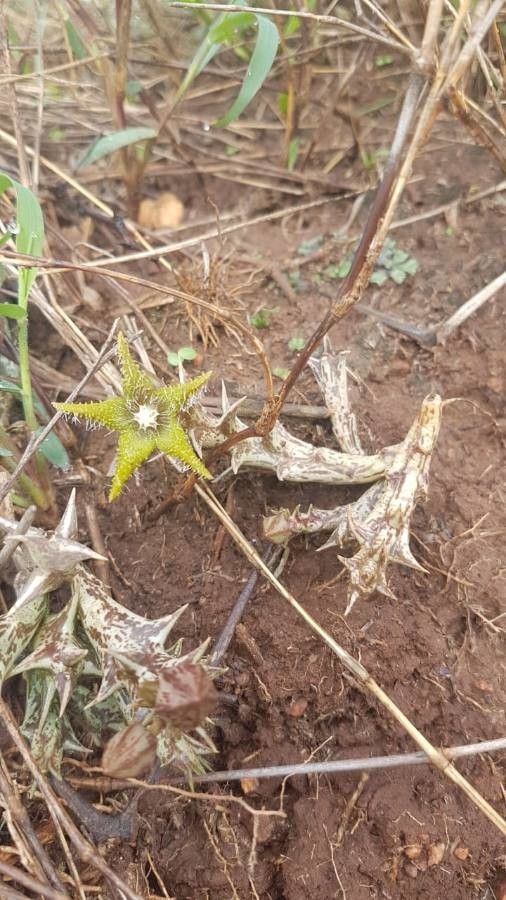
Hey there, fellow plant lovers! Today, we’re diving into the wonderful world of Orbea dummeri. If you’re looking for a unique-looking succulent with fascinating blooms, you’ve found your match. Those star-shaped, often speckled flowers are a real conversation starter! And the best part? Propagating them is a surprisingly rewarding journey, even for those just dipping their toes into the world of rare plants. Don’t be intimidated; Orbea dummeri is quite amenable to propagation once you get the hang of it.
The Best Time to Start
Spring is your golden ticket for propagating Orbea dummeri. That’s when this plant is really in its growth phase, eager to put out new stems and roots. You’ll see the most vigorous growth and the highest success rates if you start then. Aim for when the plant is actively growing, not when it’s dormant in the cooler months.
Supplies You’ll Need
To get your new Orbea dummeri babies going, here’s what you’ll want to have on hand:
- Well-draining soil mix: Think cactus/succulent mix, or a blend of potting soil with plenty of perlite or pumice.
- Sharp, clean pruning shears or a knife: For taking clean cuts.
- Rooting hormone (optional but recommended): A powder or gel can give your cuttings a helpful boost.
- Small pots or seed trays: With drainage holes, of course!
- Spray bottle: For misting.
- Newspaper or a clean surface: For letting cuttings callous over.
- Gloves (optional): Some people find the sap a bit sticky.
Propagation Methods
Let’s get our hands dirty! Here are a couple of tried-and-true ways to multiply your Orbea dummeri.
Stem Cuttings
This is my go-to method for Orbea dummeri.
- Select a healthy stem: Look for a mature, healthy stem that’s at least a few inches long and doesn’t have any signs of distress.
- Make the cut: Using your sharp, clean shears, make a clean cut about an inch or two above the soil line.
- Let it callous: This is crucial! Place the cutting on a piece of newspaper or a clean, dry surface in a bright spot (but out of direct sun) for 2-5 days. You want the cut end to dry and form a callus. This prevents rot when you plant it.
- Apply rooting hormone (optional): Once calloused, dip the cut end into rooting hormone, tapping off any excess.
- Plant your cutting: Gently insert the calloused end into your prepared well-draining soil mix, burying it about an inch deep. You can plant a few cuttings in the same pot, ensuring they have some space.
- Water sparingly: Water very lightly, just enough to settle the soil around the cutting. You don’t want it to be soggy.
Division
If your Orbea dummeri is already a nice, established clump, you might be able to divide it.
- Gently remove from pot: Carefully unpot your Orbea dummeri.
- Separate the sections: Examine the root ball. You can often gently pull apart sections that have their own roots. If they’re a bit stubborn, you can use a clean knife to make a separation. Aim for sections with a good amount of roots attached.
- Allow to callous (briefly): If you had to make any cuts into the roots to separate, let those areas dry and callous for a day or two before repotting.
- Repot: Plant each divided section into its own pot with fresh, well-draining soil. Water lightly.
The “Secret Sauce” (Pro Tips)
Here are a couple of things I’ve learned over the years that really make a difference:
- Don’t water too much, too soon. This is probably the biggest mistake beginners make. Cuttings have no roots yet, so they don’t need much moisture. Overwatering is the fastest way to rot your precious new plant. Wait until you see signs of new growth before increasing watering.
- Consider bottom heat. For cuttings that seem a bit slow to root, placing the pot on a gentle seedling heat mat can provide a little extra encouragement. It helps warm the soil and mimics ideal spring conditions.
Aftercare & Troubleshooting
Once your Orbea dummeri cuttings have calloused and are planted (or divided and repotted), the real waiting game begins.
- Light: Place your newly planted cuttings in a bright spot, but avoid direct, harsh sunlight, which can scorch them.
- Watering: Water extremely sparingly for the first few weeks. The goal is dry-to-slightly-moist soil. You can give them a light misting now and then if the air is very dry, but always let the soil dry out between waterings.
- Patience is key: It can take anywhere from several weeks to a few months for Orbea dummeri cuttings to develop substantial roots. Don’t pull them up to check too often! You’ll know they’re rooting when you see new growth appearing.
If you notice your cutting getting mushy or turning black at the base, that’s a sure sign of rot. This usually means it got too much water or wasn’t allowed to callous properly. Unfortunately, rotten cuttings are usually beyond saving. If you see rot, discard it immediately to prevent it from spreading to other cuttings.
A Little Encouragement
Propagating plants like Orbea dummeri is a beautiful way to connect with nature and expand your collection. It’s a process that teaches you patience and observation. Don’t be discouraged if your first attempt isn’t a roaring success. Every gardener has their losses! Just keep trying, learn from each experience, and most importantly, enjoy the journey of watching new life emerge. Happy propagating!
Resource:
https://identify.plantnet.org/k-world-flora/species/Orbea%20dummeri%20(N.E.Br.)%20Bruyns/data