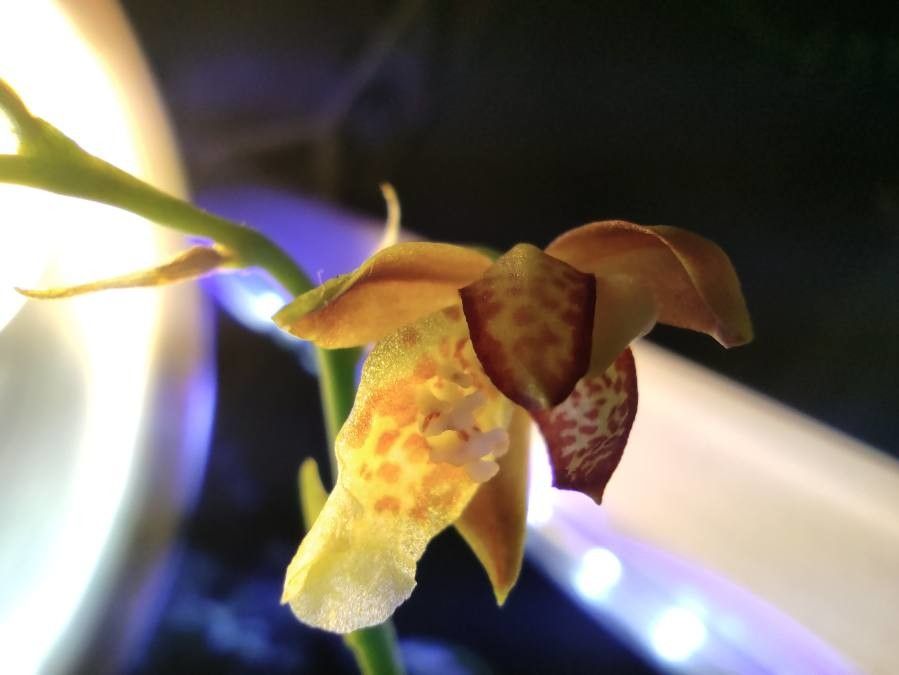
Hello fellow plant lovers! It’s so good to be here with you today, virtually of course, to talk about a truly special orchid: Leochilus carinatus. If you’ve ever marveled at its delicate, often fragrant blooms and wondered how you could get more of these beauties for yourself, you’re in the right place. Propagating Leochilus carinatus is a wonderful way to expand your orchid collection, and while it takes a bit of know-how, it’s incredibly rewarding. Now, for beginners, I wouldn’t call it the easiest plant to propagate right off the bat, but with a little care and attention, you’ll absolutely be able to succeed. Let’s dive in!
The Best Time to Start
For Leochilus carinatus, the best time to think about propagation is generally when the plant is actively growing. This usually means spring or early summer, after it has finished its flowering cycle, or when you see new shoots (called pseudobulbs or growths) emerging. This is when the plant has plenty of energy to put into developing new roots.
Supplies You’ll Need
Here’s what I always have on hand when I’m getting ready to propagate orchids:
- Sharp, sterilized pruning shears or a clean knife: You want a clean cut to prevent disease. I usually wipe mine down with rubbing alcohol.
- Orchid bark mix: A good quality, well-draining orchid bark is essential. You can also use a mix of bark, perlite, and charcoal for extra aeration.
- Small pots or containers: Choose pots that are appropriately sized for the divisions, with good drainage holes.
- Potting medium: For some methods, you might use sphagnum moss. Ensure it’s good quality and hasn’t gone to dust.
- Rooting hormone (optional but helpful): A good orchid-specific rooting hormone can give your cuttings a little boost.
- Watering can or spray bottle: For keeping your new propagations perfectly moist.
- Labeling tags and a waterproof marker: Trust me, you’ll thank yourself later!
Propagation Methods
The most common and successful way to propagate Leochilus carinatus is through division. This is essentially separating a mature plant into smaller, viable sections.
- Gently remove the plant from its pot. If it’s been in the old pot for a while and roots are clinging, you might need to carefully run a knife around the edge. Be patient here; we don’t want to damage those precious roots.
- Inspect the rhizome. The rhizome is the creeping stem that connects the pseudobulbs. You’re looking for sections of the plant that have at least two or three healthy pseudobulbs and a few good roots.
- Use your sterilized shears or knife to separate the divisions. Make a clean cut through the rhizome. If there are particularly tough or tangled roots, you can gently untangle them with your fingers or a chopstick.
- Prepare the divisions. If you used rooting hormone, lightly dust the cut surface on the rhizome. You can also gently remove any old, dead leaves from the pseudobulbs to reduce the chance of rot.
- Potting up. Place each division into its own small pot with your well-draining orchid bark mix. Make sure the pseudobulbs are sitting just on top of the bark, not buried too deeply.
- Watering. Lightly water the new divisions. I usually wait a day or two after potting to water, just to allow any minor nicks on the roots to heal. Then, water thoroughly but allow it to drain completely.
The “Secret Sauce” (Pro Tips)
Here are a couple of things I’ve learned over the years that really make a difference:
- Don’t overwater, but don’t let them dry out completely. This is a tricky balance for new divisions. I like to mist the new plants lightly every day or two, especially if the humidity is low, but I ensure the bark dries out slightly between waterings. You want to encourage root growth, not rot.
- Consider bottom heat. If you have the setup, placing your newly divided orchids on a gentle heating mat can significantly speed up root development. Orchids love warmth when they’re working on growing new roots.
Aftercare & Troubleshooting
Once your divisions are potted, find them a spot with bright, indirect light. Avoid direct sunlight, which can scorch their delicate leaves. Keep an eye on the moisture levels. You should see signs of new growth – a new leaf emerging or the beginnings of a new root – within a few weeks to a couple of months, depending on the conditions and the plant’s vigor.
The most common issue you’ll face is rot. If you see pseudobulbs turning brown and mushy, or leaves yellowing and falling off, it’s often a sign of overwatering or poor air circulation. If you suspect rot, remove the affected parts immediately with your sterilized tool and ensure the potting medium is drying out properly. Sometimes, a healthy plant can bounce back if you catch it early.
A Little Patience Goes a Long Way
Propagating orchids is a journey, not a race. Be patient with your new Leochilus carinatus divisions. They are hardy plants, and with a little care and observation, you’ll soon be rewarded with beautiful new plants. Enjoy the process, cherish the little signs of progress, and happy gardening!
Resource: