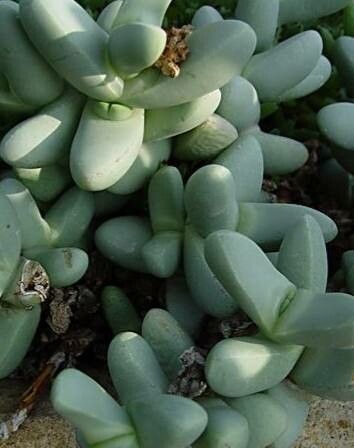
Hey there, fellow plant lovers! Today, I want to talk about a succulent that’s really captured my attention lately: Juttadinteria deserticola. If you’re looking for something a little unique for your collection, a plant that whispers tales of arid landscapes with its fascinating leaf structure, then you’re in for a treat.
Propagating Juttadinteria deserticola might sound a bit intimidating at first, but trust me, with a little know-how and patience, it’s a wonderfully rewarding experience. Seeing a tiny bit of cutting transform into a fully formed plant is one of those gardening joys that never gets old. Is it beginner-friendly? I’d say it’s a solid “intermediate” plant to propagate. It’s not as forgiving as a Sedum, but far from impossible. Let’s get our hands dirty!
The Best Time to Start
For most succulents, including our Juttadinteria deserticola, the spring and early summer are your golden ticket. This is when the plant is actively growing, brimming with energy, and most likely to form healthy roots. Aim to propagate when the plant is plump and healthy, not stressed from extreme heat or cold.
Supplies You’ll Need
Before we dive in, let’s gather our essential tools. Having everything ready makes the process much smoother:
- Well-draining potting mix: A cactus and succulent mix is ideal. You can also create your own by combining potting soil with perlite and coarse sand (about a 1:1:1 ratio).
- Clean, sharp pruning shears or a sharp knife: A clean cut is crucial to prevent disease.
- Rooting hormone (optional but recommended): This helps speed up root development.
- Small pots or seed trays: Terracotta pots are fantastic because they breathe and help prevent overwatering.
- Spray bottle: For gentle misting.
- Small labels and a marker: To keep track of your propagated plants.
- Gloves (optional): If you prefer to keep your hands clean.
Propagation Methods
Let’s get down to the nitty-gritty of making more Juttadinteria deserticola! The most common and successful method for this succulent is stem cuttings.
Stem Cuttings:
- Select a healthy stem: Look for a mature, healthy stem that has at least two or three pairs of leaves. Avoid any that look leggy or diseased.
- Make the cut: Using your clean, sharp shears or knife, make a clean cut just above a leaf node (where the leaves attach to the stem). You want to take a cutting that’s about 2-4 inches long.
- Allow it to callus: This is a really important step! Place the cutting in a dry, well-ventilated spot away from direct sunlight for 2-7 days. You’ll see the cut end dry and form a protective callus. This prevents rot when you plant it.
- Apply rooting hormone (optional): Once callused, lightly dip the cut end into rooting hormone, tapping off any excess.
- Plant the cutting: Fill your small pot with your well-draining succulent mix. Make a small hole in the center with your finger or a pencil. Gently insert the callused end of the cutting into the hole, making sure at least one leaf node is buried in the soil.
- Settle the soil: Lightly firm the soil around the cutting. Don’t water it just yet.
The “Secret Sauce” (Pro Tips)
Here are a few tricks I’ve learned over the years that can really make a difference:
- Don’t water right away: I know it feels counterintuitive, but let the soil stay dry for the first week or so after planting your cutting. This gives the stem time to further heal and signals to the plant that it needs to grow roots to survive.
- Bottom heat is your friend: If you have a way to provide gentle bottom heat, like a seedling heat mat set to a low temperature (around 70-75°F or 21-24°C), it can significantly speed up root development. The warmth encourages the plant to push out roots more readily.
- Mimic its natural environment (lightly): Once you plant your cutting, place it in bright, indirect sunlight. Too much direct sun can scorch the tender cutting, while too little can prevent it from developing the energy it needs. Think of it like the dappled shade found under a desert shrub.
Aftercare & Troubleshooting
Once you see signs of new growth, that’s your cue to start watering!
- Watering: Wait until the soil is completely dry before watering. When you do water, water thoroughly until it drains from the bottom of the pot. A good way to check if it’s time to water is to gently poke your finger into the soil about an inch deep. If it feels dry, it’s time.
- Root checks: You can gently tug on the cutting after about 4-6 weeks. If you feel resistance, it means roots have formed! You can then repot it into a slightly larger container if needed.
Now, what if things go wrong? The most common culprit for succulent propagation failure is rot.
- Signs of Rot: This usually manifests as a mushy, blackened, or translucent stem base. It’s often caused by overwatering or not allowing the cutting to callus properly.
- What to do: If you spot rot, unfortunately, the cutting is likely a goner. You’ll need to discard it to prevent the rot from spreading. The best offense is a good defense: ensure excellent drainage, proper callusing, and judicious watering.
A Encouraging Closing
Propagating Juttadinteria deserticola is a journey, and like any good journey, it requires a bit of patience and a willingness to learn. Don’t be discouraged if your first attempt isn’t a runaway success. Each cutting you try is a learning experience. Enjoy the process, watch for those tiny signs of life, and celebrate every new root you discover! Happy propagating!
Resource: