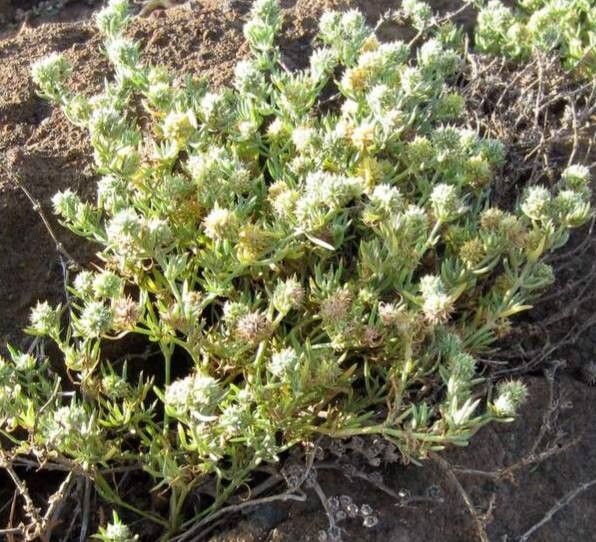
Hello, plant lovers! I’m so excited to share a little bit of my garden wisdom with you today. We’re diving into the wonderful world of Gymnocarpos sclerocephalus, a plant that, in my professional opinion, deserves a spot in every sun-drenched corner. Its architectural form and interesting texture are truly a delight. And the best part? You can easily multiply it!
There’s a special kind of satisfaction that comes from nurturing a new life from a tiny piece of an established plant. It’s like magic, really. Now, for those of you wondering if this is a beginner-friendly project, I’d say Gymnocarpos sclerocephalus falls into the moderately easy category. With a little care and attentiveness, you’ll be well on your way to success.
The Best Time to Start
When it comes to giving your new Gymnocarpos sclerocephalus cuttings the best chance, spring and early summer are your golden windows. This is when the plant is actively growing and has plenty of energy to put into developing roots. You want to take cuttings from healthy, vigorous growth that hasn’t flowered yet. Think of it as tapping into peak performance!
Supplies You’ll Need
Gathering your tools beforehand makes the whole process smoother. Here’s what I always have on hand:
- Sharp Pruning Shears or a Clean Knife: A clean cut is crucial to prevent disease.
- Rooting Hormone Powder or Liquid: This isn’t strictly mandatory for Gymnocarpos, but it can give a nice boost.
- Well-Draining Potting Mix: I prefer a blend of perlite, coarse sand, and peat moss for cuttings. A cactus or succulent mix works well too.
- Small Pots or Seed Trays: Clean, small containers are perfect for starting cuttings.
- Watering Can with a Fine Rose: Gentle watering is key.
- (Optional) A Heat Mat: Bottom heat can significantly speed up root development.
Propagation Methods
Let’s get our hands dirty with the most reliable methods for Gymnocarpos sclerocephalus.
Stem Cuttings
This is my go-to method. It’s straightforward and highly effective.
- Select a Stem: Find a healthy, non-flowering stem that’s about 4-6 inches long.
- Make the Cut: Using your sharp shears or knife, make a clean cut just below a leaf node. A leaf node is that little bump where a leaf attaches to the stem – that’s where the magic happens!
- Prepare the Cutting: Gently remove the lower leaves from the cutting. You want to expose the leaf nodes that will eventually form roots.
- Apply Rooting Hormone (Optional): Dip the cut end of the stem into your rooting hormone. Tap off any excess.
- Plant the Cutting: Make a small hole in your prepared potting mix with your finger or a pencil. Insert the cut end of the stem into the hole and gently firm the soil around it.
- Water Lightly: Water the soil gently to settle it around the cutting.
- Provide Indirect Light: Place the pot in a spot that receives bright, indirect light. Avoid direct sun, which can scorch young cuttings.
Water Propagation (A Little Trickier for Gymnocarpos)
While some plants root beautifully in water, Gymnocarpos sclerocephalus can be a bit more prone to rot if the leaves sit in the water. If you choose this method, be extra vigilant.
- Prepare the Cutting: Follow steps 1-3 above.
- Place in Water: Put the cutting in a small jar or glass of clean water.
- Crucial Step: Keep Leaves Out! Ensure that no leaves are submerged in the water. This is vital to prevent rot. You might need to trim larger leaves or reposition the cutting.
- Change Water Regularly: Change the water every few days to keep it fresh and oxygenated.
- Patience: Roots can take a while to appear. Once you see a good cluster of roots, you can carefully transplant the cutting to soil.
The “Secret Sauce” (Pro Tips)
Here are a few little tricks I’ve learned over the years that really make a difference:
- Don’t Drown Them! After planting your cuttings in soil, resist the urge to overwater. The soil should be moist but not soggy. Overwatering is the quickest way to invite root rot. Let the top inch of soil dry out slightly between waterings.
- Bottom Heat is a Game Changer: If you can, place your pots on a heated propagation mat. This gentle warmth encourages root development from below, making your cuttings significantly happier and faster to root. I see a much higher success rate when I use it.
- Mist, Don’t Soak: For stem cuttings, a light misting of the leaves once a day can help keep them hydrated while they’re trying to establish roots. Avoid overhead watering onto the soil at this stage.
Aftercare & Troubleshooting
Once you see signs of new growth – tiny leaves unfurling or that exciting tug when you gently test for roots – congratulations! You’ve likely succeeded.
- Gradual Acclimation: Begin to gradually acclimate your new plants to more direct sunlight and slightly more frequent watering. Treat them like delicate seedlings.
- Common Culprits: The most common issue you’ll face is rot. If a cutting turns black and mushy, it’s likely succumbed to rot. This is usually due to overwatering or poor drainage. Don’t get discouraged; just try again with fresh material and a slightly drier approach.
- Slow and Steady: Remember Gymnocarpos sclerocephalus isn’t the fastest grower. Be patient with the root development and new shoot emergence.
Happy Propagating!
Watching a new plant emerge from a small cutting is incredibly rewarding, and Gymnocarpos sclerocephalus is a wonderful subject to experiment with. Don’t be afraid to try, and if things don’t work out the first time, there’s always another season and another opportunity. Enjoy the process, and happy gardening!
Resource: