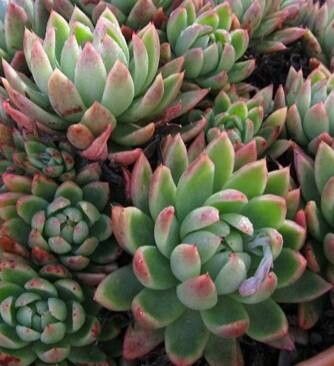
Hello fellow plant lovers! I’m so happy you’re here. Today, we’re diving into the wonderful world of Echeveria agavoides. These beauties, with their bold, architectural forms and often striking colors, are such a joy to grow. They’re like little living sculptures for your windowsill or garden. And the best part? They’re surprisingly rewarding to propagate! If you’re just starting out with succulents, you’ll be happy to know that Echeveria agavoides is a pretty forgiving plant to work with. You’ll likely have great success.
When’s the Sweet Spot for Starting?
The absolute best time to propagate Echeveria agavoides is during its active growing season, which is typically late spring and summer. This is when the plant has plenty of energy to put into producing new roots and growth. You can also have success in early fall, but try to get them established before the cooler weather really sets in. Propagating during their dormant period (winter) will be much slower and more prone to failure.
Your Propagation Toolkit
Here’s what you’ll want to have on hand to set yourself up for success:
- Clean, sharp pruning shears or a knife: For taking clean cuts.
- Well-draining succulent or cactus potting mix: This is crucial! You can buy pre-made mixes or create your own by combining potting soil with perlite or pumice (about a 50/50 ratio works well).
- A container or shallow tray with drainage holes: For your cuttings to root in.
- Rooting hormone (optional but recommended): This can give your cuttings an extra boost, especially for less water-propagated methods.
- A spray bottle: For gentle misting.
- (Optional for stem cuttings): A sunny spot with good air circulation, and potentially a seedling heat mat.
Let’s Get Our Hands Dirty: Propagation Methods
Echeveria agavoides can be propagated in a few delightful ways. My favorite is through stem cuttings.
Method 1: Stem Cuttings – The Classic Approach
This is by far one of the easiest and most common ways to multiply your Echeverias.
- Select a healthy stem: Look for a mature stem that has a few leaves. It should be firm and not leggy.
- Make the cut: Using your clean shears or knife, make a cut about an inch or two below the rosette. You want to ensure you have some stem length to work with.
- Prepare the cutting: Gently remove any leaves from the bottom two-thirds of the stem. These leaves can be saved for leaf propagation (more on that later!) or simply discarded. Removing them prevents them from rotting when they touch the soil.
- Let it callus: This is a critical step! Place the cutting in a dry, well-ventilated spot away from direct sunlight for 2-7 days. You’ll see a dry, scab-like layer form over the cut end. This “callus” protects the cutting from rot when it’s planted.
- Plant your cutting: Once callused, you can either:
- Lay it on top of soil: Simply place the callused end on the surface of your well-draining potting mix.
- Insert it into soil: Gently push the callused end about an inch deep into the potting mix.
- Watering: Do NOT water immediately. Wait about a week after planting before giving it its first light watering. The goal is to mist the soil gently with your spray bottle when it feels dry, encouraging roots to seek out moisture.
Method 2: Leaf Propagation – A Labor of Love
This method takes a bit more patience, but it’s incredibly satisfying to see tiny babies emerge from a single leaf!
- Gently remove a leaf: Choose a healthy, plump leaf from the mother plant. Gently twist or wiggle the leaf from the stem. You want to get the entire leaf base, where it attached to the stem, intact. If the base tears, the leaf is less likely to propagate.
- Let it callus: Just like stem cuttings, allow each leaf to callus over for a few days until the cut end is dry.
- Place on soil: Lay the callused leaves on top of your well-draining succulent mix. You can lightly press the callused end into the soil if you like, but it’s not essential.
- Mist occasionally: Mist the soil very lightly once every week or two, just enough to keep it slightly moist, but never wet. Avoid getting water directly on the leaves themselves, as this can lead to rot.
Method 3: Offsets (Pups) – The Easiest Route
Echeveria agavoides often send up little baby plants, called offsets or pups, from their base. This is the quickest way to get a new plant.
- Identify an offset: Look for small rosettes growing around the base of the mother plant.
- Wait for size: Ideally, wait until the offset is at least an inch or two wide and has developed its own root system. You can often tell if it has roots by gently trying to wiggle it.
- Gently separate: Using a clean knife or your fingers, carefully separate the offset from the mother plant. Try to get as much of the root system with it as possible.
- Let it callus: Allow the severed end of the offset to callus over for a day or two.
- Plant: Plant the offset in its own pot filled with well-draining succulent mix.
- Watering: You can water this one a bit sooner than cuttings, about 2-3 days after planting, to help establish its existing roots.
The “Secret Sauce”: My Top Tips
Over the years, I’ve learned a few tricks that often make all the difference.
- Don’t overcrowd: When planting multiple cuttings or leaves, give them some breathing room. Overcrowding can lead to poor air circulation and increase the risk of fungal issues.
- Bottom heat is your friend for stem cuttings: If you’re having trouble with stem cuttings rooting, try placing your propagation tray on a seedling heat mat set to a low temperature. Gentle warmth encourages root development from underneath and can significantly speed up the process.
- Patience with leaf props is key: I’ve seen people give up on leaf propagation far too soon! Some leaves might take weeks, even months, to show any signs of life. Don’t discard them too quickly! As long as they aren’t rotting, give them time.
Aftercare and Keeping Things Healthy
Once you start seeing roots appearing (you might see them peeking out of drainage holes or feel a gentle tug when you lightly try to move a cutting), it’s time for slightly more regular watering.
- Watering: Start watering as you would a mature Echeveria. Water thoroughly when the soil is completely dry, and then allow it to dry out again between waterings.
- Light: Gradually introduce your new plants to brighter light. Start with bright, indirect light and slowly move them into a spot with more sun. Echeveria agavoides loves bright light, but direct, scorching sun can burn a newly rooted plant.
- Troubleshooting: The most common enemy is rot, often caused by overwatering or not allowing cuttings to callus. If you see mushy, dark stems or bases, it’s likely rot. You might be able to salvage a healthy part of the stem or leaf if you catch it early. Another sign of failure is a shriveled, dried-out leaf or cutting that never shows any signs of life. This usually means it didn’t develop roots and has dried out prematurely.
Happy Growing!
Propagating Echeveria agavoides is such a rewarding journey. It’s a fantastic way to fill your home with more of these desert charmers or share them with friends. Remember to be patient, observe your plants, and don’t be afraid to experiment a little. You’ve got this! Happy gardening!
Resource:
https://identify.plantnet.org/k-world-flora/species/Echeveria%20agavoides%20Lem./data