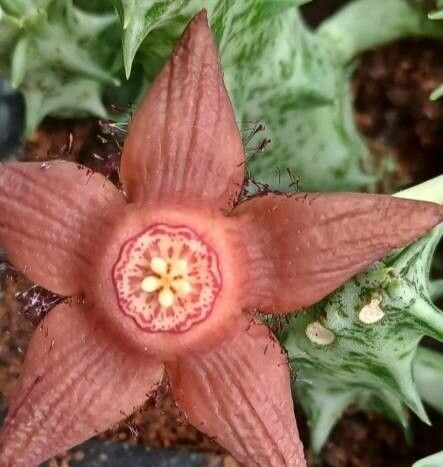
Hello green thumbs! It’s been a little while, and I’m so excited to dive into a plant that truly captures my heart: Duvalia sulcata. You know the ones – those wonderfully weird, star-shaped succulent blooms that pop up from their angular stems? They’re like little botanical alien greetings, and honestly, seeing them unfurl is a thrill every single time.
If you’re looking for a rewarding plant project, propagating Duvalia sulcata might just be your next favorite thing. While they have a reputation for being a bit… particular, I find they’re actually quite approachable once you get to know their cues. Don’t let that scare you off; this is a project that’s definitely achievable, even for those newer to the succulent world. It’s all about understanding their needs, and I’m here to share what I’ve learned over the years to help you succeed.
The Best Time to Start
For the highest chance of success with your Duvalia sulcata, aim to propagate during its active growing season. This generally falls in the late spring to early summer months. Think of it like this: when the plant is already putting on energy and growing vigorously, it’s better equipped to heal from propagation and send out new roots. Trying to propagate when it’s dormant in the cooler months can be much tougher.
Supplies You’ll Need
Gathering your tools beforehand makes the whole process smoother. Here’s what I typically have on hand:
- Well-draining potting mix: A cactus and succulent mix is a great starting point. I often amend mine with extra perlite or pumice for even better aeration.
- Sharp, clean pruning shears or a knife: Sterilize them with rubbing alcohol before you start.
- Rooting hormone (optional but recommended for beginners): This little bit of magic can speed up root development.
- Small pots or trays: Make sure they have drainage holes!
- Gloves (optional): Some succulents have a milky sap that can be irritating.
- Watering can with a fine rose: Gentle watering is key.
- A warm, bright spot: But avoid direct, scorching sun, especially for new cuttings.
Propagation Methods
Let’s get our hands dirty! Duvalia sulcata is most commonly propagated through stem cuttings and division.
Stem Cuttings
This is my go-to method for sharing these beauties!
- Select a healthy stem: Look for a stem that appears robust and has a few segments.
- Make a clean cut: Using your sterilized shears or knife, carefully cut the stem from the mother plant. Aim for a cutting that’s at least 3-4 inches long.
- Allow the cutting to callus: This is SUPER important. Lay the cutting on a dry surface in a bright, airy location, away from direct sun, for 2-5 days. You want the cut end to dry and form a protective callus. This prevents rot when you plant it.
- (Optional) Apply rooting hormone: Dip the callused end of the cutting into your rooting hormone powder.
- Plant the cutting: Fill your small pot with your well-draining mix. Make a small hole in the soil and gently insert the callused end of the cutting. You don’t need to plant it too deep, just enough so it stands upright.
- Water sparingly: Wait a few days after planting before giving it its first light watering. You want the soil to be barely moist, not soggy.
Division
If your Duvalia sulcata has started to form clumps, division is a great way to get multiple plants.
- Gently remove from pot: Carefully take the mother plant out of its container.
- Inspect the root ball: Gently tease apart the soil to see where the distinct plantlets are growing. You’re looking for sections that have their own set of roots.
- Separate the divisions: Using your hands or a clean knife, gently pull or cut apart the divisions. Try to ensure each new piece has at least a few roots attached.
- Let them callus: Just like with stem cuttings, allow the cut surfaces and any exposed roots on the divisions to callus for a day or two.
- Plant the divisions: Pot them up in their own containers with fresh, well-draining soil.
- Water very lightly: Similar to the cuttings, water very sparingly after planting.
The “Secret Sauce”
Here are a couple of things I’ve learned that really make a difference:
- Bottom heat is your friend: Duvalia sulcata roots happily when they’re warm. Placing your pots or trays on a gentle seedling heat mat can significantly speed up root formation. Just make sure it’s not set too high – lukewarm is perfect.
- Don’t drown your ambitions: This is arguably the most crucial tip for succulents. Overwatering is the fastest way to lose a cutting or division to rot. I always err on the side of too dry rather than too wet. Wait until the soil is almost completely dry before watering again, and when you do water, do it thoroughly but allow it to drain completely.
Aftercare & Troubleshooting
Once your cuttings have developed roots (you can gently tug on them – if there’s resistance, they’ve rooted!), you can start treating them a bit more like established plants. They can be watered a little more frequently, but always let the soil dry out between waterings. Keep them in bright, indirect light.
The most common culprit for failure is root rot. This looks like black, mushy stems or roots. It’s usually a sign of too much moisture and not enough drainage. If you spot it, act fast! You might be able to salvage a healthy part of the stem by cutting off the rotted section, letting the healthy part callus, and trying to re-root it.
A Little Patience Goes a Long Way
Propagating Duvalia sulcata might take a little time, but trust me, the reward of creating new life from your existing plants is incredibly satisfying. Be patient with your little ones, give them the right conditions, and enjoy watching them grow. Happy propagating!
Resource:
https://identify.plantnet.org/k-world-flora/species/Duvalia%20sulcata%20N.E.Br./data