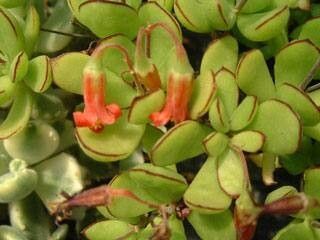
Hello there, fellow plant enthusiasts! If you’ve ever laid eyes on the delightful Cotyledon eliseae, you know it’s a real charmer. With its plump, grey-green leaves often dusted with a fine, powdery coating, it looks like it belongs in a fairy tale. And the flowers! Oh, those charming, bell-shaped blossoms are just the sweetest.
Growing your own Cotyledon eliseae from cuttings is a truly rewarding experience. It’s a fantastic way to share the joy of these beauties with friends or simply expand your own collection without breaking the bank. For beginners, I’d say Cotyledon eliseae is generally quite forgiving, making it a wonderful plant to start your propagation journey with. So, let’s get our hands a little dirty!
The Best Time to Start
When it comes to propagating Cotyledon eliseae, spring and early summer are your golden ticket. This is when the plant is actively growing, or just coming out of its dormancy. This surge of energy helps the cuttings root much more readily. You want to take cuttings from healthy, mature stems that are firm, not floppy or overly soft. Avoid taking cuttings from the very tips if they seem immature.
Supplies You’ll Need
Before we dive in, let’s gather our tools. Having everything ready makes the process much smoother.
- Sharp, clean pruning shears or a sharp knife: A clean cut is crucial to prevent disease.
- Rooting hormone (optional but recommended): This isn’t strictly necessary for Cotyledon eliseae, but it can give your cuttings a nice little boost and speed up root formation.
- Well-draining potting mix: A cactus/succulent mix is perfect. You can also create your own by mixing equal parts potting soil, perlite, and coarse sand.
- Small pots or trays: Make sure they have drainage holes.
- A watering can or spray bottle: For gentle watering.
- A sunny spot with indirect light: Think bright, but not scorching sun.
Propagation Methods
There are a couple of ways to go about propagating Cotyledon eliseae, and both are pretty straightforward.
Stem Cuttings
This is my go-to method for Cotyledon eliseae.
- Select and Prepare: With your clean shears, take cuttings from a healthy stem. Aim for pieces that are about 3-4 inches long. You can remove a few of the lower leaves to expose a bit more of the stem.
- Callus: This is a very important step for succulents. Let the cut end of your cutting dry and callus over for a few days to a week. You’ll see a dry, hardened scar form. This prevents rot when you plant it.
- Rooting Hormone (if using): Once callused, dip the callused end into your rooting hormone powder. Tap off any excess.
- Plant: Fill your small pots with your well-draining mix. Make a small hole with your finger or a pencil and gently insert the callused end of the cutting into the soil. Firm the soil gently around it.
- Wait and Watch: Place the pots in a bright location with indirect sunlight. Avoid watering for the first week or so. You want the soil to be dry.
Leaf Cuttings (Less Common for this species, but can work!)
While stem cuttings are more reliable for Cotyledon eliseae, you can try leaf propagation.
- Take a Leaf: Carefully twist or cut a healthy leaf from the main stem. Make sure you get a clean break where it attaches to the stem.
- Callus: Just like with stem cuttings, let the leaf dry and callus for a few days.
- Lay on Soil: Place the callused end of the leaf on top of your well-draining potting mix. Don’t bury it.
- Mist Gently: You can lightly mist the soil around the leaf every few days, but avoid saturating it.
- Patience: This method takes longer. You’re looking for tiny baby plants to emerge from the callused end.
The “Secret Sauce” (Pro Tips)
Here are a few little tricks I’ve picked up over the years that can really help your cuttings thrive.
- Don’t let the leaves touch the soil directly when callusing (for leaf cuttings): If you’re trying leaf cuttings, prop them up slightly so the ends aren’t sitting in moisture. This is especially true in humid environments.
- Bottom heat is your friend: If you have a propagator with a heat mat, using it can significantly speed up root development. It mimics the warmth of spring and encourages those roots to get going. Just ensure it’s not too hot – warm to the touch is perfect.
- Don’t overwater too soon! This is the biggest killer of succulent cuttings. Resist the urge to water until you see actual signs of rooting. Dryness is your friend in the initial stages.
Aftercare & Troubleshooting
Once your cuttings have developed roots (you can often tell by a gentle tug – they’ll feel more resistant), it’s time for a little more attention.
- Gradual Watering: Begin watering your new plants more regularly, but still err on the side of caution. Allow the soil to dry out partially between waterings.
- Move to Brighter Light: As they establish, you can gradually move them to brighter, but still not harsh, sunlight.
- Repotting: Once the pots are filled with roots, you can transplant them into slightly larger containers.
Now, what if things don’t go as planned? The most common issue you’ll encounter is rot. If your cutting turns mushy, black, or smells funky, it’s likely rotted. This is almost always due to too much moisture. Don’t be discouraged if some cuttings fail; it happens to all of us! You can try to salvage a piece if you catch it early enough by cutting away the rotted bits and re-callusing.
A Little Encouragement
Growing plants from cuttings is a journey. It’s about observation, patience, and a little bit of hope. Don’t be afraid to experiment, and most importantly, enjoy the process. Watching a tiny piece of a plant transform into a whole new specimen is a little bit of magic, and you’re the magician! Happy propagating!
Resource:
https://identify.plantnet.org/k-world-flora/species/Cotyledon%20eliseae%20van%20Jaarsv./data