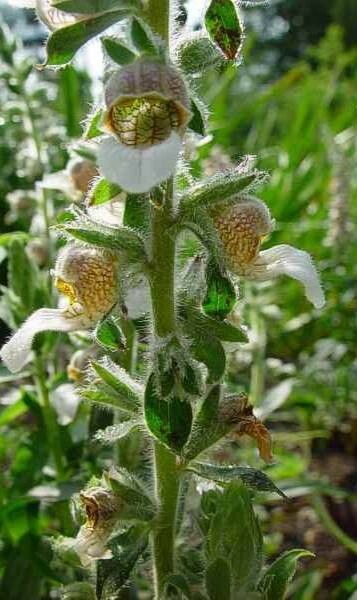
Oh, hello there! So, you’ve fallen for the charm of Digitalis lanata, have you? I can hardly blame you. Those elegant, woolly spires of creamy, bell-shaped flowers, often with intricate brown veining, are just stunning in a cottage garden or even a more modern planting. They have this lovely, almost ethereal quality about them. And the best part? You can easily multiply these beauties yourself! Propagating Digitalis lanata is a genuinely rewarding experience, and I’m here to walk you through it. Honestly, it’s not a particularly tricky plant to propagate, which makes it a great project for even those of you just starting your propagation journey.
The Best Time to Start
For the highest chances of success with Digitalis lanata, I find that late spring to early summer is simply the sweet spot. You want to work with actively growing material, and this is when the plant is really putting on a show. It’s also a time when the days are getting longer and warmer, which gives your cuttings a good head start. Aim to take cuttings from healthy, non-flowering stems if possible.
Supplies You’ll Need
Here’s what I always keep on hand when I’m propagating these lovely plants:
- Sharp pruning shears or a clean knife: For making clean cuts.
- Rooting hormone powder or gel: This isn’t strictly necessary for Digitalis lanata, but it can give your cuttings a little extra boost.
- Small pots or seed trays: Clean ones are essential to prevent disease.
- A well-draining potting mix: I like a mix of peat-free compost and perlite or coarse sand – about a 50/50 ratio works wonderfully.
- A clear plastic bag or a propagator lid: To create a humid environment.
- A spray bottle with water: For misting.
Propagation Methods
Digitalis lanata is a fantastic candidate for propagation by stem cuttings. It’s straightforward and yields great results.
Stem Cuttings:
- Take your cuttings: In late spring or early summer, select healthy, vigorous stems. Using your sharp shears or knife, cut pieces that are about 4-6 inches long. Make the cut just below a leaf node (where a leaf attaches to the stem).
- Prepare the cuttings: Gently remove the lower leaves, leaving just the top two or three sets of leaves. If the leaves are very large, you can even cut them in half to reduce water loss.
- Apply rooting hormone (optional): Dip the cut end of the stem into your rooting hormone powder or gel, tapping off any excess.
- Pot them up: Fill your clean pots or trays with your prepared potting mix. Make a small hole with a pencil or your finger. Insert the cut end of your stem cutting into the hole, ensuring the leaf nodes are below the soil surface. Gently firm the soil around the cutting.
- Water and cover: Water the soil gently but thoroughly. Then, place the pots inside a clear plastic bag or cover them with a propagator lid to maintain high humidity. Seal it up!
- Find a good spot: Place the pots in a bright location that receives indirect light. Avoid direct sun, as this can scorch the cuttings.
The “Secret Sauce” (Pro Tips)
Now, for those little nuggets of wisdom that make all the difference!
- Don’t crowd them! Give your cuttings a bit of space in their pots. Overcrowding can lead to fungal issues and poor air circulation, which is the enemy.
- Bottom heat is your friend. If you have a heated propagator or can place your pots on a heat mat, do it! Digitalis lanata cuttings absolutely love a bit of gentle warmth from below. It really speeds up root development.
- Watch for mildew. Because we’re creating a humid environment, keeping an eye out for white, powdery mildew is important. If you see it, lift the lid for a few hours to increase ventilation.
Aftercare & Troubleshooting
Once your cuttings are potted, the care is pretty simple.
- Keep the soil consistently moist but not waterlogged. I like to check them every couple of days. If the top inch of soil feels dry, mist the cuttings lightly or water from the bottom by placing the pots in a tray of water for about 20 minutes.
- Be patient! It can take anywhere from 4 to 8 weeks for roots to develop, and sometimes even longer. You can gently tug at a cutting to feel for resistance – that’s a good sign of root growth. Once you see new leaf growth, that’s a very promising indicator.
- Signs of failure: The most common issue is rot. If your cuttings turn black and mushy, it’s a sign that they’re getting too much moisture and not enough air. If you see this, unfortunately, they’re unlikely to recover. Ensure your potting mix is well-draining, and don’t let the leaves of your cuttings sit in water that collects in the bottom of a tray.
A Encouraging Closing
Growing new plants from cuttings is such a satisfying hobby. It connects you to the rhythm of nature and fills your garden with more of what you love. Be patient with your Digitalis lanata cuttings. Celebrate the tiny signs of progress – a new leaf unfurling, a bit of resistance when you gently tug. Enjoy the process, and soon you’ll have a whole new collection of these delightful foxgloves to share and admire! Happy propagating!
Resource:
https://identify.plantnet.org/k-world-flora/species/Digitalis%20lanata%20Ehrh./data