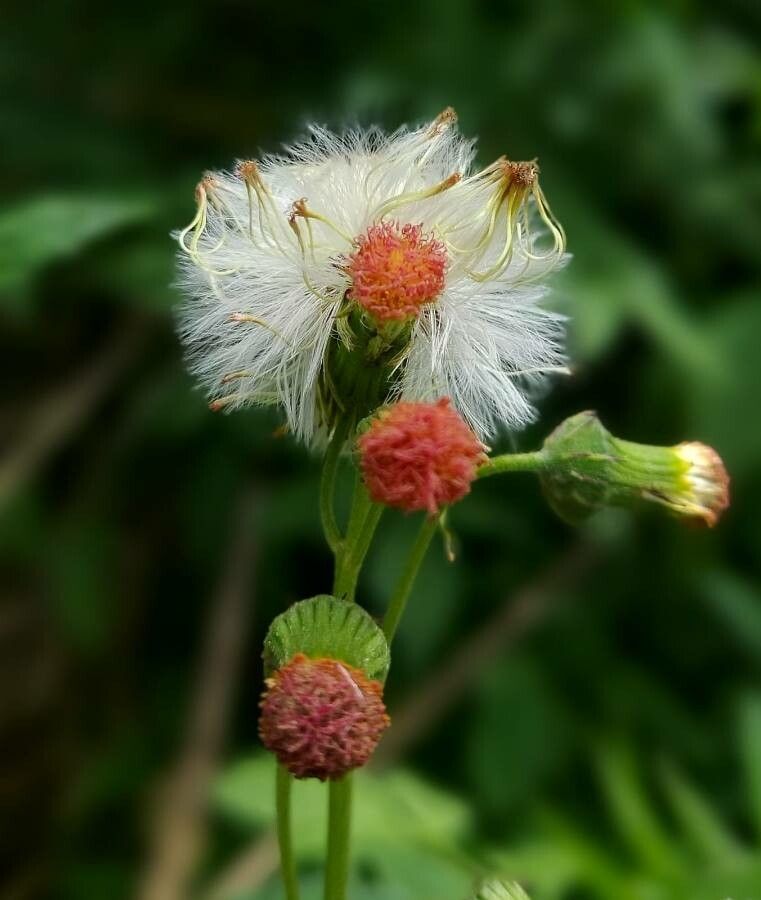
Well hello there, fellow plant enthusiast! I’m so glad you’ve stopped by for a chat about one of my particular garden joys: Crassocephalum crepidioides. You might know it by its common names, like red-leaf-leaf African marigold or fire cracker plant. It’s a burst of vibrant color and texture, isn’t it? Especially that lovely reddish hue that deepens in the sun. And the best part? It’s wonderfully easy to share! Propagating this beauty is incredibly rewarding, and I’m thrilled to walk you through it. For beginners, this is an absolute star – a fantastic plant to start your propagation journey with.
The Best Time to Start
My go-to time for propagating Crassocephalum crepidioides is usually late spring to early summer. The plant is in its active growing phase then, so it has plenty of energy to put into forming new roots. You’re looking for healthy, non-flowering stems. If the plant has already started to put out a lot of blooms, it’s using its energy for that, not for root development. So, aim for that sweet spot before it gets too busy flowering.
Supplies You’ll Need
Here’s what I always have on hand when I’m getting ready to propagate:
- Sharp pruning shears or a clean, sharp knife: For taking clean cuts.
- Rooting hormone (optional but helpful): A powder or gel that helps encourage root formation.
- Well-draining potting mix: A good seed-starting mix, or a blend of potting soil and perlite or coarse sand (about 50/50) works wonders.
- Small pots or trays: Clean containers with drainage holes.
- Watering can with a fine rose: For gentle watering.
- Plastic bags or a propagaton dome: To create a humid environment.
Propagation Methods
Let’s get our hands dirty! I find stem cuttings the most reliable and straightforward way to multiply these plants.
Stem Cuttings: My Favorite Way
- Take Your Cuttings: Find a healthy, vigorous stem. Using your clean shears, make a cut just below a leaf node (that little bump where a leaf grows from). Aim for cuttings that are 4-6 inches long. Gently remove the lower leaves, leaving just the top couple of leaves. This prevents them from rotting in the soil.
- Dip in Hormone (Optional): If you’re using rooting hormone, dip the cut end of the stem into the powder or gel. Tap off any excess.
- Plant Your Cuttings: Fill your small pots with your well-draining mix. Make a small hole with your finger or a pencil. Gently insert the cuttings, ensuring the node where you removed the leaves is buried in the soil. Press the soil gently around the base of the cutting to secure it.
- Water Gently: Water the soil thoroughly but gently. You want it moist, not waterlogged.
- Create Humidity: This is key! Cover the pots with a clear plastic bag or place them in a propagation dome. Make sure the leaves aren’t touching the sides of the bag if possible. This traps moisture and creates the humid environment cuttings need to thrive.
- Find a Good Spot: Place the pots in a bright, indirect light location. Avoid direct sun, which can scorch the delicate cuttings.
The “Secret Sauce” (Pro Tips)
After years of coaxing plants to root, I’ve picked up a few tricks:
- Bottom Heat is Your Friend: If you have a heat mat, placing your pots on it can significantly speed up rooting. It mimics the warmth of spring soil and gives those nascent roots a real boost.
- Don’t Over-Water: This is probably the most common pitfall. Let the top inch of soil dry out slightly between waterings. It’s better to underwater a tiny bit than to overwater and risk rot. You’ll learn to feel the weight of the pot, which is a good indicator.
- Patience is a Virtue (and a Good Indicator): When you gently tug on a cutting and feel resistance, that’s a sure sign roots have formed! Don’t start the tugging too early, though – wait at least 2-3 weeks.
Aftercare & Troubleshooting
Once you start seeing new leaf growth, it’s a good sign that roots are forming. You can also gently check for that resistance when tugging.
- Acclimatize: Once you confirm rooting, start gradually removing the plastic bag over a few days. This helps your new baby plants adjust to normal humidity levels.
- Repotting: When the new plants have developed a good root system (you might see roots peeking out of the drainage holes), it’s time to pot them up into slightly larger individual containers with fresh potting mix.
- Signs of Trouble: The most common culprit is rot, which usually shows up as mushy, black stems at the soil line. This is almost always due to overwatering or poor drainage. If you see this, sadly, that cutting is likely lost, but don’t despair! You can just try again. Yellowing leaves can also be a sign of too much or too little water, or insufficient light.
A Encouraging Closing
Propagating Crassocephalum crepidioides is a truly delightful experience. Watching those tiny roots emerge and new leaves unfurl is so satisfying. Be patient with yourself, as every plant and every environment is a little different. Take joy in the process, and soon you’ll have a whole collection of these cheerful plants to enjoy and share! Happy gardening!
Resource: