Hello fellow garden enthusiasts! It’s so lovely to have you here on my little corner of the internet. Today, we’re diving into the wonderful world of Staphylea bolanderi, affectionately known as Bolander’s bladder-senna.
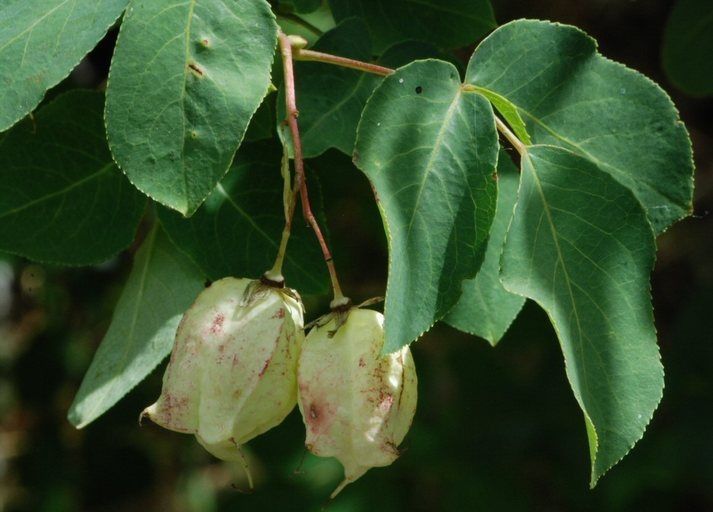
This California native shrub is a real charmer. I adore its delicate, pendulous white flowers that look like tiny parachutes, and the papery, inflated seed pods that follow are just delightful. They add such a unique architectural element to the garden, even in winter. Propagating it yourself? Oh, it’s incredibly rewarding. You get to multiply that beauty, and let me tell you, sharing these little treasures with friends feels fantastic. Now, for beginners, I’d say Staphylea bolanderi is moderately easy. It’s not one of those plants that throws a tantrum if you look at it wrong, but it does appreciate a little know-how.
The Best Time to Start
The sweet spot for propagating Staphylea bolanderi is definitely late spring to early summer. This is when the plant is actively growing and has plenty of energy to put into developing new roots. You want to be working with semi-hardwood cuttings – that means the current year’s growth that has started to firm up a bit, but isn’t yet woody and rigid like older stems.
Supplies You’ll Need
Here’s what will help you along the way:
- Sharp Pruning Shears or a Knife: Clean cuts are crucial.
- Rooting Hormone: A powder or gel will give your cuttings that extra boost.
- Well-Draining Potting Mix: I like a blend of equal parts peat moss, perlite, and a bit of coarse sand. You can also buy specific propagation mixes.
- Small Pots or Seed Trays: Clean ones, please!
- Plastic Bags or a Humidity Dome: To keep those cuttings nice and moist.
- Labels: Don’t forget to label your cuttings! Trust me on this one.
Propagation Methods
Let’s get our hands dirty! We’ll focus on stem cuttings, as this is generally the most successful method for Staphylea bolanderi.
- Take Your Cuttings: On a mild day, select healthy, vigorous stems from your mature plant. Look for those semi-hardwood sections. Using your clean shears, cut pieces that are about 4-6 inches long. Make sure each cutting has at least a couple of leaf nodes (where the leaves attach to the stem).
- Prepare the Cuttings: Gently remove the lower leaves from the cutting, leaving one or two sets of leaves at the very top. This is important because these remaining leaves will photosynthesize and help the plant create energy. If the leaves are very large, you can even cut them in half to reduce water loss.
- Dip in Rooting Hormone: Dip the cut end of each stem into your chosen rooting hormone. Tap off any excess – you don’t need a thick coating.
- Plant Your Cuttings: Fill your small pots or trays with your well-draining mix. Make a small hole with a pencil or your finger to avoid rubbing off the rooting hormone. Insert the end of each cutting into the hole, pushing it about an inch or two deep. Gently firm the soil around the base.
- Provide Humidity: Water the soil lightly. Then, cover the pots with a plastic bag or place them under a humidity dome. Make sure the plastic doesn’t touch the leaves. This creates that essential humid environment for the cuttings to root.
The “Secret Sauce” (Pro Tips)
Here are a couple of things I’ve learned over the years that really make a difference:
- Bottom Heat is Your Friend: If you have a heat mat designed for propagation, place your pots on it. This gentle warmth encourages root development from below. It’s like giving your cuttings a cozy little hot tub for their roots!
- Location, Location, Location: Place your propagation setup in a bright, but indirect, light. Direct sun will scorch those tender cuttings and dry them out too quickly. An east-facing window is often perfect.
- Don’t Overwater: While humidity is key, soggy soil is the enemy. Allow the top layer of soil to dry out slightly between waterings. You’ll get a feel for it!
Aftercare & Troubleshooting
Once your cuttings have been planted, it’s time for patience! Keep them consistently moist and check them every few days. You’ll know they’re rooting when you see new leaf growth – this usually takes anywhere from 4 to 8 weeks, sometimes longer.
When you see those tiny new shoots appearing, it’s a good sign that roots are forming. You can gently tug on a cutting; if there’s resistance, it’s likely rooted. At this point, you can start to gradually acclimate them to lower humidity by opening the plastic bag or dome a little each day. Once they’re strong enough, you can transplant them into slightly larger pots.
The most common issue you’ll face is rot. If you see stems turning black and mushy, it’s usually a sign of too much moisture and not enough air circulation. Don’t be discouraged if some cuttings don’t make it; that’s part of the learning process!
A Warm Welcome to Your New Plants!
Propagating Staphylea bolanderi is such a rewarding way to expand your garden’s beauty. Be patient, keep an eye on your little ones, and most importantly, enjoy the magic of watching new life emerge from a simple cutting. Happy gardening!
Resource:
https://identify.plantnet.org/k-world-flora/species/Staphylea%20bolanderi%20A.Gray/data