Oh, hello there, fellow plant enthusiast! Grab a cuppa, settle in, and let’s talk about a truly special Australian native: Adenanthos obovatus, often called the “woollybush” or “butterfly bush” for its delightfully soft foliage and delicate flowers. I’ve been growing and propagating these beauties for years, and let me tell you, there’s a real thrill in coaxing new life from a parent plant.
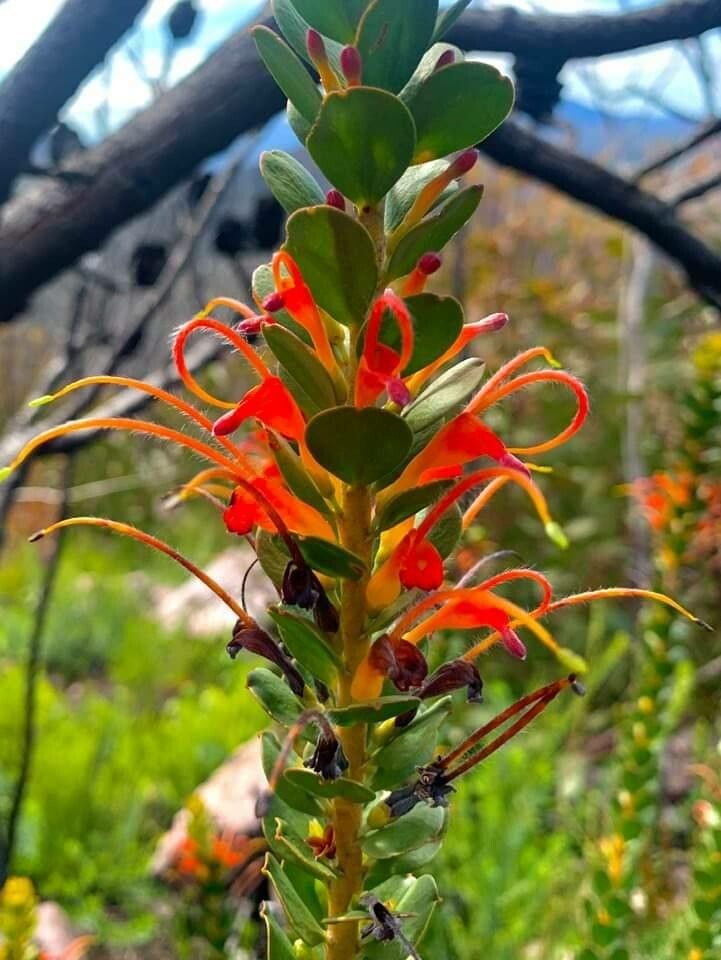
Adenanthos obovatus is just charming. The soft, fuzzy leaves have a lovely texture and a delicate, almost ethereal quality. Plus, those small, tubular flowers are a magnet for our native pollinators! Propagating it is a fantastic way to expand your garden without breaking the bank, and honestly, it’s a very rewarding process. For beginners, I’d say it’s moderately easy. It’s not quite as foolproof as, say, a spider plant, but with a little care and attention, you’ll be successful.
The Best Time to Start
The sweet spot for propagating Adenanthos obovatus is undoubtedly the late spring to early summer. Think about when your plants are actively growing and producing fresh, new shoots. This is when the plant is brimming with energy, and those cuttings have the best chance of rooting. You can also have success in early autumn with slightly more mature growth, but the spring window is generally more foolproof.
Supplies You’ll Need
You won’t need a whole workshop, just a few essentials at hand:
- Sharp pruning shears or a clean knife: For taking clean cuts.
- Rooting hormone powder or gel: This really helps give your cuttings a boost. I prefer a powder, but gel works wonderfully too.
- A well-draining potting mix: A good blend is often a mix of perlite, coarse sand, and coco peat or fine bark. You want it to drain freely, as Adenanthos dislikes soggy feet!
- Small pots or seed trays with drainage holes: Clean ones, please!
- A clear plastic bag or a propagator lid: To create a humid environment.
- A spray bottle: For misting.
- Labels: So you don’t forget what you planted where!
Propagation Methods
The most reliable and straightforward way to propagate Adenanthos obovatus is through stem cuttings. Here’s how I do it:
- Select Your Cuttings: Look for healthy, semi-hardwood cuttings. These are shoots that have started to firm up but are still somewhat flexible. You want stems that are about 10-15 cm (4-6 inches) long, and have formed this year. Avoid very soft, new growth or old, woody stems.
- Make the Cut: Using your clean pruning shears or knife, take cuttings from healthy stems. Make the cut just below a leaf node (where a leaf attaches to the stem). This is where the magic happens for rooting.
- Prepare the Cuttings: Gently remove the lower leaves from the bottom half of the cutting. You can leave a few at the top to help with photosynthesis. If your leaves are quite large, you can even cut them in half to reduce water loss.
- Dip in Rooting Hormone: Moisten the cut end of the stem and dip it into your rooting hormone. Tap off any excess. The hormone helps stimulate root development.
- Plant Your Cuttings: Fill your clean pots or trays with your well-draining potting mix. Make a small hole with a pencil or your finger in the center of the mix. Insert the cutting into the hole, firming the mix gently around it. Don’t cram too many into one pot; give them a little breathing room.
- Create a Humid Environment: Water your cuttings gently after planting. Then, place the pots inside a clear plastic bag, sealing it loosely with an elastic band, or pop on a propagator lid. This traps humidity, which is crucial for cuttings before they develop roots.
The “Secret Sauce” (Pro Tips)
Now, here are a few little tricks I’ve picked up over the years that really make a difference:
- Bottom Heat is Your Friend: If you can, pop your propagator or pots onto a gentle heated propagator mat. This bit of warmth from below tricks the plant into thinking it’s the perfect growing season and significantly speeds up the rooting process. You won’t believe the difference it makes!
- Don’t Let the Leaves Drip: When you’re misting or watering your cuttings under cover, ensure the leaves aren’t constantly sitting in water. This is a fast track to rot. A light misting is usually enough. If you see condensation pooling heavily, open the bag or lid for a short while to let it air out.
- Patience, Dear Gardener, Patience: Adenanthos can be a little slow to root initially. Don’t be tempted to pull them out to check for roots too early! Give them at least 4-6 weeks, and sometimes even longer. You’ll often see new leaf growth as a sign that roots are forming.
Aftercare & Troubleshooting
Once you’ve spotted signs of new growth (tiny new leaves unfurling at the tip), it’s a good sign that roots have developed. Gradually acclimatise your new plants to drier air by opening the plastic bag or propagator lid a little more each day for about a week.
Water them regularly but allow the potting mix to dry out slightly between waterings. They still need to be kept moist, but never waterlogged. When they’re big enough, and the roots are well-established, you can carefully pot them into their own individual pots with a good quality, well-draining potting mix.
The most common problem you’ll encounter is rot. If your cuttings look brown, mushy, or seem to be collapsing, it’s usually down to too much moisture and not enough airflow. If you catch it early, you might be able to salvage a healthy section, but often it’s best to start again. Remember, good drainage and avoiding overwatering are paramount!
A Encouraging Closing
So there you have it! Propagating Adenanthos obovatus is a wonderful way to share these gorgeous plants or simply enjoy more of their unique beauty in your own garden. Be patient, keep an eye on your cuttings, and don’t be disheartened if your first attempt isn’t perfect. Every gardener has had their share of wilting failures! Just keep trying, learn from each batch, and enjoy the journey of nurturing new life. Happy gardening!
Resource:
https://identify.plantnet.org/k-world-flora/species/Adenanthos%20obovatus%20Labill./data