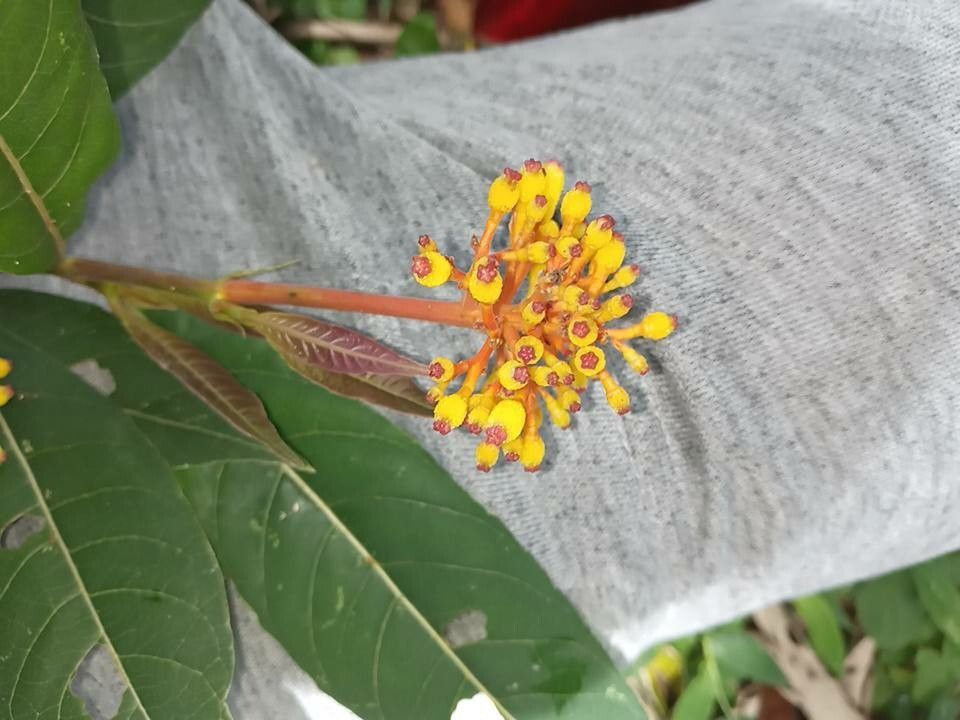
Ah, Palicourea australis! If you’re drawn to its vibrant, almost electric-blue flowers, you’re in for a treat. It’s the kind of plant that stops you in your tracks, a little jewel for any garden. And the joy of coaxing a new life from an existing one? Well, that’s a whole other level of garden satisfaction. Now, I’ll be honest with you, Palicourea australis can be a tad particular about propagation. It’s not quite a “stick it in the ground and hope for the best” kind of plant, but don’t let that deter you! With a little understanding and patience, you’ll be rewarded.
The Best Time to Start
For Palicourea australis, your best bet is to take cuttings during its active growing season. Think spring and early summer, when the plant is putting out fresh, new growth. You want those semi-hardwood stems – not the brand new, super-soft tips, and not the old, woody stuff from last year. They should still be a bit flexible but have started to firm up. This vigorous stage means the plant has the energy reserves to focus on root development.
Supplies You’ll Need
Ready to get your hands dirty? Here’s what I usually have on hand:
- Sharp Pruning Shears or a Clean Knife: Essential for clean cuts, which heal better.
- Propagation Potting Mix: A light, airy mix is key. I often use a blend of peat moss, perlite, and a little bit of coarse sand. You can also buy specific propagation mixes.
- Rooting Hormone: This isn’t always strictly necessary, but it can give your cuttings a significant boost, especially with plants that can be a little slow to root. Look for one with IBA.
- Small Pots or Trays: For your cuttings to root in. Make sure they have drainage holes!
- Clear Plastic Bag or Dome: To create a humid microclimate around your cuttings.
- Watering Can with a Fine Rose: For gentle watering.
- Optional: Heat Mat: Can really speed up rooting, especially if your home is on the cooler side.
Propagation Methods: Stem Cuttings
This is generally the most successful route for Palicourea australis.
- Select Your Cuttings: Find a healthy stem on your parent plant. Look for a section that’s about 4-6 inches long and has at least two sets of leaves. Make a clean cut just below a leaf node (where a leaf attaches to the stem).
- Prepare the Cuttings: Gently remove the leaves from the bottom half of the cutting. You only want one or two sets of leaves left at the very top. This prevents the leaves from rotting when buried in the soil and directs the plant’s energy to root formation. If your top leaves are very large, you can also snip them in half to reduce water loss.
- Apply Rooting Hormone (Optional but Recommended): Dip the cut end of the stem into the rooting hormone powder, tapping off any excess.
- Plant Your Cuttings: Fill your pots with your prepared potting mix. Gently insert the base of each cutting into the soil, about an inch deep. Make sure the leaf nodes you removed are below the soil line. Firm the soil gently around the stem.
- Create Humidity: Water the pot thoroughly, allowing excess water to drain. Then, cover the pot with a clear plastic bag or a propagation dome. Ensure the leaves aren’t touching the plastic if possible. If using a bag, you can use stakes to prop it up.
The “Secret Sauce” (Pro Tips)
Having grown these beauties for years, I’ve picked up a few tricks that often make all the difference.
- The “Just Right” Moisture: The soil should be consistently moist, not soggy. Think of a wrung-out sponge. If it’s too wet, you risk rot. If it’s too dry, your cutting will shrivel. Feel the soil regularly.
- Warmth is Key: Palicourea australis absolutely loves a bit of warmth to encourage roots. Placing your pots on a heat mat set to around 70-75°F (21-24°C) can dramatically speed up the rooting process. It’s like giving them a cozy blanket to work under.
- Air Circulation: While humidity is crucial, you don’t want stagnant air, which can encourage fungal diseases. Open the plastic bag or dome for a few minutes each day to allow for some air exchange. This is part of the process of acclimatizing them to normal conditions.
Aftercare & Troubleshooting
Once you start to see new leaf growth appearing on your cuttings, that’s a fantastic sign! It means roots are forming. You can gently tug on a cutting to feel for resistance – that’s another indicator of successful rooting.
- Gradual Acclimation: When you see new growth, slowly begin to acclimate your cuttings to normal humidity. Gradually open the plastic bag or dome over a week or two.
- Transplanting: Once the roots are well-established and filling the pot (you might see them peeking out the drainage holes), you can transplant them into slightly larger pots with a regular potting mix. Water them gently.
- Troubleshooting: The most common issue you’ll face is rot. If your cutting turns black and mushy, it’s usually a sign of too much moisture and not enough air circulation. Sadly, a rotted cutting is usually a goner. Another sign of failure is wilting that doesn’t recover even after watering – this usually means the roots never formed, or they rotted away. If you see mold on the soil surface, it’s another indicator of overly wet conditions.
A Little Patience Goes a Long Way
Don’t get discouraged if your first few attempts don’t pan out exactly as planned. Propagation is a journey, and every gardener has had their share of failures. The key is to observe, learn, and adjust. Take joy in the process, celebrate every little success, and soon you’ll be surrounded by your own beautiful Palicourea australis babies! Happy gardening!
Resource:
https://identify.plantnet.org/k-world-flora/species/Palicourea%20australis%20C.M.Taylor/data