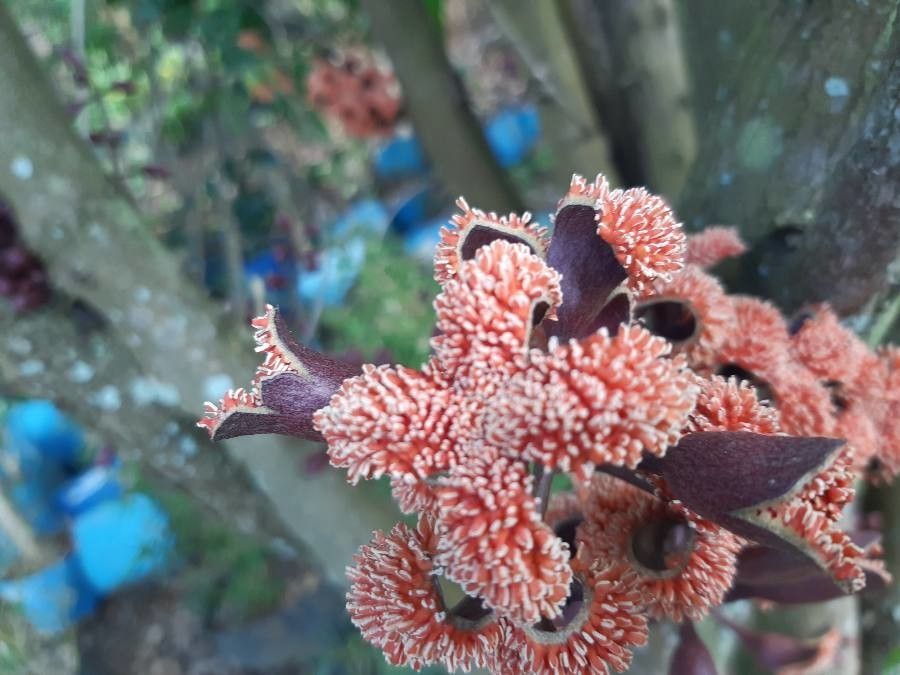
Oh, hello there, fellow plant lover! So, you’ve fallen for the charm of Tambourissa cordifolia, haven’t you? I don’t blame you. That lovely, heart-shaped foliage and its subtle, almost tropical vibe can really brighten up any space. It’s a plant that whispers rather than shouts, and I find that incredibly appealing.
And the best part? Sharing that beauty by propagating it. There’s a special kind of joy in nurturing a brand new plant from a tiny piece of its parent. It connects you to the cycle of life in such a tangible way. Now, as for how easy it is for beginners? Honestly, Tambourissa cordifolia is moderately easy to propagate. It’s not the kind of plant that throws a tantrum if you mistreat it slightly, but a little bit of care goes a long way. You’ll do wonderfully!
The Best Time to Start
When it comes to getting the most bang for your propagation buck, spring and early summer are your prime times. Think of it as when the plant is waking up from its rest and putting on its most vigorous growth. New, healthy stems are packed with the energy needed to sprout roots. You want to grab those supple, but not yet woody, shoots. Avoid anything that feels brittle or looks like it’s struggling; we’re aiming for vitality!
Supplies You’ll Need
Before we dive in, let’s gather our tools. Having everything ready will make the process so much smoother.
- Sharp, clean pruning shears or a sharp knife: For making clean cuts. Sterilize them with rubbing alcohol before and after use!
- Rooting hormone (optional but recommended): I find it gives cuttings a real boost.
- Potting mix: A well-draining mix is key. I like a blend of peat moss and perlite, or a good quality seed starting mix. Some gardeners swear by equal parts perlite and coco coir for this kind of plant.
- Small pots or trays: Clean ones, of course! About 4-inch pots are usually perfect.
- Clear plastic bag or propagator: To create a humid environment.
- Water: For misting and watering.
Propagation Methods
Tambourissa cordifolia is a good candidate for stem cuttings. It’s straightforward and usually yields great results when done correctly.
Stem Cuttings: This is my go-to method for this plant.
- Take the Cutting: On a healthy, growing stem, make a clean cut just below a leaf node (that little bump where a leaf emerges). You’re looking for cuttings about 4-6 inches long. Remove the leaves from the bottom half of the cutting. You can leave 2-4 leaves at the top.
- Dip in Rooting Hormone (Optional): If you’re using rooting hormone, dip the cut end into it. Gently tap off any excess.
- Potting Up: Fill your clean pot with your well-draining potting mix. Make a small hole in the center with your finger or a pencil.
- Insert the Cutting: Gently place the cut end of the Tambourissa cordifolia cutting into the hole. Press the soil gently around the stem to ensure good contact.
- Water and Cover: Water the medium thoroughly until you see water draining from the bottom of the pot. Then, cover the pot with a clear plastic bag or pop it into a propagator. This keeps humidity high, which is vital for preventing the cutting from drying out before it grows roots. You can prop the bag up with a few chopsticks to keep it off the leaves. Place it in a spot with bright, indirect light.
The “Secret Sauce” (Pro Tips)
Now, for a couple of things that have really helped me over the years:
- Don’t let those leaves touch the water in the pot! This is crucial. If the leaves that are submerged in the soil stay wet all the time, they’ll quickly turn mushy and rot. That rot can travel right down the stem, and your cutting will be a goner before it even has a chance. I always make sure any remaining leaves are well above the soil line.
- Bottom heat is your friend. If you have a heat mat designed for seedlings, this is the perfect time to use it. Placing your pots on a gentle heat source encourages root development much faster. It mimics the warm soil that the plant naturally loves. You don’t need it to be super hot, just cozy.
Aftercare & Troubleshooting
Once your cuttings have taken root – you’ll know because you’ll see new growth emerging from the top! – you can start gradually acclimatizing them to normal conditions.
- Light Watering: Continue to water when the top inch of soil feels dry. Don’t let it completely dry out, but don’t drown it either.
- Reduce Humidity: Over the next week or two, gradually open the plastic bag or propagator for increasing amounts of time each day. This helps the new plant adjust to lower humidity levels.
- Fertilizing: Once your young plant is showing good, consistent new growth, you can start feeding it with a diluted, balanced liquid fertilizer, perhaps once a month during the growing season.
Troubleshooting: The most common issue you’ll face is rot. If you see your cutting slumping over, turning black and mushy at the base, or if you notice mold on the soil surface, it’s usually a sign of too much moisture and not enough air circulation. Unfortunately, most of the time, if rot sets in, the cutting is lost. Your best bet is to remove it immediately to prevent it from spreading and start fresh with a new cutting, paying extra attention to the drainage and humidity levels. Yellowing leaves can sometimes indicate too much direct sun or being kept too wet, while wilting might mean it’s too dry or just hasn’t rooted yet.
A Encouraging Closing
Propagating plants is a journey, and sometimes those journeys have a few bumps along the way. Don’t get discouraged if a cutting doesn’t make it. Every attempt is a learning experience. Just keep trying, observe your plant, and enjoy the process of bringing new life into your home. That new little Tambourissa cordifolia will be a testament to your patience and care! Happy planting!
Resource:
https://identify.plantnet.org/k-world-flora/species/Tambourissa%20cordifolia%20Lorence/data