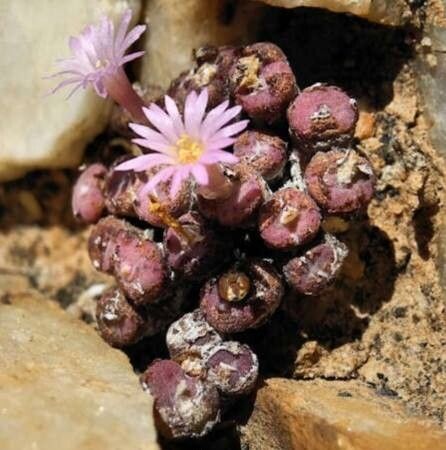
Oh, hello there! Grab yourself a cuppa, and let’s chat about a truly fascinating little gem: Conophytum obscurum. If you’ve ever admired those neat, pea-sized little succulents that look like they’ve been carefully sculpted, chances are you’ve seen a conophytum. C. obscurum, in particular, is known for its charmingly dusky, often patterned tops, and watching new ones emerge from a parent plant is just pure joy.
Now, if you’re a beginner, you might find conophytums a tad on the challenging side. They’re not your run-of-the-mill pothos, that’s for sure! But don’t let that deter you. With a little patience and the right approach, propagating them is absolutely achievable, and oh-so-rewarding. Seeing your own little conophytum babies sprout is a special kind of magic.
The Best Time to Start
For Conophytum obscurum, the sweet spot for propagation is generally late spring to early summer. This is when the plants are actively growing and have the most energy to put into new root development. You’re looking for plants that are mature enough to have formed little pups, or offsets, that have developed their own distinct body. Trying to take cuttings too early in their growth cycle can be a recipe for disappointment.
Supplies You’ll Need
Before we get our hands dirty, let’s gather our bits and bobs:
- A very gritty potting mix: Think 50% perlite or pumice mixed with 50% fine inorganic material like horticultural grit or coarse sand. Regular potting soil will hold too much moisture.
- Sharp, clean pruning shears or a sharp knife: For making clean cuts. Sterilize them with rubbing alcohol between cuts if you’re working with multiple plants.
- Small pots or seed trays: With good drainage holes are crucial!
- A rooting hormone powder (optional but recommended for cuttings): This can give your cuttings a helpful boost.
- A mister or spray bottle: For gentle watering.
- A small trowel or dibber: For making planting holes.
- A sunny spot with bright, indirect light: And good air circulation is key here.
Propagation Methods
Conophytums can be propagated in a couple of primary ways: by division and by taking offsets (a type of cutting).
Method 1: Dividing Offsets (Pups)
This is often the easiest and most successful method when your conophytum has produced new little plantlets, or “pups,” growing alongside the main body.
- Gently extract the parent plant from its pot. Be careful not to damage the roots.
- Identify the pups. You’ll see smaller bodies emerging from the base of the main plant.
- Carefully twist or cut the pups away from the parent. Aim to leave a small portion of the parent plant’s body attached to the pup, or ensure the pup has its own tiny root nubs. A sharp knife works best for a clean separation.
- Let the cut end callous over. This is super important! Place the detached pups in a dry, airy spot for 2-3 days until the cut surface has dried and healed. This prevents rot.
- Pot them up! Fill your small pots with your gritty mix. Make a little hole with your dibber.
- Plant the calloused pups. Place them in the holes, ensuring the body is sitting on the soil surface, not buried too deeply.
- Don’t water immediately. Wait about a week after planting before giving them their first very light watering.
Method 2: Taking Stem Cuttings (Less Common for C. obscurum, but possible for larger specimens)
This method is more common for slightly larger conophytums that might have elongated stems or if you’re looking to propagate a specific growth.
- Select a healthy stem or growth. Look for a section that has at least one or two leaf pairs.
- Make a clean cut. Use your sharp, sterilized shears to cut the stem.
- Allow the cutting to callous. Just like with offsets, this is absolutely critical. Leave the cut end to dry and heal for 3-5 days.
- Rooting hormone (optional). If you’re using rooting hormone, dip the calloused end into the powder.
- Plant in gritty mix. Insert the calloused end (or the end with rooting hormone) into your dry, gritty potting mix.
- Wait to water. Again, patience is key. Hold off on watering for about a week to allow any microscopic injuries at the cut site to seal.
The “Secret Sauce” (Pro Tips)
Here are a few little tricks I’ve picked up over the years that make a difference:
- Resist the urge to mist constantly! While a light mist might be okay, over-misting is how rot sets in. Conophytums are desert dwellers; they’re happy with infrequent, deep watering when they actually need it, and that applies to their babies too. Let the soil dry out between waterings.
- Bottom heat is your friend. If you’re propagating in a cooler environment, a gentle seedling heat mat can work wonders for encouraging root development. Just make sure the mat isn’t too hot – you don’t want to cook your little ones.
- Airflow, airflow, airflow. Good air circulation is non-negotiable. It helps prevent fungal issues and rot. Make sure your propagation area isn’t stagnant. A small fan on a low setting nearby can do wonders if your space is enclosed.
Aftercare & Troubleshooting
Once you’ve potted up your new conophytums, the real adventure begins!
- Initial watering. As mentioned, wait about a week after planting before the first light watering. You want to encourage roots to seek out moisture. Water thoroughly but infrequently. Let that gritty mix dry out completely between waterings.
- Light. Place your new plants in a spot with bright, indirect light. Direct sun can scorch delicate new growth.
- Signs of success. You’ll know they’re happy when the little bodies start to plump up and you might even see tiny new growth emerging. Patience is key here; root development can take weeks.
- Troubleshooting: Rot! The biggest enemy is rot, usually caused by too much moisture and poor drainage/airflow. If you see a pup turning mushy, brown, or translucent, act fast. Try to remove it immediately and check the surrounding soil. Sometimes, if it’s caught early enough, you can salvage a healthy portion and let it callous again. Preventative care (gritty mix, good watering habits, airflow) is the best cure. Yellowing leaves can sometimes indicate overwatering, while shriveling might mean it’s thirsty, but always check the soil moisture first before watering a shriveled plant – rot can sometimes cause shriveling too!
A Little Encouragement
Propagating Conophytum obscurum might require a bit more attention than some other succulents, but the satisfaction of growing your own little collection is absolutely worth it. Don’t get discouraged if a few don’t make it; every gardener has their learning curve. Just keep observing your plants, trust your instincts, and enjoy the process. Happy propagating!
Resource:
https://identify.plantnet.org/k-world-flora/species/Conophytum%20obscurum%20N.E.Br./data