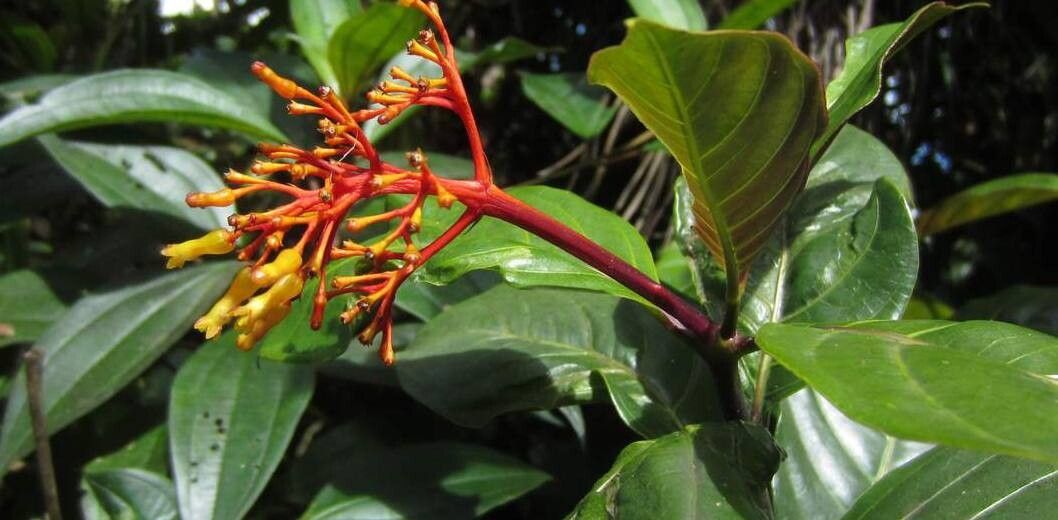
Oh, Palicourea crocea! If you’ve ever seen this beauty with its vibrant, fiery orange-red blooms, you know exactly why it’s such a coveted addition to any garden. It’s like a little burst of sunshine, even on a cloudy day. And the best part? You can easily fill your garden with these cheerful plants by propagating them yourself. It’s a deeply satisfying feeling, watching a tiny cutting transform into a thriving specimen. Now, for beginners, I’d say Palicourea crocea is moderately easy to propagate. It’s not quite as foolproof as, say, a pothos, but with a little attention, you’ll be swimming in blooms.
The Best Time to Start
My favorite time to get started with propagating Palicourea crocea is late spring to early summer. This is when the plant is actively growing after the dormancy of winter. You’re capitalizing on that natural surge of energy, which really helps those cuttings take root. Look for stems that are soft and pliable, not yet woody.
Supplies You’ll Need
Here’s what I usually have on hand when I’m ready to propagate:
- Sharp pruning shears or a clean, sharp knife: For making clean cuts.
- Rooting hormone (powder or gel): This really gives your cuttings a boost.
- A well-draining potting mix: I like a blend of equal parts coarse sand, perlite, and good quality potting soil. Or, a specialized cactus and succulent mix works wonderfully.
- Small pots or seed trays: Clean ones are essential to prevent disease.
- A mister bottle: For keeping things humid.
- Clear plastic bags or a propagation dome: To create that humid environment.
- Optional: A heating mat: This can speed up the rooting process considerably.
Propagation Methods
I find stem cuttings to be the most reliable and straightforward method for Palicourea crocea.
- Take Your Cuttings: Using your sharp shears or knife, select healthy, non-flowering stems. Make a clean cut just below a leaf node (where a leaf attaches to the stem). Aim for cuttings that are about 4 to 6 inches long.
- Prepare the Cuttings: Gently remove the lower leaves, leaving just a couple of leaves at the top. This prevents the lower leaves from rotting in the soil. If your cuttings are very large, you can even snip off half of each remaining leaf to reduce water loss.
- Apply Rooting Hormone: Dip the cut end of each stem into your rooting hormone, tapping off any excess. This step is crucial for encouraging root development.
- Plant Your Cuttings: Fill your clean pots or trays with your prepared potting mix. Make a small hole with your finger or a pencil and gently insert the cut end of the cutting. Firm the soil gently around the stem.
- Water and Cover: Water the soil lightly until it’s evenly moist but not waterlogged. Then, cover the pot or tray with a clear plastic bag or propagation dome. This will create a humid environment, which is vital for cuttings to root. You can perch the bag on sticks to keep it from touching the leaves.
The “Secret Sauce” (Pro Tips)
Here are a few things I’ve learned over the years that make a big difference:
- Don’t let the leaves touch the water (if you were tempted to try water propagation): While some plants love water propagation, Palicourea crocea does best in soil. If you do try it, make sure the leaves are well above the water line, otherwise, they’ll rot before they have a chance to root. This is why soil is my preferred method!
- Bottom heat is your friend: If you can, place your pots on a heating mat. This gentle warmth from below mimics the conditions at the base of the parent plant and really encourages root formation. It’s a game-changer!
- Freshness matters: Use your cuttings as soon as possible after taking them. The longer they sit around, the less likely they are to root successfully.
Aftercare & Troubleshooting
Once your cuttings are planted, keep them in a bright, indirect light location. Avoid direct sun, as it can scorch the delicate new plants. Keep the soil consistently moist but not soggy. You can gently tug on a cutting after a few weeks – if you feel resistance, congratulations, you have roots! At this point, you can gradually acclimate them to normal houseplant conditions by slowly opening the plastic bag or dome over a week or so.
The most common sign of failure is rot. If your cuttings turn mushy, black, or slimy, it’s usually a sign of too much moisture and not enough air circulation, or perhaps a pathogen in the soil. Too little moisture and lack of humidity can also cause them to shrivel up and die. If you see signs of rot, discard the affected cuttings immediately.
A Encouraging Closing
Propagating Palicourea crocea is a journey, and like any good gardening endeavor, it requires a bit of patience. Don’t be discouraged if all your cuttings don’t make it – that’s perfectly normal! Celebrate the successes, learn from the failures, and most importantly, enjoy the incredibly rewarding process of growing your own beautiful, fiery plants. Happy propagating!
Resource:
https://identify.plantnet.org/k-world-flora/species/Palicourea%20crocea%20(Sw.)%20Schult./data