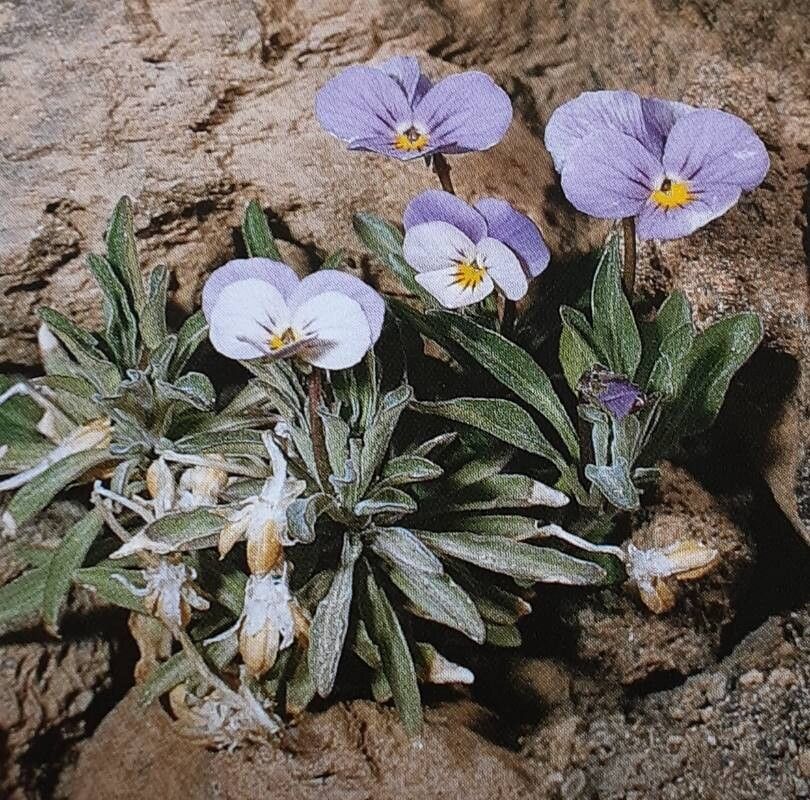
Hello, fellow plant enthusiasts! Today, I want to talk about a gem that brings a touch of joy to any garden: Viola cheiranthifolia. You know, the kind with those delicate, almost otherworldly blooms in vibrant hues? It’s truly a special plant. And the best part? You can easily share that magic by propagating it yourself. It’s a wonderfully rewarding process, and I promise, it’s more accessible than you might think, even for those just starting their green journey.
The Best Time to Start
For Viola cheiranthifolia, the sweet spot for propagation is late spring to early summer. This is when the plant is in its active growth phase and has plenty of energy to put into creating new roots. You want to catch it before it gets too hot and dry, as this can stress both the parent plant and your new cuttings.
Supplies You’ll Need
Gathering your supplies beforehand makes the whole process smooth sailing. Here’s what I usually have on hand:
- Sharp, clean pruning shears or a sharp knife: For taking neat cuttings.
- Well-draining potting mix: A 50/50 blend of seed starting mix and perlite works wonders. Alternatively, a specialized succulent or cactus mix is also a good bet.
- Small pots or seed trays: Clean ones are crucial to prevent disease.
- Rooting hormone (optional but recommended): A stimulated start can make a big difference.
- A spray bottle: For gentle misting of your cuttings.
- A clear plastic bag or propagator lid: To create a humid environment.
- A dibber or pencil: For making planting holes.
Propagation Methods
Viola cheiranthifolia is a trooper, and it’s quite forgiving with a couple of straightforward methods.
Stem Cuttings: My Go-To Approach
This is my favorite way to multiply these beauties. It’s reliable and gives you a strong start.
- Take your cuttings: Look for healthy, non-flowering shoots that are about 4-6 inches long. Using your sharp shears, make a clean cut just below a leaf node (where a leaf attaches to the stem).
- Prepare the cuttings: Gently remove the lower leaves, leaving just the top couple. This prevents them from rotting in the soil and encourages the plant to focus its energy on roots.
- Apply rooting hormone (optional): Dip the cut end of each cutting into rooting hormone. Tap off any excess.
- Plant the cuttings: Make a small hole in your prepared potting mix using a dibber or pencil. Gently insert the cut end of the stem into the hole, being careful not to knock off the rooting hormone. Firm the soil gently around the base.
- Water and cover: Water the soil lightly until it’s evenly moist but not soggy. Then, lightly mist the leaves of your cuttings. Pop a clear plastic bag over the pot or close your propagator lid. This traps humidity, which is vital for success.
Division: A Quick Boost
If your Viola cheiranthifolia has become a bit crowded over time, division is a wonderful way to get multiple new plants and revitalize the parent.
- Gently lift the plant: Carefully dig around the base of the plant and lift it out of its pot or the ground, trying to keep as much of the root ball intact as possible.
- Inspect the root ball: Gently tease apart the root ball into sections. You’re looking for natural breaks where you can separate clumps, each with its own roots and shoots.
- Replant the divisions: Immediately replant the divided sections into new pots filled with your well-draining mix. Water them in well.
The “Secret Sauce” (Pro Tips)
Alright, let’s sprinkle in a little experience here. These little tricks have saved many a cutting for me:
- Don’t let the leaves touch the water! I’ve seen too many cuttings develop mushy, rotten stems because their lower leaves were sitting in moisture. Keep them tucked up above the soil line.
- Bottom heat is your friend. If you can, place your pots on a gentle heat mat designed for propagation. This little bit of warmth from below encourages root development like nothing else. It’s like giving your cuttings a warm hug to get them growing.
- Air circulation is key. While you need humidity, too much stagnant air can lead to fungal issues. If you notice condensation building up heavily on your plastic bag, open it up for an hour each day to let things air out.
Aftercare & Troubleshooting
Once your cuttings have developed roots (you’ll see new growth and they’ll feel a bit resistant when gently tugged), it’s time to transition them.
- Gradually remove the cover: Don’t shock them by removing the plastic bag all at once. Do it in stages over a few days.
- Watering: Water them when the top inch of soil feels dry. I always prefer to water from the bottom by placing the pots in a tray of water for about 20 minutes, letting the soil wick up what it needs.
- Light: Position your new plants in a bright spot, but avoid direct, harsh sunlight until they are well-established.
If you notice your cuttings developing black or mushy stems, that’s a sign of rot. This usually means there’s too much moisture and not enough air circulation. Sadly, these are often lost causes, but don’t be discouraged. Take what you learned and try again. Sometimes propagation is a bit of trial and error.
Enjoy the Process
Propagating Viola cheiranthifolia is a journey. There will be triumphs, and yes, a few little setbacks. Be patient with yourself and your new plants. Watching a tiny cutting transform into a beautiful, blooming viola is an incredibly rewarding experience. Happy growing!
Resource:
https://identify.plantnet.org/k-world-flora/species/Viola%20cheiranthifolia%20Bonpl./data