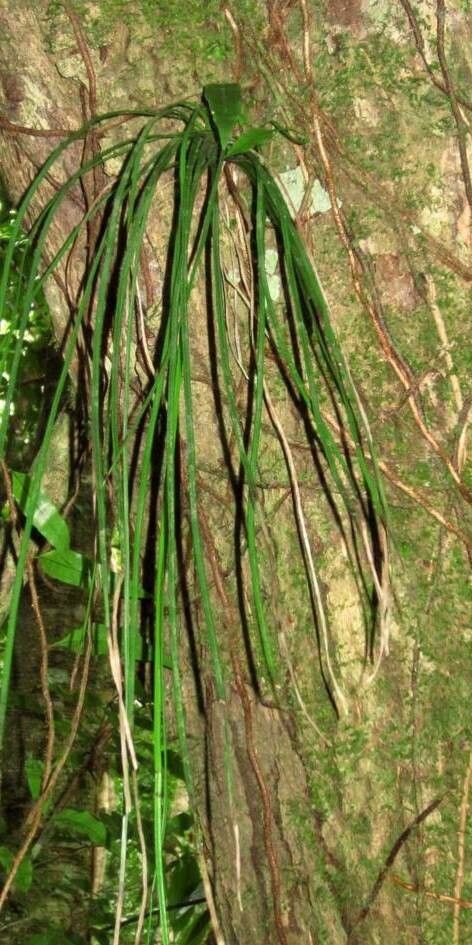
Hey there, fellow plant lovers! Today, we’re diving into the wonderful world of Vittaria lineata, commonly known as shoestring fern. If you’re drawn to its delicate, cascading fronds that look like wisps of green ribbon, you’re not alone. This fern has a unique charm that many of us adore. And the best part? You can easily multiply its beauty and share it with friends, or simply expand your own green oasis. While it might seem a little specialized, I’ve found that with a few key tricks, propagating shoestring fern is a wonderfully achievable project, even for those just starting their plant-parenting journey.
When to Get Your Hands Dirty
For the best results with Vittaria lineata, I always recommend tackling propagation in the spring or early summer. This is when the plant is in its most vigorous growth phase, meaning it has the energy reserves to bounce back from being divided or cut and to put out those new roots and leaves with gusto. Waiting until after your plant has had a good winter rest and is showing clear signs of new growth is your cue to begin.
Your Propagation Toolkit
Gathering the right tools makes all the difference, believe me! Here’s what I usually have on hand:
- Sharp Pruning Shears or Scissors: Clean cuts are essential for healthy recovery.
- Small Pots or Containers: Terracotta or plastic, just make sure they have drainage holes.
- Well-Draining Potting Mix: A blend of peat moss, perlite, and orchid bark is my go-to for ferns. About a 1:1:1 ratio works wonders.
- Rooting Hormone (Optional, but helpful!): A powder or gel can give your cuttings that extra boost.
- Spray Bottle: For that essential misting.
- Clear Plastic Bag or Dome: To create a humid microclimate.
- Gloves (if you prefer): Though Vittaria isn’t messy, it’s always good practice.
- Watering Can: For gentle watering.
Bringing More Shoestrings to Life
Vittaria lineata is a bit unique in how it reproduces, but we can harness its natural tendencies. The most reliable method I’ve found is division, as shoestring ferns tend to clump and spread.
Method: Division
- Prepare Your Mother Plant: Gently remove your shoestring fern from its pot. Take a look at the root ball. You’re looking for distinct clumps or sections of the plant that have their own root system. If it’s quite dense, you might want to gently tease apart some of the soil to see where natural divisions occur.
- Make the Cut: Using your clean, sharp pruners, carefully cut through the root ball to separate a division. Aim for a section that has at least 2-3 healthy fronds and a good chunk of root. If you’re struggling to pull them apart by hand, don’t force it – this is where those snips come in handy.
- Potting Up: Place your new division into a small pot filled with your prepared, nicely moistened potting mix. Make sure the roots are well-covered and the base of the plant is at soil level.
- Water Gently: Water the newly potted division thoroughly until water runs out the drainage holes. You want the soil to be consistently moist but not waterlogged.
My “Secret Sauce” for Success
Over the years, I’ve picked up a few little nudges that really help new propagations thrive.
- Don’t Treat it Like a Cactus! Ferns, and especially Vittaria, love consistent moisture. After dividing, ensure the new pots stay evenly damp. I like to check the soil daily in the beginning and mist the fronds a couple of times a day until roots establish.
- Humidity is Your Best Friend: Shoestring ferns are woodland plants at heart, so they crave high humidity. Once you pot up your division, pop the pot into a clear plastic bag or place a clear dome over it. This creates a mini-greenhouse effect. Just remember to open it for a few minutes each day to allow for air circulation and prevent fungal issues.
- Bottom Heat is a Boon: If you have it, placing your potted divisions on a gentle heat mat can significantly speed up root development. It mimics natural ground warmth and gives those developing roots a happy little boost to get going.
Aftercare and What to Watch For
Once your shoestring fern division is potted, it’s all about patience and consistent care. Keep that humidity high by misting and the soil consistently moist but never soggy. You’ll know roots are forming when you see new fronds starting to unfurl or if you gently tug on the plant and feel resistance.
Now, the tricky part: troubleshooting. The most common issue is rot, which usually happens when the soil is too wet and there’s not enough air circulation. If you notice the base of the fronds turning mushy and black, it’s a sign of overwatering. If that happens, pull it out, trim away any rotten bits with clean scissors, and repot into fresh, slightly drier mix. Another sign things aren’t going well is if the fronds turn yellow and crispy; this usually indicates too little humidity or perhaps too much direct sunlight. Always place new propagations in bright, indirect light.
Go Forth and Propagate!
There’s a special kind of joy in watching a tiny cutting or division transform into a beautiful, thriving plant. Don’t be discouraged if your first attempt isn’t perfect; gardening is always a learning process. Embrace the journey, be patient with your new shoestring ferns, and enjoy the satisfaction of growing more of these lovely, lacy beauties. Happy propagating!
Resource:
https://identify.plantnet.org/k-world-flora/species/Vittaria%20lineata%20(L.)%20Sm./data