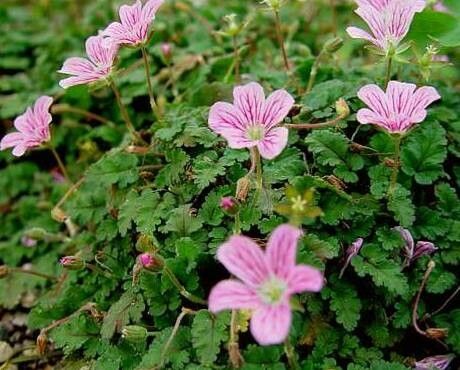
Hello there, fellow garden enthusiasts! I’m thrilled to share my experiences with a delightful little gem that brings so much charm to any garden space: Erodium reichardii, or as it’s often affectionately called, Alpine Geranium. Its delicate, pretty flowers and neat, mounding habit make it a joy to behold, especially in rock gardens or containers. If you’ve ever admired this plant and wished you had more of them gracing your garden, well, good news! Propagating Erodium reichardii is a wonderfully rewarding process, and I’m here to guide you through it. Don’t worry if you’re new to plant propagation; this one is quite forgiving, making it a lovely project for beginners and seasoned gardeners alike.
The Best Time to Start
For the highest success rates with Erodium reichardii, I’ve found that the late spring or early summer is your golden window. This is when the plant is actively growing and has plenty of energy to put into developing new roots. You’ll want to look for healthy, non-flowering stems. Waiting until the main flush of blooms has passed is often a good indicator that the plant is ready for a little propagation action.
Supplies You’ll Need
Here’s a quick rundown of what you’ll want to have on hand:
- Sharp, clean pruners or scissors: A clean cut is crucial to prevent disease.
- Well-draining potting mix: A mix designed for succulents or cacti works wonderfully, or you can create your own by combining potting soil with perlite or vermiculite.
- Rooting hormone (optional but recommended): This can give your cuttings a significant boost.
- Small pots or seed trays: Ensure they have drainage holes.
- Spray bottle: For misting.
- Clear plastic bag or propagation dome: To create a humid environment.
- Gravel or grit: For the bottom of pots if you’re concerned about drainage.
Propagation Methods
Let’s get our hands dirty with the most common and effective ways to propagate Erodium reichardii.
Stem Cuttings
This is my go-to method for increasing my Erodium collection.
- Take Your Cuttings: Using your clean pruners, select healthy, semi-woody stems that are about 3-4 inches long. Make a clean cut just below a leaf node. A leaf node is where a leaf attaches to the stem; this is where roots are most likely to form. Remove the lower leaves, leaving just two or three sets of leaves at the top.
- Apply Rooting Hormone (Optional): If you’re using rooting hormone, dip the cut end of the stem into the powder or gel. Gently tap off any excess.
- Plant Your Cuttings: Fill your small pots or trays with your well-draining potting mix. Make a small hole with your finger or a pencil. Insert the cut end of the Erodium stem into the hole, ensuring the leaf nodes are under the soil surface. Gently firm the soil around the base of the stem.
- Water Lightly: Water the soil gently until it’s evenly moist. Avoid waterlogging.
- Create Humidity: This is key! Place your pots inside a clear plastic bag or cover them with a propagation dome. Ensure the leaves don’t touch the plastic. You want to create a mini greenhouse effect.
- Provide Bright, Indirect Light: Place your cuttings in a spot that receives plenty of bright, indirect sunlight. Avoid direct sun, which can scorch the delicate cuttings.
- Be Patient: Check the soil moisture regularly and mist lightly if it seems dry.
Division
If you have a larger, established clump of Erodium reichardii, division is a straightforward way to get more plants.
- Gently Unpot: Carefully remove the entire plant from its pot or dug it up from the garden. You want to minimize root disturbance.
- Separate the Roots: Gently tease apart the root ball. You should be able to see distinct sections or crowns. If the roots are very matted, you might need to use a clean trowel or even your fingers to divide them. The goal is to get sections with both healthy roots and some foliage.
- Replant: Pot up each division in its own container with fresh, well-draining soil or replant them directly into the garden, giving them plenty of space.
- Water Well: Water thoroughly after replanting.
The “Secret Sauce” (Pro Tips)
Here are a couple of my favorite little tricks that have helped me achieve consistent success:
- Don’t let the leaves touch the water (if you try water propagation): While I primarily advocate for soil propagation, some folks like to try water. If you do, make sure absolutely no leaves are submerged. Rot sets in very quickly if leaves are in contact with water. Only the stem should be in the water.
- Bottom heat is your friend: While not strictly essential for Erodium, placing your pots on a gentle heat mat can significantly speed up root development. It mimics the warmth of spring soil and really encourages those roots to get moving.
Aftercare & Troubleshooting
Once you start seeing signs of new growth – tiny leaves or a little tug on the cutting – that’s a good indicator that roots have formed!
- Acclimatize Gradually: Once roots are established, you’ll want to slowly acclimatize your new plants to normal conditions. Open the plastic bag or dome for increasing periods each day over a week or so.
- Watering: Continue to water sparingly, letting the soil dry out slightly between waterings. Overwatering is the most common mistake and can lead to root rot.
- Troubleshooting Rot: The tell-tale sign of rot is a mushy, black base to your cutting, or the entire cutting shriveling and turning black. This is usually a sign of too much moisture and not enough ventilation. If you spot it early, you might be able to salvage a healthy portion by taking a new cutting, but often, the entire cutting is lost.
A Little Garden Hug
Propagating plants is a journey of patience and observation. Don’t get discouraged if your first attempt isn’t perfect. Every cutting, every seed, is a chance to learn and connect with your garden on a deeper level. Enjoy the process, celebrate the tiny victories, and soon you’ll have a whole host of beautiful Erodium reichardii to share and enjoy! Happy gardening!
Resource:
https://identify.plantnet.org/k-world-flora/species/Erodium%20reichardii%20(Murray)%20DC./data