Hey there, fellow plant lovers! It’s me, your resident plant whisperer, back with another exciting gardening adventure. Today, we’re diving into the wonderful world of propagating Asparagus racemosus, also known as Shatavari. If you’re looking for a plant that’s both beautiful and beneficial – and trust me, it is – then you’re in for a treat.
Why Propagate Shatavari?
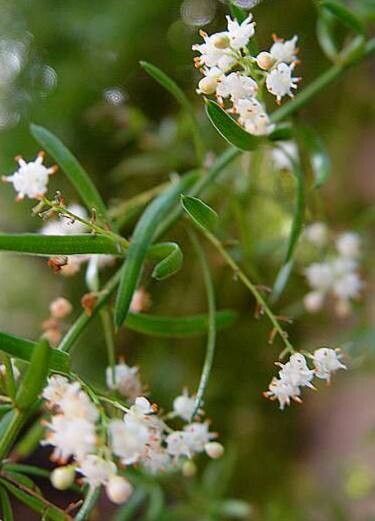
There’s something incredibly satisfying about growing a plant from scratch, isn’t there? Shatavari is no different. With its delicate, fern-like foliage and its long history of use in Ayurvedic traditions, it’s a plant that truly nourishes the soul. Propagating it means you can easily expand your collection, share these beauties with friends, or even start your own little herbal haven. Now, as for beginners, I’d say Shatavari can be a moderately easy plant to propagate. It doesn’t require super-special conditions, but a little patience and attention to detail go a long way.
When is the Magic Hour?
For the highest success rates with Shatavari propagation, I find the late spring or early summer to be your absolute best bet. This is when the plant is bursting with new growth and has plenty of energy to put into developing roots. You want to start when the shoots are young and tender, not yet woody. Think of it like a seedling – full of life and ready to take on the world!
Gathering Your Gardener’s Toolkit
Before we get our hands dirty, let’s make sure we have everything we need. A little preparation makes the whole process smoother!
- Sharp Pruning Shears or a Clean Knife: For taking clean cuts.
- Seed Starting Mix or a Well-Draining Potting Mix: I like a blend of peat moss, perlite, and a bit of compost. Good aeration is key!
- Small Pots or Trays: Whatever you have on hand will work.
- Rooting Hormone (Optional but Recommended): This can give your cuttings a little boost.
- Watering Can with a Fine Rose: For gentle watering.
- Plastic Bags or a Propagator Lid: To create a humid environment.
- Labels and a Pen: To keep track of your precious little ones.
Letting New Life Bloom: Propagation Methods
Shatavari is a pretty forgiving plant, and there are a couple of ways you can successfully propagate it. My go-to is usually stem cuttings; it’s efficient and yields great results.
Method 1: Stem Cuttings (My Favorite!)
- Select Your Cuttings: In late spring or early summer, look for healthy, vibrant stems on your mature Shatavari plant. You want pieces that are about 4-6 inches long and have at least two or three nodes (where leaves emerge). Avoid any flowering or fruiting stems.
- Make the Cut: Using your sharp shears or knife, make a clean cut just below a node. This is where new roots are most likely to form.
- Prepare the Cutting: Gently remove the leaves from the bottom half to two-thirds of the cutting. This prevents them from rotting in the soil or water.
- Dip in Rooting Hormone (Optional): If you’re using rooting hormone, dip the cut end of the stem into the powder, tapping off any excess.
- Planting Time: Fill your small pots with your prepared potting mix. Make a small hole in the center with your finger or a pencil. Insert the cutting into the hole, making sure the bottom node is buried in the soil. Gently firm the soil around the base of the cutting.
- Water Gently: Water the soil thoroughly until it’s moist but not waterlogged.
- Create Humidity: Cover the pot loosely with a plastic bag or a propagator lid. This helps create the humid environment cuttings love. Pop it in a bright spot, but out of direct sunlight.
Method 2: Division (For Mature Plants)
If you have a larger, established Shatavari plant that’s looking a bit crowded, division is a great option.
- Gently Excavate: Carefully remove the entire plant from its pot or dig it up from the ground.
- Examine the Root Ball: Gently loosen the soil around the roots to expose the individual crowns (where the stems emerge from the roots).
- Separate the Divisions: Using your hands or a clean knife, carefully pull or cut the root ball into sections. Each section should have at least one healthy shoot and a good supply of roots.
- Replant: Pot up each division into its own container with fresh, well-draining soil. Water them in well.
The “Secret Sauce” – Insider Tips
I’ve learned a few tricks over the years that can really give your Shatavari propagation a boost.
- Bottom Heat is Your Friend: If you have a heating mat, place your pots on it. This gentle warmth encourages root development from below, mimicking ideal summer soil temperatures. It makes a surprising difference!
- Don’t Let Those Leaves Touch Water: If you decide to try a water propagation method (though I find it less reliable for Shatavari), make sure no leaves are submerged. Any submerged foliage will quickly rot, which can then affect the stem and prevent rooting.
- Patience with the Roots: Don’t be tempted to pull up your cuttings to check for roots too early! It’s a common mistake. Wait at least 3-4 weeks before gently tugging on a cutting. If there’s resistance, you’ve got roots!
Aftercare and What to Watch For
Once your cuttings have successfully rooted (hooray!), it’s time to nurture them into happy, healthy plants.
- Gradual Acclimation: If your cuttings were under a plastic bag, gradually acclimate them to the normal humidity by opening the bag for a little longer each day over a week.
- Light and Water: Keep them in bright, indirect light. Water when the top inch of soil feels dry.
- Transplanting: Once the new plants have developed a good root system and are showing new growth, you can transplant them into slightly larger pots.
Now, what if things don’t go as planned? The most common culprit to watch out for is rot. If your cuttings turn mushy, black, or smell funky, it’s usually a sign of too much moisture and not enough airflow. Ensure your soil is well-draining, and don’t let them sit in soggy conditions. Sometimes, it’s just a matter of trying again with fresh cuttings and adjusting your watering.
Keep Planting, Keep Growing!
Propagating Shatavari is a journey, and like any good journey, it’s about the process as much as the destination. Don’t get discouraged if your first attempt isn’t perfect. Learn from it, adjust, and try again. Every new sprout is a little victory, a testament to your green thumb and your dedication to nurturing life. So go ahead, get your hands in the soil, and enjoy the rewarding experience of growing your own beautiful Shatavari. Happy gardening!
Resource:
https://identify.plantnet.org/k-world-flora/species/Asparagus%20racemosus%20Willd./data