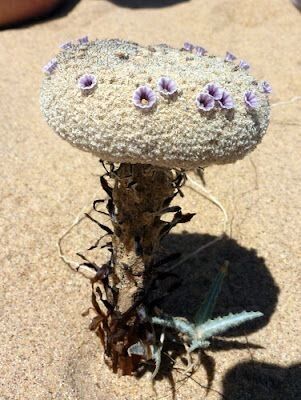
Oh, hello there! Come on in, let’s chat about this wonderfully unique plant, Pholisma sonorae. If you’ve had the pleasure of seeing one in bloom, you know the magic it brings to a garden. Its delicate, almost otherworldly flowers are simply stunning, and there’s a deep satisfaction that comes with nurturing these beauties from tiny beginnings.
Now, about propagating Pholisma sonorae… Let’s be honest, for total beginners, it can be a bit of a learning curve. It’s not quite as straightforward as a spider plant, but with a little patience and the right approach, you’ll absolutely be able to multiply your collection. The reward, I promise, is well worth the effort!
The Best Time to Start
For the highest chance of success with your Pholisma sonorae propagation, aim for late spring to early summer. This is when the plant is in its most vigorous growth phase. You’re looking for healthy, actively growing stems that are neither too soft and new nor too woody and old. Think of it as catching the plant at its peak, bursting with energy and ready to spring into action.
Supplies You’ll Need
Before we get our hands dirty, let’s gather our tools. Having everything ready makes the process so much smoother.
- Sharp, clean pruning shears or a craft knife: Cleanliness is paramount to prevent disease.
- Rooting hormone powder or gel: This is a game-changer for encouraging root development.
- Well-draining potting mix: A good blend for my clients is typically equal parts peat moss, perlite, and coarse sand. You want to avoid anything that holds too much moisture.
- Small pots or propagation trays: Clean ones, of course!
- Plastic bags or a propagation dome: To create a humid environment.
- Watering can with a fine rose or spray bottle: For gentle watering.
Propagation Methods: Stem Cuttings
This is, hands down, my favorite and most reliable method for propagating Pholisma sonorae.
- Select Your Cuttings: Gently examine your Pholisma sonorae plant. Look for healthy stems that are about 4-6 inches long. You want stems that have at least a couple of leaf nodes (where leaves emerge from the stem).
- Make the Cut: Using your sharp, sterilized shears or knife, make a clean cut just below a leaf node. This is where the plant is most likely to root.
- Prepare the Cutting: Carefully remove the lower leaves from the cutting. You want to expose at least one or two leaf nodes; these are where new roots will form. Leave a few leaves at the top for photosynthesis.
- Apply Rooting Hormone: Dip the bottom cut end of the stem into your rooting hormone powder or gel. Tap off any excess. This really gives your cutting a head start!
- Plant the Cuttings: Fill your small pots or trays with your well-draining potting mix. Make a small hole in the center of the mix with your finger or a pencil. Gently insert the cut end of the Pholisma sonorae cutting into the hole, ensuring the prepared leaf nodes are covered by the soil. Firm the soil gently around the base of the cutting.
- Create Humidity: Water the soil lightly until it’s evenly moist, but not soggy. Then, cover the pot with a plastic bag or place it under a propagation dome. This traps moisture and creates the humid environment cuttings need. You can secure the bag with a rubber band or place it over stakes to keep it from touching the leaves.
- Provide Light: Place your cuttings in a warm location with bright, indirect light. Avoid direct sunlight, which can scorch the delicate leaves.
The “Secret Sauce” (Pro Tips)
Here are a couple of things I’ve learned over the garden years that make a real difference:
- Forget the Water Jar, Mostly: While some plants love a good soak in water before potting, Pholisma sonorae cuttings are much happier with the direct connection to a rooting medium. If you must use water temporarily, keep the water level just covering the cut end, and ensure no leaves are submerged. Submerged leaves are a fast track to rot.
- Bottom Heat is Your Friend: If you have access to a seedling heat mat, use it! Placing your pots on a gentle heat source (around 70-75°F or 21-24°C) dramatically speeds up root formation. It’s like giving your cuttings a warm little spa treatment!
Aftercare & Troubleshooting
Once your Pholisma sonorae cuttings are potted and covered, the main job is to keep the soil consistently moist but not waterlogged. Check the moisture level every few days by gently touching the soil surface. If it feels dry, water lightly. You might also want to “vent” the plastic bag or dome for a few minutes each day to allow for some air circulation.
You’ll know your cuttings are happy when you start to see new growth emerging from the stem or the development of tiny leaves. This usually takes anywhere from 4 to 8 weeks, sometimes longer.
On the flip side, if your cuttings look limp, discolored, or start to develop mushy, dark spots all over, that’s usually a sign of rot. This is most often caused by too much moisture and not enough air circulation. Don’t despair! Remove the affected cutting immediately to prevent it from spreading, and adjust your watering and ventilation practices for the remaining ones. Sometimes, a cutting just doesn’t take, and that’s part of the gardening adventure.
A Encouraging Closing
So there you have it! Propagating Pholisma sonorae is a journey, not a race. Be patient with your little cuttings, pay attention to their needs, and celebrate every tiny sign of progress. There’s so much joy to be found in watching life unfurl, right from your own hands. Happy propagating!
Resource:
https://identify.plantnet.org/k-world-flora/species/Pholisma%20sonorae%20(Torr.)%20Yatsk./data