Hello fellow garden enthusiasts! It’s so lovely to have you here. Today, we’re diving into the wonderful world of propagating Hebenstretia angolensis. If you’ve ever admired this charming plant – with its delicate blooms and elegant form – you’re in for a treat. Growing new ones from your existing plants is incredibly satisfying, a little like magic happening right in your hands.
Why Propagate Hebenstretia angolensis?
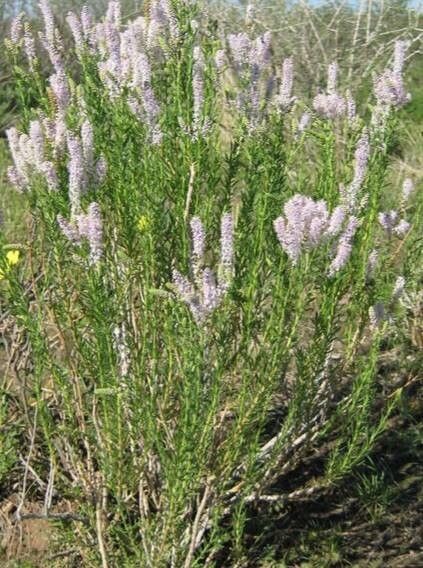
The appeal of Hebenstretia angolensis lies in its subtle beauty. It brings a touch of understated grace to any garden with its dainty flowers that often perfume the air. And honestly, the joy of taking a piece of a plant you love and nurturing it into a brand new life? It’s unbeatable. For beginners, I’d say Hebenstretia angolensis sits comfortably in the “moderately easy” category. A little attention to detail, and you’ll be well on your way.
The Best Time to Start
My go-to time for propagating Hebenstretia angolensis is during its active growing season. Think late spring to early summer. The plant is full of energy right now, and cuttings taken at this time have the best chance of rooting quickly and successfully. You’re essentially catching it at its peak vitality.
Supplies You’ll Need
To set yourself up for success, gather these essentials:
- Sharp, clean pruning shears or a sharp knife: Cleanliness is key to preventing disease.
- A good quality potting mix: I prefer a mix that drains well. A blend of peat moss, perlite, and a bit of compost works wonders. My personal favorite is about 2 parts potting soil, 1 part perlite, and 1 part coco coir.
- Small pots or seed trays: Ensure they have drainage holes!
- Rooting hormone (optional but helpful): This can give your cuttings a nice boost.
- A plastic bag or propagation dome: To create a humid environment.
- Spray bottle filled with water: For a gentle mist.
Propagation Methods
Let’s get our hands dirty! Here are a couple of tried-and-true methods for Hebenstretia angolensis:
Stem Cuttings
This is my favorite way to go. It’s efficient and yields excellent results.
- Select your cutting: Look for healthy, non-flowering stems that are about 4-6 inches long. You want stems that are somewhat firm but not yet woody. Pinch off any lower leaves.
- Make the cut: Using your clean shears, make a clean cut just below a leaf node. This is where roots are most likely to form.
- Prepare the cutting: Gently remove the remaining leaves from the bottom half of the stem. If the leaves are very large, you can even snip them in half to reduce water loss.
- Apply rooting hormone (if using): Dip the cut end of the stem into the rooting hormone, tapping off any excess.
- Plant the cutting: Fill your small pots with your prepared potting mix. Make a small hole with your finger and insert the cutting, ensuring the leaf nodes are buried. Firm the soil gently around the stem.
- Water gently: Water the soil thoroughly but gently until water drains from the bottom.
Water Propagation (for softer stems)
If you find a softer, more pliable stem, water propagation can be a beautiful way to watch the roots develop.
- Take the cutting: Follow steps 1 and 2 above for selecting and cutting your stem.
- Remove lower leaves: Just as before, remove any leaves that would fall below the water line.
- Place in water: Put the cutting in a clean jar or glass filled with fresh water. Make sure no leaves are submerged – they will rot.
- Find a bright spot: Place the jar in a bright location, but out of direct, harsh sunlight.
- Change water regularly: Refresh the water every few days to keep it clean and oxygenated. You’ll start to see little bumps a week or two later, which will eventually develop into roots.
The “Secret Sauce” (Pro Tips)
Here are a few little tricks I’ve picked up over the years:
- Bottom Heat is Your Friend: For stem cuttings, placing the pots on a gentle heat mat can significantly speed up root development. It mimics the warmth of spring soil and gives those nascent roots a welcome boost.
- Don’t Overwater: This is crucial. Consistently damp, not waterlogged soil is the goal. Too much moisture is the quickest way to invite rot and disappointment. Let the top inch of soil dry out slightly between waterings.
- Humidity is Key for Cuttings: Once you pot your stem cuttings, pop a plastic bag loosely over the pot, or place it inside a clear plastic propagator. This creates a humid microclimate that helps prevent the cuttings from drying out while they’re busy developing roots. Remember to open it for a few minutes each day to allow for air circulation and prevent fungal issues.
Aftercare & Troubleshooting
Once you see evidence of new growth or notice roots emerging from the drainage holes, you’re doing great!
- Transitioning: For water-propagated cuttings, wait until you have a good network of roots (at least an inch or two long) before potting them into soil. For stem cuttings, gentle tugging on the stem – if it resists, roots have formed! Gradually acclimatize your new plants to normal room humidity by opening the plastic bag or dome for longer periods over a week or so.
- Regular Watering: Water your new plant as you would an established one, allowing the top inch of soil to dry out between waterings. Keep it in bright, indirect light.
- Signs of Trouble: The most common issue is rot, which often appears as a mushy, black stem at the soil line. This is usually a sign of overwatering. Sadly, if rot sets in, it’s very difficult to save the cutting. Another sign of stress is wilting or yellowing leaves, which can indicate too much or too little water, or insufficient humidity. Don’t be discouraged if not every cutting makes it; it’s part of the learning process!
Happy Growing!
Propagating Hebenstretia angolensis is a journey of patience and observation. It’s a beautiful way to connect with your plants and multiply the joy they bring. Be gentle, be observant, and most importantly, enjoy the process of watching new life unfurl. Happy gardening!
Resource:
https://identify.plantnet.org/k-world-flora/species/Hebenstretia%20angolensis%20Rolfe/data