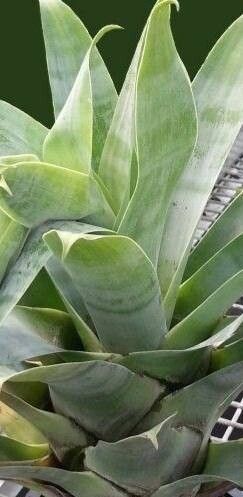
Oh, hello there! Pull up a chair and let’s chat about one of my favorite plant pals: Stigmatodon belloi. If you’re looking for a plant that brings a touch of exotic flair with its gorgeous, almost architectural foliage and delicate blooms, you’ve found it. And the best part? It’s incredibly rewarding to create new life from an established beauty. Now, some folks might warn you that propagating some unique plants can be a bit tricky, but I’ve found Stigmatodon belloi to be surprisingly cooperative. It’s a wonderful project, even for those just dipping their toes into the world of plant propagation.
The Best Time to Start
For the highest chance of success with your Stigmatodon belloi, I always recommend starting in the spring or early summer. This is when the plant is in its most vigorous growth phase. The days are getting longer, the temperatures are warming up, and the plant has plenty of energy to dedicate to developing new roots. Waiting until after the plant has finished its main blooming period is also a good idea, as you’ll be taking cuttings from healthy, non-flowering stems.
Supplies You’ll Need
Gathering your tools beforehand makes the whole process much smoother. Here’s what I like to have on hand:
- Sharp, clean pruning shears or a knife: For making clean cuts that heal well. Sterilize them with rubbing alcohol between uses.
- Rooting hormone (optional but helpful): A powder or gel can give your cuttings a real boost.
- Well-draining potting mix: A blend of perlite, peat moss, and coarse sand works wonders. You can also find specific succulent or cactus mixes.
- Small pots or trays: Clean containers with drainage holes are essential.
- Spray bottle: For keeping your cuttings lightly moist.
- Clear plastic bags or a propagator: To create a humid environment for your cuttings.
Propagation Methods
Stigmatodon belloi is quite obliging, and you can have great success with a couple of straightforward methods.
1. Stem Cuttings: This is my go-to method for this plant.
- First, select healthy, non-flowering stems. Look for stems that are firm and have at least a few leaves.
- Using your sterilized shears, make a clean cut about 3-6 inches from the tip of the stem. Try to cut just below a leaf node – that’s where roots tend to emerge.
- Gently remove the lower leaves from the cutting. Leave at least two sets of leaves at the top.
- If you’re using rooting hormone, dip the cut end into the powder or gel. Just a light coating is needed.
- Now, firmly insert the cut end into your prepared potting mix. Make sure the bottom leaf nodes are buried in the soil.
- Water the soil lightly.
- To create a humid microclimate, you can cover the pot with a clear plastic bag, propped up with a few stakes so it doesn’t touch the leaves, or place it in a propagator.
- Place the pot in a bright spot that receives indirect sunlight. Avoid direct sun, as it can scorch the delicate cuttings.
2. Water Propagation (with caveats!): While possible, I’m a bit more cautious with this for Stigmatodon belloi, as they can be prone to rot if the conditions aren’t just right.
- Take your stem cuttings as described above, ensuring you have at least a couple of leaf nodes.
- Remove all leaves that would be submerged in water.
- Place the cuttings in a clean glass or jar filled with room-temperature water.
- Crucially, ensure no leaves are touching the water’s surface. This is where rot can set in quickly.
- Place the jar in a brightly lit spot without direct sun.
- Change the water every few days to keep it fresh and oxygenated.
The “Secret Sauce” (Pro Tips)
Here are a few little tricks I’ve learned over the years that can really make a difference:
- Use bottom heat: If you have a seedling heat mat, placing your pots on it can significantly speed up root development. The warmth encourages the plant to put its energy into forming roots. Just keep an eye on the moisture levels – it can dry out a bit faster with bottom heat.
- Don’t overwater, especially with stem cuttings: This is probably the biggest mistake beginners make. The soil should be consistently moist, but not soggy. If the cuttings feel mushy or the leaves look yellow and limp, you’re likely drowning them.
- Be patient with the rooting hormone: While rooting hormone is a great aid, don’t be tempted to keep reapplying it. One application is usually enough. Too much can actually inhibit rooting.
Aftercare & Troubleshooting
Once you see signs of new growth, like tiny new leaves or if the cutting resists a gentle tug, it’s a good sign that roots have formed!
- Gradually acclimatize your new plant to less humidity. If it was in a plastic bag, start by opening it for a few hours each day.
- Water sparingly. Allow the top inch of soil to dry out between waterings.
- Keep it in bright, indirect light.
- Common Signs of Trouble: The most frequent issue is rot. If your cutting turns black and mushy, or the leaves start to yellow and fall off, it’s a sign of too much moisture or a general lack of vigor. Sadly, sometimes a cutting is just a dud. Don’t get discouraged; just try again! Another sign of failure is if the cuttings simply shrivel up, which might mean they aren’t getting enough moisture or humidity, or they might be getting too much direct sun.
A Little Encouragement
Watching a new plant sprout from a tiny piece of a parent is truly magical. Be patient with your Stigmatodon belloi cuttings. Not every attempt will be successful, but each one is a learning experience. It’s all part of the wonderful journey of gardening. Enjoy the process, and soon you’ll have a whole collection of these beauties to share! Happy propagating!
Resource: