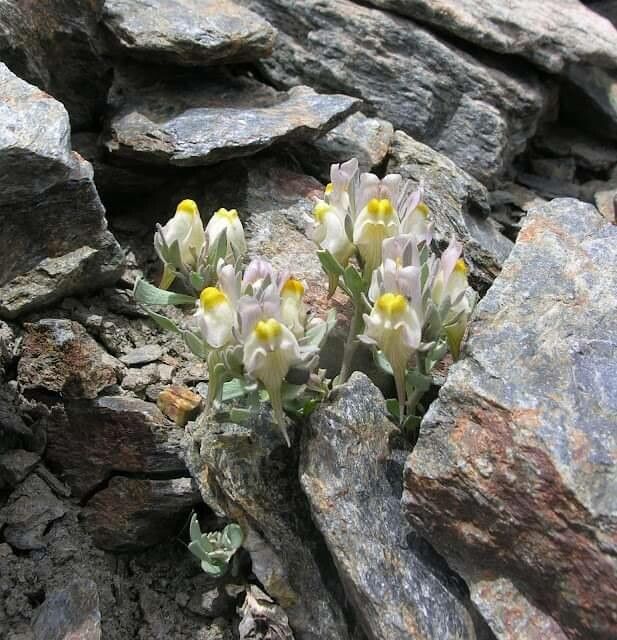
Oh, hello there! It’s lovely to have you join me for a chat about a truly charming little plant: Linaria glacialis. If you’re looking for a splash of delicate, almost ethereal beauty in your garden, this is one you’ll want to get to know. Its tiny, snapdragon-like flowers, often in shades of lilac and white, are simply captivating. And the best part? Bringing more of these beauties into your life through propagation is incredibly rewarding. For those of you just starting your gardening journey, I’d say Linaria glacialis is moderately easy to propagate. It’s not quite as grab-and-go as some, but with a little attention, you’ll be successful.
The Best Time to Start
When it comes to getting your Linaria glacialis on a propagation roll, spring is your golden ticket. Wait until the last frost has safely passed and your plants are actively putting on new growth. This vigorous energy is exactly what we want to harness when taking cuttings. You’ll be looking for those fresh, soft stems rather than woody bits.
Supplies You’ll Need
Gathering your supplies beforehand makes everything so much smoother. Here’s what I always have on hand:
- A sharp, clean pruning shear or razor blade. Cleanliness is key to preventing disease!
- A well-draining seed starting mix or a blend of equal parts peat moss and perlite. We don’t want soggy roots, ever.
- Small pots or trays for your cuttings. Yogurt cups with drainage holes work in a pinch!
- Rooting hormone (optional, but it can give your cuttings a helpful boost).
- A plastic bag or a clear dome to create a humid environment.
- A spray bottle filled with clean water.
Propagation Methods
For Linaria glacialis, stem cuttings are my go-to method. They’re reliable and give you a good chance of success.
- Take Your Cuttings: With your clean shear, snip off 3-4 inch sections of healthy, new growth from your established plant. Make sure each cutting has at least two sets of leaves.
- Prepare the Cuttings: Gently remove the lower leaves from the cutting, leaving just the top two sets. This prevents them from rotting once they’re in the soil. If you’re using rooting hormone, dip the cut end into it now, tapping off any excess.
- Plant Your Cuttings: Fill your pots with your chosen soil mix, moisten it slightly (it should feel like a wrung-out sponge), and then carefully insert the prepared cuttings about an inch deep. Gently firm the soil around them.
- Create a Humid Environment: Place your pots inside a plastic bag (seal it loosely) or cover them with a clear dome. This traps moisture and creates the humid microclimate that cuttings love.
- Provide Bright, Indirect Light: Find a spot that gets good light but avoid direct sun, which can scorch those tender new cuttings.
The “Secret Sauce” (Pro Tips)
Here are a couple of little tricks I’ve picked up over the years that often make a big difference:
- When you place your cuttings in their humid environment, make sure none of the leaves are touching the plastic bag or dome. If they are, the leaves can get a bit too much moisture and start to rot. Just a little bit of air circulation around them makes them happier.
- If you have a propagation mat or can place your pots on top of your refrigerator, a little bit of gentle bottom heat can really speed things up. It mimics the warmth of spring soil and encourages those roots to get going. Don’t go too hot, though – just a gentle warmth is perfect.
Aftercare & Troubleshooting
Once your cuttings are planted, water them sparingly. You want the soil to stay consistently moist but never waterlogged. The humidity inside the bag will do most of the watering for you.
You’ll know your cuttings are rooting when you see new growth appearing. This can take anywhere from a few weeks to a couple of months, so patience is key! Once they have a good root system (you can gently tug on a cutting; if it resists, it’s rooted), you can gradually acclimate them to normal conditions. This means opening the bag for a few hours each day before removing it entirely.
The most common issue you might run into is rot. If a cutting turns black and mushy, it’s sadly not going to make it. This usually happens due to too much moisture or a lack of air circulation. Don’t be discouraged if a few don’t make it; that’s part of the process! Just try again.
A Encouraging Closing
Propagating Linaria glacialis is a wonderful way to multiply your garden’s charm. It’s a journey of observation and a little bit of hands-on care. Be patient with your new little plants, trust the process, and most importantly, enjoy the magic of growth. Happy gardening!
Resource:
https://identify.plantnet.org/k-world-flora/species/Linaria%20glacialis%20Boiss./data