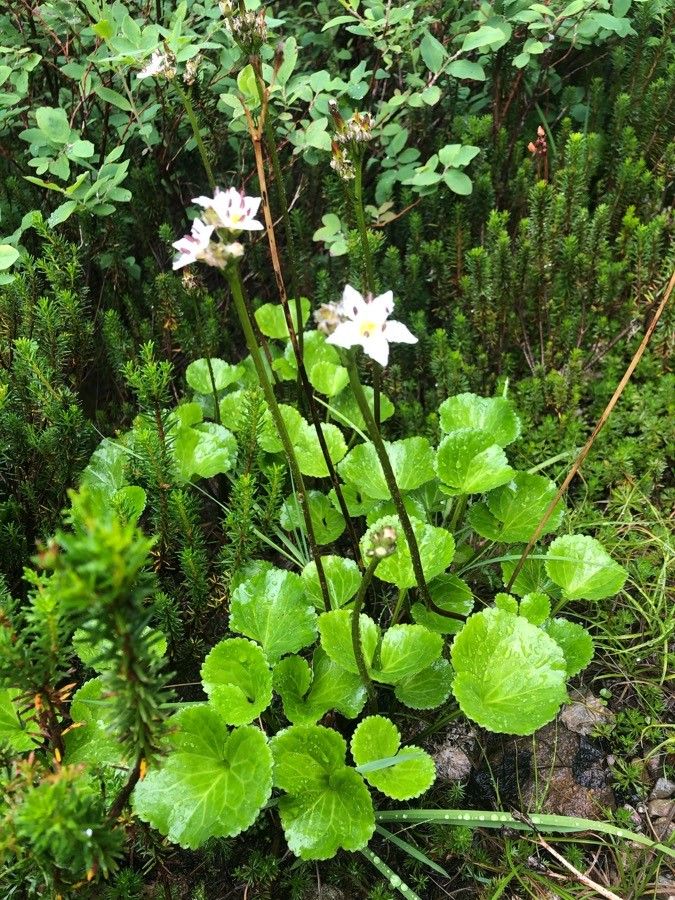
Oh, hello there! Pull up a chair and let’s chat about a truly unique plant: Nephrophyllidium crista-galli. You probably know it by its common name, Rooster Comb Fern. Isn’t it just striking? That ruffled, almost architectural frond with its vibrant green hues really turns heads. And the best part? You can easily multiply this beauty for your own garden or to share with fellow plant lovers. It’s a really rewarding project, even for those just dipping their toes into the world of plant propagation.
The Best Time to Start
For Rooster Comb Fern, timing is a big part of success. I find the absolute best time to propagate is during its active growing season. For most folks, that means late spring right through the summer. You want to work with healthy, vigorous plant material. Trying to propagate when the plant is stressed or slowing down just sets you up for disappointment. Look for new, unfurling fronds – they’re full of life and ready to get started on their own adventure.
Supplies You’ll Need
Gathering your tools before you begin always makes the process so much smoother. Here’s what I like to have on hand:
- Sharp Pruning Shears or a Clean Knife: For making clean cuts.
- Well-Draining Potting Mix: A good blend of peat moss, perlite, and a bit of orchid bark works wonderfully. I often use a mix specifically designed for ferns.
- Small Pots or Seed Starting Trays: Whatever you prefer for housing your new cuttings. Make sure they have drainage holes!
- Rooting Hormone (Optional but helpful): Especially for stem cuttings.
- Clear Plastic Bags or a Propagation Dome: To maintain humidity.
- Watering Can with a Fine Rose: For gentle watering.
Propagation Methods
Rooster Comb Fern is pretty obliging, and I’ve had great success with a couple of methods.
Division (My Personal Favorite!)
This is often the easiest and most successful method for Rooster Comb Fern.
- Gently Remove from Pot: Carefully take the mother plant out of its container.
- Examine the Root Ball: Look for natural divisions. You’ll often see clumps of rhizomes (those thick, creeping stems) with fronds emerging from them.
- Separate the Divisions: Using your hands or a clean knife, gently pull or cut apart the larger clumps. Aim for divisions that have at least a few healthy fronds and some intact roots.
- Pot Up: Plant each division in its own pot filled with your well-draining potting mix. Don’t plant them too deep; the top of the root ball should be just at the soil surface.
- Water Gently: Water thoroughly until water drains from the bottom.
Stem Cuttings
This method works well if you have a particularly robust plant.
- Select a Healthy Stem: Choose a healthy, mature frond that’s emerging from the rhizome.
- Make the Cut: Using your sharp shears, cut the stem as close to the rhizome as possible.
- Apply Rooting Hormone (Optional): If you’re using rooting hormone, dip the cut end into it.
- Plant the Cutting: Insert the cut end about an inch deep into your prepared potting mix.
- Water and Cover: Water gently and cover the pot with a clear plastic bag or propagation dome to keep the humidity high.
The “Secret Sauce” (Pro Tips)
Now, a couple of little things I’ve learned over the years that can really make a difference.
- Don’t Let the Fronds Touch the Water (If Water Propagating): While some plants are happy to root in water, I’ve found Rooster Comb Fern is much happier in soil. If you are ever tempted to try water, ensure the cut stem is submerged, but not the fronds themselves. They can rot if they sit in water for too long.
- Bottom Heat is Your Friend: For stem cuttings, a little warmth from below can really speed things up. A heated propagator mat or placing your pots on top of a warm appliance (like a gently running refrigerator) can encourage root development. Just make sure it’s not too hot.
- Humidity is Key, But Not Soggy: While new cuttings and divisions need high humidity to prevent drying out, they don’t want to sit in soggy soil. That’s a fast track to rot. The plastic bag or dome creates that microclimate, but I always give mine a little airing out every few days.
Aftercare & Troubleshooting
Once your new Rooster Comb Ferns have started to show signs of life – think new frond growth – it’s time to ease them into their new routine.
- Gradually Acclimate: Slowly increase the time you leave the plastic bag off or the propagation dome open to help them adjust to normal room humidity.
- Water Consistently: Keep the soil consistently moist but not waterlogged. It will start to feel like you know your plant’s needs with practice.
- Bright, Indirect Light: Place them in a bright spot that doesn’t get direct afternoon sun, which can scorch young leaves.
What if things go wrong? The most common issue is rot. If your cutting turns mushy and black, or if a division’s fronds suddenly wilt and yellow and turn to slime, it’s usually a sign of too much moisture and poor air circulation. If you catch it early, you might be able to salvage a healthy part, but often it means starting over.
A Encouraging Closing
Propagating plants is an act of hope and a little bit of magic. Don’t be discouraged if your first attempt isn’t perfect. Each plant is a learning experience, and the reward of seeing a new Rooster Comb Fern unfurl its delicate fronds, knowing you helped it grow, is just wonderful. Be patient, enjoy the process, and happy gardening!
Resource: