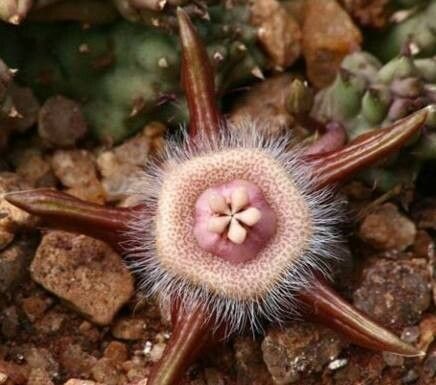
Hey there, fellow plant lovers! I’m so excited to chat with you today about a little gem that’s a real treasure in my collection: Duvalia corderoyi. If you’re looking for a succulent that’s a bit off the beaten path, with those fascinating, star-shaped, almost alien-looking flowers, then you’ve come to the right place. Propagating Duvalia corderoyi is incredibly rewarding, and while it might seem a tad intimidating at first, I promise you, it’s a journey absolutely worth taking. For beginners, it’s a fantastic plant to practice with – it’s quite forgiving!
The Best Time to Start
When it comes to getting your Duvalia corderoyi off to a good start, spring and early summer are your best friends. This is when the plant is naturally in its active growth phase. You’ll find it’s putting out fresh stems and generally bursting with vitality. Starting your propagation efforts during this time means your new babies will have the entire growing season to establish themselves.
Supplies You’ll Need
Gathering your supplies beforehand makes the entire process so much smoother. Here’s what you’ll want to have on hand:
- Well-draining potting mix: I usually go for a 50/50 blend of perlite and a good quality succulent or cactus soil. You can also add a bit of coarse sand.
- Sharp, sterilized pruning shears or a clean knife: For taking cuttings. Sterilize them with rubbing alcohol to prevent spreading any funk.
- Rooting hormone (optional but recommended): This can give your cuttings a healthy boost.
- Small pots or trays: Clean and with drainage holes! This is crucial.
- A spray bottle: For misting.
- Optional: A heat mat: If you find your space is a bit on the cooler side.
Propagation Methods
Duvalia corderoyi is wonderfully adaptable, but I find the most reliable method to be stem cuttings. It’s straightforward and usually yields great results.
- Take Your Cuttings: Gently twist or cut a healthy stem from your mature Duvalia corderoyi. Aim for a section that’s at least 2-3 inches long, with a few leaves or nodes.
- Let Them Callus: This is a super important step for succulents! Place your cuttings on a clean surface in a dry, well-ventilated spot, away from direct sunlight, for 2-5 days. You want the cut end to dry and form a callus. This prevents rot when you plant them. It looks like a little dry scab.
- Prepare the Pots: Fill your small pots with your well-draining potting mix.
- Plant the Cuttings: Once callused, you can dip the cut end in rooting hormone, if you’re using it. Then, gently insert the callused end into the potting mix. You don’t need to push it too deep, just enough for it to stand upright.
- Initial Watering: Give the soil a very light mist or a tiny bit of water. You don’t want to drench it. The goal is to provide just enough moisture to encourage roots to form.
The “Secret Sauce” (Pro Tips)
Over the years, I’ve learned a few little tricks that make a big difference.
- Don’t overwater right away. I know it’s tempting, but let those callused ends do their thing. Wait until you see some minor signs of wrinkling on the cutting before giving it a light watering. It’s better to underwater a bit than to overwater and invite rot.
- Warmth is key. If you’re lucky enough to have a greenhouse, fantastic! If not, placing your pots on a propa-gator or a heat mat on a low setting can really speed up root development. It mimics that lovely warmth the plant enjoys.
- Be patient with the leaves. If your cutting has smaller leaves, don’t worry if they seem to dry up a bit. The plant is essentially using the energy stored in those leaves to push out roots. It’s all part of the process!
Aftercare & Troubleshooting
Once your cuttings have been in their pots for a few weeks, give them a gentle tug. If you feel resistance, congratulations – you’ve got roots!
Now, you can treat them pretty much like a mature Duvalia corderoyi, but with a bit more tenderness. Water sparingly when the soil is dry to the touch, and provide bright, indirect light. As they grow stronger, you can gradually introduce them to more direct sunlight.
The main thing to watch out for is rot. If a cutting turns mushy, black, or smells foul, it’s a sure sign of rot. This usually happens from too much moisture and poor air circulation. If you see this, sadly, it’s best to discard the affected cutting and to check your watering habits and soil drainage for the others.
A Little Encouragement
Starting new plants from cuttings is such a magical experience. It’s a tangible way to connect with the life cycle of your plants. There will be times when things don’t go perfectly, and that’s okay! Every gardener has had cuttings that just haven’t made it. Just keep at it, learn from each attempt, and enjoy the journey of nurturing those tiny beginnings into something beautiful. Happy propagating!
Resource:
https://identify.plantnet.org/k-world-flora/species/Duvalia%20corderoyi%20(Hook.f.)%20N.E.Br./data