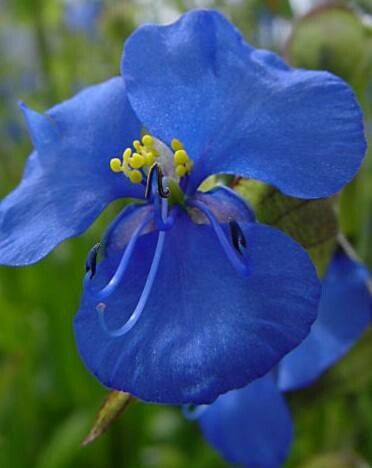
Hello fellow plant enthusiasts! I’m so excited to chat with you today about one of my favorite, often overlooked treasures: Commelina tuberosa, also known as the Tuberous Dayflower. If you haven’t had the pleasure, imagine delicate, sky-blue flowers gracing your garden beds or hanging baskets, appearing like little bursts of happiness throughout the summer. They’re surprisingly low-maintenance and, best of all, incredibly easy to propagate. So easy, in fact, that I’d say they’re a fantastic choice for anyone just dipping their toes into the wonderful world of plant multiplication!
The Best Time to Start
For me, the sweet spot for propagating Commelina tuberosa is late spring to early summer. This is when the plant is in its most vigorous growth phase, meaning it’s full of energy and ready to put out new shoots and roots. You can often get away with propagating later in the summer, but starting a bit earlier gives your new babies plenty of time to establish themselves before the cooler weather arrives.
Supplies You’ll Need
You won’t need a whole lot of fancy equipment to get started. Here’s what I usually have on hand:
- Sharp Pruning Shears or Scissors: Cleanliness is key to prevent disease.
- Well-Draining Potting Mix: A standard potting mix with added perlite or vermiculite works beautifully. I like to make my own by mixing equal parts potting soil, perlite, and a touch of compost.
- Small Pots or Trays: Enough to house your cuttings. Yogurt cups with drainage holes poked in the bottom work in a pinch!
- Rooting Hormone (Optional but helpful): This isn’t strictly necessary for Commelina tuberosa, but it can give your cuttings a little extra boost.
- Watering Can or Spray Bottle: For gentle watering.
- Labeling Sticks: To keep track of what you’ve planted.
Propagation Methods
Lucky for us, Commelina tuberosa is a breeze to propagate through a couple of very straightforward methods.
Stem Cuttings
This is my go-to method for multiplying these beauties.
- Take Your Cuttings: Look for healthy, non-flowering stems. Using your sharp shears, take cuttings that are about 4-6 inches long. Make sure each cutting has at least 2-3 sets of leaves.
- Prepare the Cuttings: Gently remove the lower leaves from the bottom half of the cutting. This prevents them from rotting when they are in the soil or water.
- Apply Rooting Hormone (Optional): If you’re using rooting hormone, dip the cut end of the stem into it.
- Planting:
- In Soil: Make a small hole in your prepared potting mix with your finger or a pencil. Insert the cut end of the stem into the hole, ensuring the nodes (where the leaves were removed) are below the soil surface. Gently firm the soil around the cutting.
- In Water: Place the prepared cuttings in a jar or glass of clean water. Make sure the nodes are submerged but no leaves are touching the water.
- Water Gently: Water the cuttings thoroughly if planted in soil, or ensure the water level in the jar is sufficient.
Division
If you have a larger, established clump of Commelina tuberosa, division is a fantastic way to get more plants.
- Gently Excavate: Carefully dig up the entire plant.
- Separate the Roots: Gently tease apart the root ball. You’ll often find separate sections that can be easily divided. Each section should have some roots and at least one healthy stem or growing point.
- Replant: Plant the divided sections directly into your garden or into pots filled with well-draining potting mix.
The “Secret Sauce” (Pro Tips)
You know, sometimes it’s the little things that make all the difference. Here are a couple of my favorite tricks for Commelina tuberosa propagation:
- Don’t Overcrowd Your Water Cuttings: I’ve found that if the leaves of multiple cuttings are touching in the water, it can encourage rot. Give them a little breathing room! Change the water every few days to keep it fresh.
- Embrace a Little “Warmth”: While not strictly essential, these cuttings love a bit of warmth from below. If you have a propagation mat or can place your pots on a warm windowsill (away from direct, scorching sun), it can really speed up root development. It’s like a little spa treatment for your cuttings!
Aftercare & Troubleshooting
Once your cuttings have been planted (or placed in water), keep them in a bright spot but out of direct, harsh sunlight.
- For Water Cuttings: You’ll start to see roots forming in a few weeks. Once the roots are about an inch or two long, it’s time to transplant them into pots with well-draining soil.
- For Soil Cuttings: Keep the soil consistently moist but not waterlogged. A good way to check is to feel the top inch of soil. If it’s dry, give it a gentle watering. You should see new leaf growth appearing within a couple of weeks, which is a good sign that roots are developing.
The most common issue you might encounter is rot. This usually happens if the cuttings are kept too wet or if those lower leaves are left to sit in water. If you see a cutting turning black or mushy, unfortunately, it’s best to discard it to prevent it from affecting others. Don’t get discouraged, though! It happens to the best of us, and Commelina tuberosa is so generous, you’ll likely have plenty of other cuttings to try again with.
A Little Encouragement to Finish
Nurturing new life from something as small as a cutting is one of the most rewarding aspects of gardening. Be patient with your little Commelina tuberosa propagations. They might seem slow at first, but with a little bit of care and a lot of encouragement, you’ll soon have a whole new collection of these gorgeous blue wonders. Happy propagating!
Resource:
https://identify.plantnet.org/k-world-flora/species/Commelina%20tuberosa%20L./data