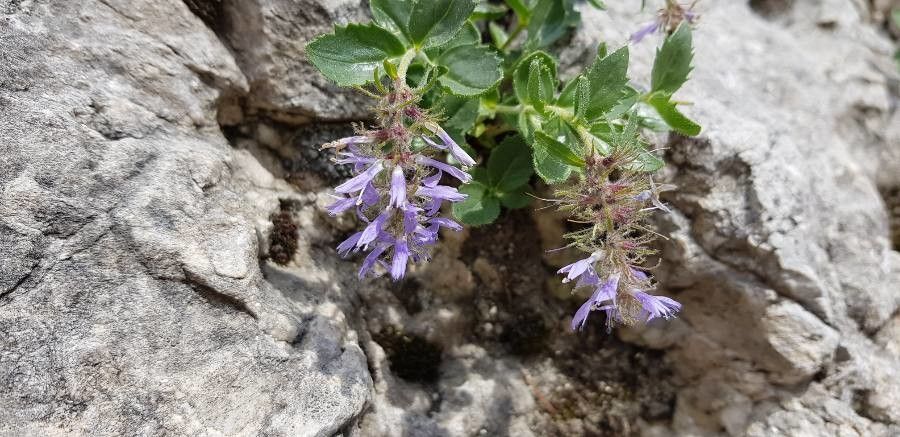
Oh, hello there! Pull up a chair and let’s talk about a truly special little plant: Phyteuma cordatum, or the Heartleaf Rampion. If you’ve ever seen this beauty in a garden, you’ll know exactly why I’m so excited to share how to grow more of it. Its delicate, unique flower spikes are just captivating, and there’s something so incredibly satisfying about taking a piece of a plant you love and turning it into a whole new one. Now, I won’t sugarcoat it – Phyteuma cordatum isn’t the absolute easiest plant for a complete novice to propagate, but with a little attention and following these steps, I have no doubt you can achieve success. The rewards are so worth it!
The Best Time to Start
Timing is everything, isn’t it? For Phyteuma cordatum, your best bet is to take cuttings in late spring to early summer. This is when the plant is actively growing and has plenty of youthful energy. You’re looking for new, non-flowering shoots. If you try to take cuttings from older, woody stems, they’re much less likely to root. Think “tender and keen to grow,” and you’re on the right track.
Supplies You’ll Need
Gathering your supplies before you start makes the whole process so much smoother. Here’s what I like to have on hand:
- Sharp, clean pruning shears or a sharp knife: For making nice, clean cuts. Dull tools can damage the stems.
- A good quality, free-draining potting mix: I usually mix about two parts perlite or coarse sand with one part peat moss or coco coir. You want something that drains well to prevent rot.
- Small pots or seedling trays: Whatever you have that’s clean and offers good drainage.
- Rooting hormone powder (optional but recommended): This can give your cuttings a little boost.
- A clear plastic bag or a propagation dome: To help maintain humidity.
- A spray bottle with water: For misting.
Propagation Methods
Phyteuma cordatum is generally best propagated by stem cuttings. It’s a reliable method, and here’s how we’ll do it:
Taking the Cuttings
- Select your plant: Find a healthy Phyteuma cordatum that’s not flowering right now.
- Make the cut: Using your clean shears or knife, take a cutting that is about 4-6 inches long. Make the cut just below a leaf node – that’s where the little bumps are on the stem where leaves or roots can emerge.
- Prepare the cutting: Gently remove the lower leaves from the cutting. Leave just a few leaves at the top. This reduces moisture loss and directs the plant’s energy into rooting, not leaf production. If the leaves are quite large, you can even cut them in half to further reduce water loss.
Getting Them Rooted
- Apply rooting hormone (optional): If you’re using rooting hormone, lightly dip the cut end of the stem into the powder, tapping off any excess.
- Plant the cuttings: Lightly moisten your potting mix. Then, make a small hole in the mix with a pencil or your finger. Insert the cutting into the hole, ensuring the nodes that had leaves removed are buried in the soil. Gently firm the soil around the stem.
- Water gently: Water the pot lightly from the top. You want the soil to be moist but not waterlogged.
- Create a humid environment: Place the pots into a clear plastic bag or cover them with a propagation dome. This creates a mini-greenhouse effect, keeping the humidity high. Make sure the leaves aren’t touching the plastic; if they are, prop the bag up slightly.
- Provide bright, indirect light: Place the pots in a spot that gets plenty of bright light but no direct, scorching sun. A bright windowsill that doesn’t get direct afternoon sun is usually perfect.
The “Secret Sauce” (Pro Tips)
Here are a couple of little tricks I’ve picked up over the years that really make a difference:
- Bottom heat is your friend: While not absolutely essential, placing your pots on a gentle heating mat can significantly speed up root formation. It mimics the warmth of spring soil and encourages those roots to grow the moment they’re ready. Just make sure the heat isn’t too intense – lukewarm is what we’re aiming for.
- Don’t be overzealous with watering: It’s tempting to keep misting and watering, but let the surface of the soil dry out slightly between waterings. It’s far better to have slightly dry soil than waterlogged soil, which is a surefire way to invite rot. You can always give it a gentle mist if the leaves start to look a bit puckered.
Aftercare & Troubleshooting
Once your cuttings have been in their little humid environment for a few weeks, gently tug on them. If you feel resistance, congratulations! You’ve got roots!
- Acclimatize them: Begin by slowly removing the plastic bag or propagation dome for longer periods each day. This helps the new plant adjust to normal room humidity.
- Continue bright, indirect light: Keep them in a bright spot.
- Regular watering: Water when the top inch of soil feels dry.
- Potting up: Once they have a good root system and are showing new growth, you can transplant them into slightly larger individual pots with your regular well-draining potting mix.
Now, let’s talk about things that can go wrong. The biggest culprit is rot. If your cutting turns mushy, black, and seems to be dissolving, that’s rot. This is usually caused by too much moisture and poor drainage. If you see this, unfortunately, that cutting is likely lost. Another sign of trouble is wilting that doesn’t perk up after misting. This could mean it’s too dry, or potentially that the cutting simply didn’t take. Don’t get discouraged if a few don’t make it; it’s part of the learning process!
A Little Seed of Encouragement
Propagating Phyteuma cordatum is a journey, and like all good garden journeys, it requires a bit of patience and a lot of love. Don’t fret if your first attempts aren’t perfect. Each time you try, you’ll learn something new and get a better feel for what your plants need. Enjoy the process of nurturing these new life forms, and soon you’ll be admiring your own little patch of Heartleaf Rampion! Happy growing!
Resource:
https://identify.plantnet.org/k-world-flora/species/Phyteuma%20cordatum%20Balb./data