Hello fellow plant lovers! Today, we’re diving into the fascinating world of Conophytum breve. If you’re drawn to these quirky, jewel-like succulents that resemble tiny, colorful pebbles, then you’re in for a treat. Propagating them is not just about getting more plants; it’s about understanding their unique needs and celebrating their resilience. While they might seem a little delicate, with a bit of care and patience, propagating these little wonders can be incredibly rewarding, even for newer gardeners.
The Best Time to Start
For Conophytum breve, the ideal time to propagate is during their active growing season, which is typically autumn and spring for these mesembs. You’ll see them plump up and show new growth then. Waiting until they’ve naturally started to divide or form offsets is key. Trying to propagate when they’re dormant in summer or deep winter is far less likely to succeed.
Supplies You’ll Need
Here’s what you’ll want to have on hand before you get started:
- Well-draining Cacti & Succulent Potting Mix: Think gritty! A good blend is 50% coarse sand and 50% standard succulent mix, or even a coarser mix with perlite or pumice.
- Sharp Pruning Shears or a Clean Knife: For making precise cuts. Sterilize them with rubbing alcohol between uses.
- Rooting Hormone (Optional but Recommended): A powdered rooting hormone can give your cuttings a little extra boost.
- Small Pots or Seed Trays: Terracotta pots are excellent as they allow the soil to dry out faster.
- Gravel or Small Pebbles: For top dressing and helping to keep the base of the plant dry.
- Watering Can with a Fine Rose: For gentle watering.
- Patience! This is the most crucial ingredient.
Propagation Methods
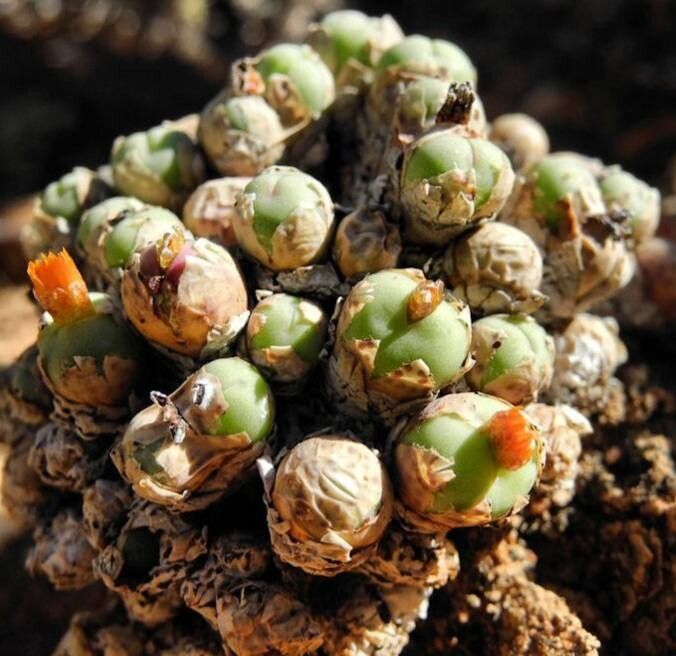
The most common and successful way to propagate Conophytum breve is through division. These plants naturally form clumps, and separating these offsets is like having their permission to create new babies!
- Gently Remove from Pot: Carefully ease your Conophytum breve from its pot. You might need to tap the sides gently.
- Inspect the Roots: Look for where the plant has naturally divided. You’ll often see a clear separation between the body parts or where roots have emerged from a point connecting two larger clumps.
- Make the Cut: Using your sterilized shears or knife, carefully separate the offset. Try to get a piece that has some roots attached. If an offset doesn’t have easily visible roots, don’t worry too much; they can often root from a clean cut.
- Allow to Callus (Crucial Step!): This is vital for preventing rot. Place the separated offset on a dry surface (like a paper towel) in a warm, dry, and well-ventilated spot for 2-7 days. You want the cut end to develop a dry, sealed callus. The duration depends on humidity – more humid environments might need longer.
- Planting: Once callused, lightly press the bottom of the offset into your prepared potting mix. Don’t bury it too deeply; just enough so it stands upright. You can add a little gravel around the base for support.
- Rooting – The Waiting Game: Do not water immediately. Wait at least another week, preferably longer, before your first gentle watering. Initially, you’re just encouraging root development, not trying to stimulate rapid growth.
The “Secret Sauce” (Pro Tips)
Here are a few things I’ve learned over the years that make a big difference:
- The “Don’t Forget They’re Dry” Method: When you do water for the first time after planting, water sparingly. I like to water from the bottom if possible, allowing the soil to wick up just enough moisture. Overwatering at this stage is the fastest way to lose your new babies to rot.
- Embrace the Warmth: While they grow actively in spring and fall, providing a bit of gentle bottom heat during propagation can really speed up root formation. A seedling heat mat set to a low temperature (around 70-75°F or 21-24°C) is perfect.
- The “Feel it” Test: After a few weeks of waiting, give your offset a gentle tug. If you feel any resistance, that’s a good sign roots are forming. If it comes away easily, it hasn’t rooted yet, and it’s best to put it back and wait more.
Aftercare & Troubleshooting
Once your Conophytum breve has established roots (you’ll see it plump up nicely and it will resist that gentle tug), you can start treating it like an adult. Water only when the soil is completely dry, which might be every few weeks, depending on conditions. Provide bright, indirect light.
The most common issue you’ll encounter is rot. This is almost always due to overwatering, especially before roots have formed. Signs of rot include a mushy, discolored base and a generally sad-looking plant. If you spot this, act fast: remove the plant immediately, cut away all rotted material, and let the healthy part callus over again before attempting to reroot. Sometimes, it’s simply a matter of the offset not taking, and that’s okay! Not every cutting will succeed, and that’s part of the learning process.
So there you have it! Propagating Conophytum breve is a beautiful journey into the tiny world of succulents. Be patient, observe your plants closely, and enjoy the magic of watching them multiply. Happy growing!
Resource:
https://identify.plantnet.org/k-world-flora/species/Conophytum%20breve%20N.E.Br./data