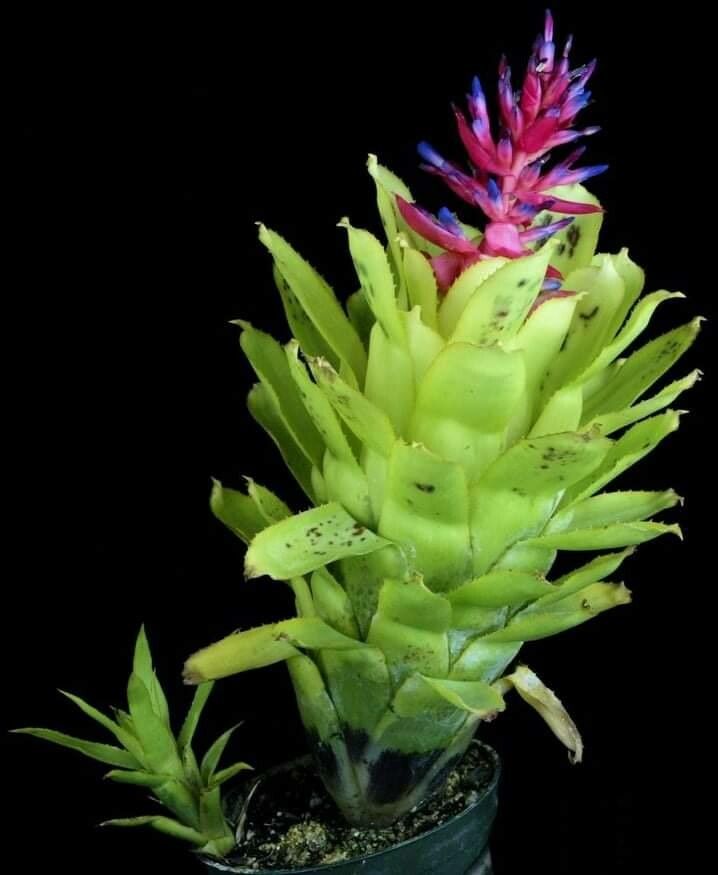
Oh, Quesnelia tubifolia! What a stunner of a bromeliad. If you’ve ever seen one of these beauties in a botanical garden or a well-established collection, you’ll know what I mean. Those gorgeous, tubular leaves that form a perfect rosette, often with hints of burgundy or pink – they just have a certain elegance, don’t they?
Propagating them is a truly rewarding experience. It’s like unlocking a little secret, watching a new plant emerge from what was once just a part of its parent. It allows you to expand your collection without breaking the bank, and there’s a special satisfaction in nurturing something from its very beginnings. Happily for us, Quesnelia tubifolia is generally quite agreeable when it comes to propagation, making it a nice project even for those of you just starting your bromeliad adventure.
The Best Time to Start
Timing is always key in gardening, isn’t it? For Quesnelia tubifolia, the spring and early summer months are your sweet spot. This is when the plant is actively growing, meaning it has plenty of energy to put into developing roots and new shoots. You’ll often find the most pups (those baby plants that emerge from the base) appear during this period of vigorous growth. Waiting until the plant is clearly thriving after its main growing season will give you the best chance of success.
Supplies You’ll Need
Before we dive in, let’s make sure you’re armed with the right gear. Nothing too fancy, just the basics:
- Sharp, clean pruning shears or a sturdy knife: For making clean cuts and minimizing damage.
- A well-draining potting mix: Think orchid bark, perlite, and a bit of peat moss. Bromeliads hate soggy feet!
- Small pots or containers: Terracotta pots are great as they allow the soil to breathe.
- Rooting hormone (optional but recommended): A little boost can speed things along.
- Plastic bags or a clear propagation dome: To create a mini-greenhouse effect.
- A spray bottle: For misting.
- Gloves (optional): Bromeliads can have spiky edges!
- A soft brush: To gently clean away old debris.
Propagation Methods
For Quesnelia tubifolia, the most successful way is usually by dividing pups. This plant is a prolific producer of these little offsets, so you’ll likely have opportunities to try this method.
- Locate the Pups: Gently examine the base of your mature Quesnelia tubifolia. You’re looking for those small, baby plants that have emerged from the mother plant. They’ll usually have their own tiny leaves.
- Gently Loosen the Soil: If the pup is still attached, you might need to carefully tease away some of the soil around its base to get a better look at where it connects to the parent plant.
- Sever the Connection: This is the most crucial step! Using your sharp, clean shears or knife, you want to make a clean cut as close to the mother plant as possible, ensuring the pup has some of its own roots attached. If a pup has no visible roots, don’t fret too much; it can often root from scratch, but it’s a bonus if it already has some.
- Prepare the Pup: If the pup has any brown, dead leaf bases, gently remove them with your fingers or the brush. This helps prevent rot. If you’re using rooting hormone, dip the cut end of the pup into it.
- Potting Up: Fill your small pot with your well-draining bromeliad mix. Make a small hole in the center and place the pup in, firming the mix gently around its base. You want to ensure it’s stable.
The “Secret Sauce” (Pro Tips)
Here are a few little tricks I’ve learned over the years that can really make a difference:
- Don’t Over-Water the New Pups: This is probably the most common mistake. New plants are susceptible to rot. Water just enough to keep the potting mix barely moist, not soggy. Think of it as a gentle pat of hydration, not a drowning.
- Embrace the Humidity: Bromeliads love a humid environment. After potting, I like to place the pot inside a clear plastic bag or a propagation dome. Seal it loosely or leave a small opening for air circulation. This creates a humid microclimate that encourages root development. You might mist the inside of the bag lightly occasionally.
- Patience is a Virtue (and So is Warmth): Quesnelia tubifolia pups can take their time to establish. Don’t be discouraged if you don’t see new growth immediately. A little gentle warmth can also speed things up. Placing your propagation setup on a heat mat (available at garden centers) set to a low temperature (around 70-75°F or 21-24°C) can be a real game-changer.
Aftercare & Troubleshooting
Once your pup has started to show signs of new growth – a tiny new leaf unfurling in the center is a great indicator! – you can begin to gradually reduce the humidity. Start by opening the bag or dome for a few hours each day. Eventually, you can remove it altogether. Continue to water sparingly, allowing the potting mix to dry out slightly between waterings.
The most common issue you might encounter is rot. This usually happens if the potting mix is too wet or if you have poor air circulation. If you notice the leaves turning mushy and brown, or if the base of the pup becomes soft, it’s a sign of rot. There’s not much you can do once rot sets in, unfortunately. This is why preventing it with good drainage and careful watering is so important. Another sign of a struggling pup is just a general lack of interest – no new growth, and the leaves might start to look a bit limp. This often points back to watering issues or inadequate light.
A Encouraging Closing
So there you have it! Propagating Quesnelia tubifolia is a journey worth taking. Remember to be patient with your little ones. Nature has its own schedule, and with a little care and attention, you’ll be rewarded with beautiful new plants to admire and share. Happy propagating!
Resource: