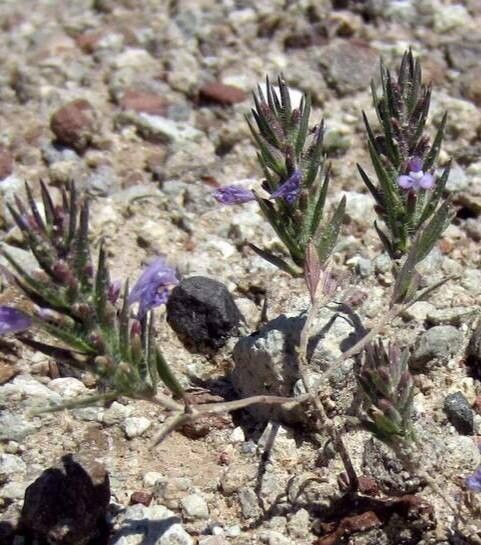
Hey there, fellow garden enthusiasts! It’s so good to be chatting with you today from my little patch of green. We’re diving into a truly delightful herb: Ziziphora tenuior. If you haven’t met this little gem, imagine tiny, fragrant leaves with delicate whorls of purple-blue flowers that attract all sorts of buzzing friends. It’s an absolute charmer for borders, pots, or even that herb spiral you’ve been dreaming of. And the best part? Propagating it is incredibly rewarding, and honestly, quite doable even for those just starting their gardening journey.
The Best Time to Start
For the absolute best chance of success with Ziziphora tenuior, I find that late spring or early summer is your golden ticket. Think of it as when the plant is really hitting its stride, full of vigorous new growth. This is when you’ll find those perfect, semi-hardened stems that are neither too soft and floppy nor too woody. Waiting until after the main flowering flush can also be a good time, as the plant is putting energy back into its stems.
Supplies You’ll Need
Before we get our hands dirty, let’s gather our tools. Here’s what I always have on hand for a propagation session:
- Sharp Pruning Shears or a Craft Knife: Clean cuts are key!
- Rooting Hormone (optional but helpful): A good quality powder or gel.
- Seed Starting Mix or a Perlite/Peat Moss Blend: We want something light and airy that drains well.
- Small Pots or Trays: Clean, of course. Old yogurt cups with drainage holes work wonders.
- Watering Can with a Fine Rose: To avoid disturbing newly planted cuttings.
- Plastic Bags or a Propagator Lid: To create a humid environment.
- Labels and a Marker: Trust me, you’ll thank yourself later!
Propagation Methods
Ziziphora tenuior is wonderfully adaptable when it comes to making more of it. I’ve had great luck with a couple of methods, and I think you will too.
Stem Cuttings – My Go-To
This is my absolute favorite way to multiply Ziziphora. It’s efficient and often gives you a whole new plant that’s genetically identical to the parent.
- Take the Cuttings: On a bright, but not scorchingly hot, morning, select healthy, non-flowering stems. Look for new growth that’s a bit firm but still flexible – you don’t want anything that snaps easily or is still very soft. Aim for cuttings about 3 to 4 inches long.
- Prepare the Cuttings: Using your clean pruning shears or craft knife, make a clean cut just below a leaf node (where a leaf attaches to the stem). Gently remove the lower leaves, leaving just a couple of sets at the top. This prevents them from rotting in the soil or water.
- Apply Rooting Hormone (Optional): If you’re using it, dip the cut end of the stem into the rooting hormone, tapping off any excess.
- Pot Them Up: Fill your small pots or trays with your prepared, moistened seed starting mix. Make a little hole in the center with your finger or a pencil.
- Plant the Cuttings: Insert the prepared end of each cutting into the hole, ensuring the leaf nodes are below the soil surface. Gently firm the soil around the base of the cutting.
- Create a Humid Environment: Water them lightly. Then, cover the pots with a plastic bag, securing it around the rim with a rubber band, or place them inside a propagator with a lid. This traps moisture and prevents the cuttings from drying out while they try to root.
- Find a Good Spot: Place the pots in a bright location that gets indirect light. Avoid direct sun, which can scorch the delicate cuttings.
Water Propagation – The Visual Method
This is a bit more hands-on in terms of observation, and I love seeing the roots develop!
- Gather Healthy Stems: Similar to cuttings, take 3-4 inch pieces of healthy, non-flowering growth.
- Remove Lower Leaves: Just like with soil propagation, clear off the leaves from the bottom half of the stem.
- Place in Water: Find a small glass or jar and fill it with fresh water. Crucially, make sure none of the leaves are submerged in the water. Leaves sitting in water will just rot and hinder rooting.
- Find a Bright Spot: Place your jar in bright, indirect light.
- Change Water Regularly: Change the water every few days to keep it fresh and prevent bacterial growth.
The “Secret Sauce” (Pro Tips)
After years of trial and error, I’ve picked up a few tricks that seem to make all the difference:
- Bottom Heat is Your Friend: If you have it, using a heated propagator mat or placing your pots on top of a warm appliance can significantly speed up root development. It mimics the warmth of spring soil and really encourages those roots to kick into gear.
- Don’t Over-Water: This is a killer for many cuttings. While they need humidity, soggy soil leads to rot. Your seed starting mix should feel like a wrung-out sponge – damp, but not waterlogged. I like to water from the bottom if possible, letting the pot soak up what it needs.
- Patience with the Pruning: When you take cuttings, err on the side of slightly older, more semi-hardened wood. The really fresh, floppy stuff can be too prone to rot. You want a stem that has a little bit of give but won’t break when you bend it gently.
Aftercare & Troubleshooting
Once you start to see new growth, or a gentle tug on a cutting reveals that it’s firmly anchored, you’re in business!
- Gradual Acclimation: If you’ve used a plastic bag or propagator, gradually remove the cover over a few days to let your new plants get used to the ambient humidity.
- Potting Up: Once they have a decent root system (you might see roots emerging from the drainage holes), carefully transplant them into slightly larger pots using a good quality potting mix.
- Watering: Water them thoroughly after transplanting, and then water as needed, allowing the top inch of soil to dry out between waterings.
- Signs of Trouble: The most common culprit is rot. If your cuttings look brown and mushy at the base, or develop black spots, it’s usually a sign of too much moisture or poor air circulation. If you see this, remove the affected cutting immediately. Yellowing leaves can sometimes indicate a lack of light or a deficiency, but often it’s just the plant adjusting.
A Green Thumb’s Encouragement
Making new plants is such a joyous part of gardening, and Ziziphora tenuior is a wonderfully forgiving plant to practice on. Don’t be discouraged if your first few attempts aren’t perfect. Every gardener has lost a cutting or two! Just keep trying, observe your plants, and enjoy the process of bringing more of this delightful herb into your garden. Happy propagating!
Resource:
https://identify.plantnet.org/k-world-flora/species/Ziziphora%20tenuior%20L./data