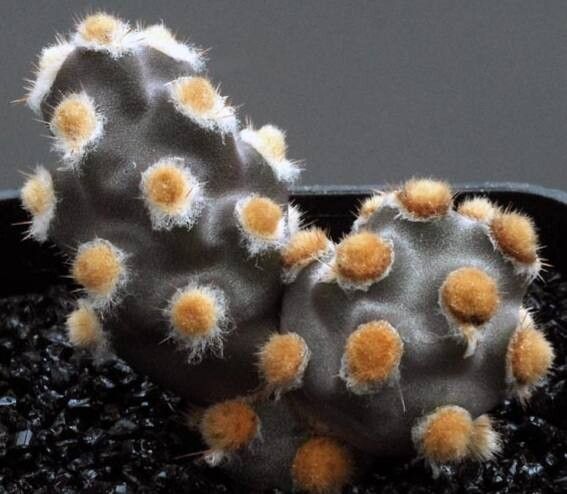
Hey there, fellow plant lovers! I’m so excited to chat with you today about a truly unique cactus: Tephrocactus molinensis. If you’ve ever spotted this prickly beauty with its segmented, almost geometric stems, you know it has a special charm. Propagating it isn’t just about getting more plants; it’s about understanding its quirky nature and celebrating its resilience. For beginners, I’d say Tephrocactus molinensis is moderately easy. It’s not going to fight you every step of the way, but it does appreciate a little know-how.
The Best Time to Start
Hands down, the spring and early summer are your golden windows for propagating Tephrocactus molinensis. This is when the plant is actively growing and full of vigor. You’ll find that cuttings taken during this period have the best chance of rooting quickly and successfully. Waiting until the heat of summer or the cool of autumn can sometimes slow things down and increase the risk of rot.
Supplies You’ll Need
Gathering your tools before you begin makes the whole process so much smoother. Here’s what I always have on hand:
- Well-draining potting mix: A cactus-specific blend is perfect, or you can make your own by mixing equal parts potting soil, perlite, and coarse sand.
- Sharp pruning shears or a clean knife: Make sure they’re sterilized to prevent disease spread. A quick wipe with rubbing alcohol works wonders.
- Rooting hormone (optional but recommended): This can give your cuttings a helpful boost.
- Small pots or seed trays: Nothing too large; we want the roots to fill the space before transplanting.
- Watering can with a fine rose: For gentle watering.
- Gloves (optional): Those spines can be persistent!
- Labels and a marker: You’ll thank yourself later for keeping track.
Propagation Methods
There are a few ways to go about this, but for Tephrocactus molinensis, I find the stem cutting method to be the most reliable and satisfying.
- Take Your Cuttings: Gently twist or cut off healthy, mature segments from your parent plant. They should be at least an inch or two long. Avoid taking segments that look too young or were recently produced; older, established ones tend to have more stored energy.
- Let Them Callus: This is a crucial step for cacti, and Tephrocactus is no exception. Place your cuttings on a dry surface (like a paper towel or a clean tray) in a shaded, well-ventilated spot for several days to a week, or even longer if your environment is humid. You want the cut end to form a dry, protective scab. This prevents rot when you plant them. Patience here is key!
- Prepare Your Pots: Fill your small pots or trays with your prepared well-draining soil mix. Make it slightly damp but not wet.
- Plant the Cuttings: Once the cuttings have callused, you can plant them. I like to make a small indentation in the soil with my finger or a pencil, then gently insert the callused end of the cutting. Don’t bury it too deep; just enough so it stands upright. If you’re using rooting hormone, dip the callused end into it before planting.
- Wait and Watch: Place your potted cuttings in a bright location that receives indirect sunlight. Resist the urge to water immediately! Wait about a week after planting before giving them their first gentle watering.
The “Secret Sauce” (Pro Tips)
Here are a couple of tricks I’ve picked up over the years that really make a difference:
- Bottom Heat is Your Friend: If you’re propagating in cooler weather or your environment is a bit chilly, using a gentle heat mat underneath your pots can significantly speed up root development. Think of it as giving your little cuttings a warm hug! Just a consistent warmth, not scorching hot.
- Don’t Overwater, Ever! This is the cardinal sin of cactus propagation. It’s far better to underwater than to overwater a cutting. Let the soil dry out completely between waterings. I usually check by feeling the weight of the pot or sticking my finger into the soil.
Aftercare & Troubleshooting
Once you see signs of new growth, like tiny buds or a slight swelling at the base, you know roots are forming! Continue to keep them in bright, indirect light and water sparingly. As they get a bit bigger, you can gradually introduce them to a bit more direct sun.
The most common problem you’ll encounter is rot. If a cutting starts to look mushy, discolored (often brown or black), or wilts dramatically, it’s likely rot. Unfortunately, there’s not much you can do to save a rotting cutting. Your best bet is to remove it immediately from the pot to prevent it from affecting any nearby cuttings. Sometimes, you can salvage a healthy portion above the rot, let it callus again, and try propagating that piece.
A Encouraging Closing
Propagating Tephrocactus molinensis is a journey, and like any good garden project, it requires a little patience and a lot of observation. Don’t get discouraged if not every cutting makes it; that’s just part of the learning process. Celebrate your successes, learn from your challenges, and enjoy the satisfaction of growing these fascinating plants from your own efforts. Happy propagating!
Resource: