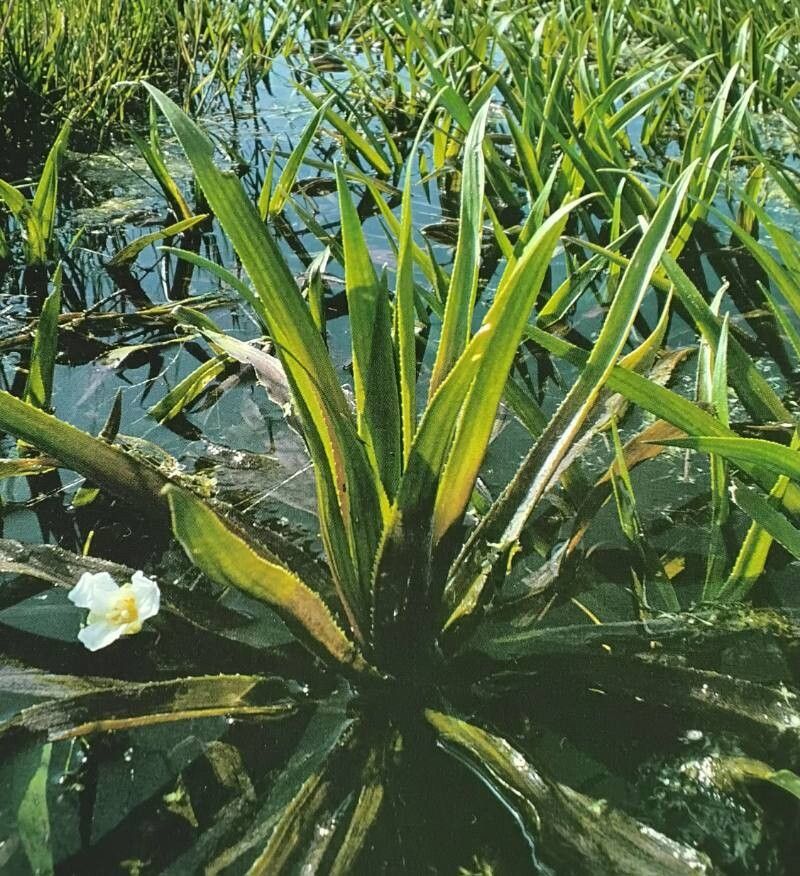
Hey there, fellow plant lovers! Today, we’re diving into the wonderful world of Stratiotes aloides, also known as Water Soldier. If you’re looking for a unique aquatic plant that adds a touch of the wild to your pond or water garden, you’ve found it. Its spiky, pineapple-like leaves and cool floating habit are just charming. And honestly, propagating it yourself? That’s a truly satisfying feeling. Getting started with Water Soldier is quite forgiving, even for those new to the aquatic gardening scene.
The Best Time to Start
When it comes to getting new Water Soldier plants, late spring to early summer is your golden ticket. This is when the plant is in its most vigorous growth phase. You’ll see lots of little offshoots beginning to form, making them easy to spot and separate. Trying this when the plant is dormant or stressed is just asking for a bit of frustration, so let’s aim for those sunnier, warmer months.
Supplies You’ll Need
You don’t need a whole lot of fancy gadgets for this. Here’s what I usually have on hand:
- Sharp pruning shears or a clean knife: For making neat cuts.
- A bucket or large container: To hold your water and cuttings.
- Small pots or containers: If you plan to grow them on separately for a bit.
- Aquatic plant substrate (optional): Some gardeners like to use this for a bit of extra anchoring, but it’s not always necessary.
- Clean pond water: The best water to use is water from the pond where your parent plant is thriving.
Propagation Methods
Water Soldier is a champ at reproducing, and the easiest way to get more is through division or by collecting offsets.
1. Collecting Offsets (The Easiest Way!)
Your mature Water Soldier will naturally produce little baby plants, called offsets, that sprout from its base.
- Locate the offsets: Look for the small, miniature versions of the parent plant nudging their way out. They’ll be attached by a small stolon, which is like a little runner.
- Gently detach: Using clean pruning shears or a knife, carefully cut the stolon to separate the offset from the mother plant. Try to make a clean cut as close to the parent as possible.
- Handle with care: These little ones are delicate. Try not to crush their leaves.
- Ready to float: Your new offset is usually ready to go straight into the pond or water feature. If it seems a bit small, you can let it grow a little more by leaving it in a shallow container of pond water for a week or two.
2. Division (For Larger Clumps)
If your Water Soldier has become a bit of a clump, you can gently divide it.
- Gently pull apart: With clean hands, try to gently tease apart the larger clump. You’re looking to separate sections that already have a few leaves and ideally a few developing roots.
- Use your tools if needed: If they are tightly bound, use your clean shears or knife to make a careful cut between the sections. Again, aim for clean cuts.
- Separate and float: Once you have smaller sections, treat them like the offsets – ready for their new watery home.
The “Secret Sauce” (Pro Tips)
I’ve learned a few tricks over the years that can really boost your success.
- Don’t let the leaves touch the bottom: If you’re placing your new offsets in a container, try to ensure their leaves aren’t resting directly on the substrate or the bottom of the pot for extended periods, especially if it’s not stagnant water. They prefer to float and breathe.
- Keep it moving (a little): Unlike some plants that need still water, Water Soldier actually appreciates a little gentle movement. If your pond has a bit of flow, that’s perfect. If not, don’t worry too much, but avoid placing cuttings in stagnant, murky pools.
- Patience with the parent: When you’re taking offsets, be gentle with your mother plant. Don’t strip it bare. Leave plenty of healthy foliage on it so it can recover and continue to grow.
Aftercare & Troubleshooting
Once your new Water Soldier is happily floating, the care is pretty minimal.
- Location, location, location: Find a spot in your pond or water feature that gets decent sunlight. Most aquatic plants love their sun!
- Keep an eye out for rot: The most common issue you might face is rot. This usually happens if the cutting is weak, the water quality is poor, or if it’s constantly submerged in murky, stagnant water. If you see leaves turning brown and mushy, it’s a sign things aren’t going well. Sadly, once rot sets in, it’s hard to save, so it’s best to discard and try again with a healthier-looking cutting.
- Observe: Just watch your new plant. If it’s perking up, developing new leaves, and looking generally happy, you’re doing great!
So there you have it! Propagating Stratiotes aloides is a straightforward and rewarding task. Don’t be afraid to experiment and enjoy the process of nurturing new life in your water garden. Happy growing!
Resource:
https://identify.plantnet.org/k-world-flora/species/Stratiotes%20aloides%20L./data