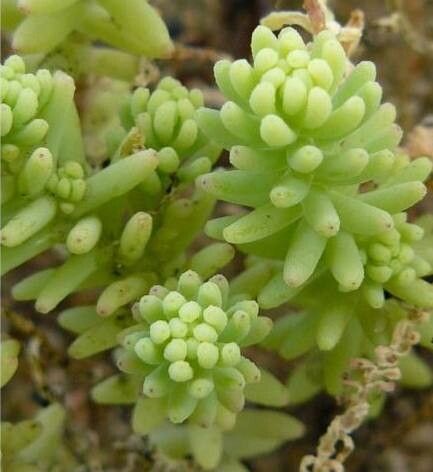
Hey there, fellow plant lovers! It’s so good to chat with you today. We’re diving into the wonderful world of Sedum alamosanum, a succulent that’s truly captured my heart over the years. Its delicate, almost bell-shaped flowers and charming rosettes make it a standout in any collection. And the best part? Propagating it is surprisingly rewarding, and I’m thrilled to guide you through it.
While I’d say Sedum alamosanum is pretty forgiving, especially compared to some of my fussier succulents, a little bit of know-how goes a long way. Don’t let that deter you; this is a fantastic plant to start your propagation journey with.
The Best Time to Start
For Sedum alamosanum, the sweet spot for propagation is definitely late spring through early summer. This is when the plant is actively growing and has plenty of energy to put into developing new roots. You’re looking for healthy, established stems that aren’t flowering or stressed. Think of it as capturing the plant at its most vigorous!
Supplies You’ll Need
Gathering your supplies upfront makes the whole process much smoother. Here’s what I like to have on hand:
- Sharp, clean pruning shears or a small knife: A clean cut is crucial to prevent disease.
- Well-draining potting mix: A cactus and succulent mix is perfect. I often add a bit of perlite or pumice to make it even airier.
- Small pots or seed trays: Whatever you have available, just ensure they have drainage holes.
- Rooting hormone (optional but helpful): A light dusting can give your cuttings a good start.
- Watering can with a fine rose or a spray bottle: Gentle watering is key.
- A sunny spot: Bright, indirect light is ideal for rooted cuttings.
Propagation Methods
There are a couple of ways we can coax new life from our Sedum alamosanum. I usually go for stem cuttings because they’re so straightforward.
Stem Cuttings:
- Select a healthy stem: Look for a piece that’s at least 2-3 inches long.
- Make a clean cut: Using your sharp shears or knife, snip the stem, ideally just below a leaf node (where a leaf attaches to the stem).
- Remove lower leaves: Gently pull off the bottom few leaves. This exposes the node, which is where roots will form. Don’t worry if you leave a few small ones; just make sure they aren’t touching the soil later on.
- Let it callous: This is a vital step! Lay your cuttings on a dry surface in a well-ventilated area out of direct sun for 2-3 days. You want the cut end to dry and form a protective callus. This prevents rot.
- Potting up: Once calloused, you can either dip the cut end in rooting hormone (if you’re using it) or simply plant the cutting directly into your prepared potting mix. Gently firm the soil around the base, ensuring the calloused end is buried.
Water Propagation (for the patient observer):
- Follow steps 1-3 above for creating stem cuttings.
- Place the cuttings in a clean glass or jar filled with fresh water.
- Crucially, make sure the leaves do not touch the water. Only the submerged stem end should be in contact with the water.
- Place the jar in bright, indirect light.
- Change the water every few days to keep it fresh and prevent bacterial growth.
- You’ll start to see tiny roots emerge from the stem nodes after a few weeks. Once the roots are about an inch long, you can carefully transfer them to soil using the potting method described above.
The “Secret Sauce” (Pro Tips)
Over the years, I’ve picked up a few little tricks that I think really make a difference:
- The “Warm Toe” Technique: While we want bright light, a little bit of bottom heat can be incredibly beneficial for encouraging root development. If you have a seedling heat mat, placing your pots on it (on a low setting, of course!) can speed things up considerably. It mimics the warmth of summer soil.
- Don’t Overwater Those Calloused Cuttings! This is probably the most common mistake beginners make. Once the cuttings are in soil and calloused, resist the urge to water them immediately. Wait a few days. Let them settle in and then water very sparingly. The callused stem contains enough moisture to get started, and excessive water at this stage is a fast track to rot.
- Air Circulation is Your Friend: Whether your cuttings are callousing or potted up, good airflow prevents fungal issues. I like to give them a gentle puff of air from a fan on a low setting for a few hours a day, especially in humid conditions.
Aftercare & Troubleshooting
Once you see signs of roots – usually a bit of tug resistance when you gently pull on the cutting, or even new leaf growth – you’re on the home stretch!
- Watering: Begin watering more regularly, but still allow the soil to dry out between waterings. This is the golden rule for all succulents. Feel the soil; if the top inch or two feels dry, it’s time for a drink.
- Light: Gradually introduce your new plant to brighter light. Direct, intense sun can still scorch a young succulent, so bright, indirect light is best for a while.
- Repotting: Once the roots have filled the pot, you can transplant your new Sedum alamosanum into a slightly larger pot.
Common Signs of Failure:
- Rot: This is the big one. If your cutting turns mushy, black, or smells foul at the base, it’s likely rot. This is usually caused by overwatering or a damp environment where the cutting couldn’t callous properly. Unfortunately, a rotten cutting is usually a goner, but don’t despair – just try again with a fresh one and adjust your watering strategy.
- Wilting/Shriveling: Sometimes cuttings will shrivel because they are drying out too much before roots form. If this happens, gently mist them lightly or increase watering slightly, but always lean towards too dry rather than too wet.
A Fond Farewell (For Now!)
There you have it! Propagating Sedum alamosanum is a wonderful way to fill your garden or share your love of plants with friends. Be patient with yourself and the process. Nature has its own rhythm, and sometimes it takes a couple of tries to get it just right. Enjoy every step, from that first clean cut to the joy of seeing roots emerge. Happy gardening!
Resource:
https://identify.plantnet.org/k-world-flora/species/Sedum%20alamosanum%20S.Watson/data