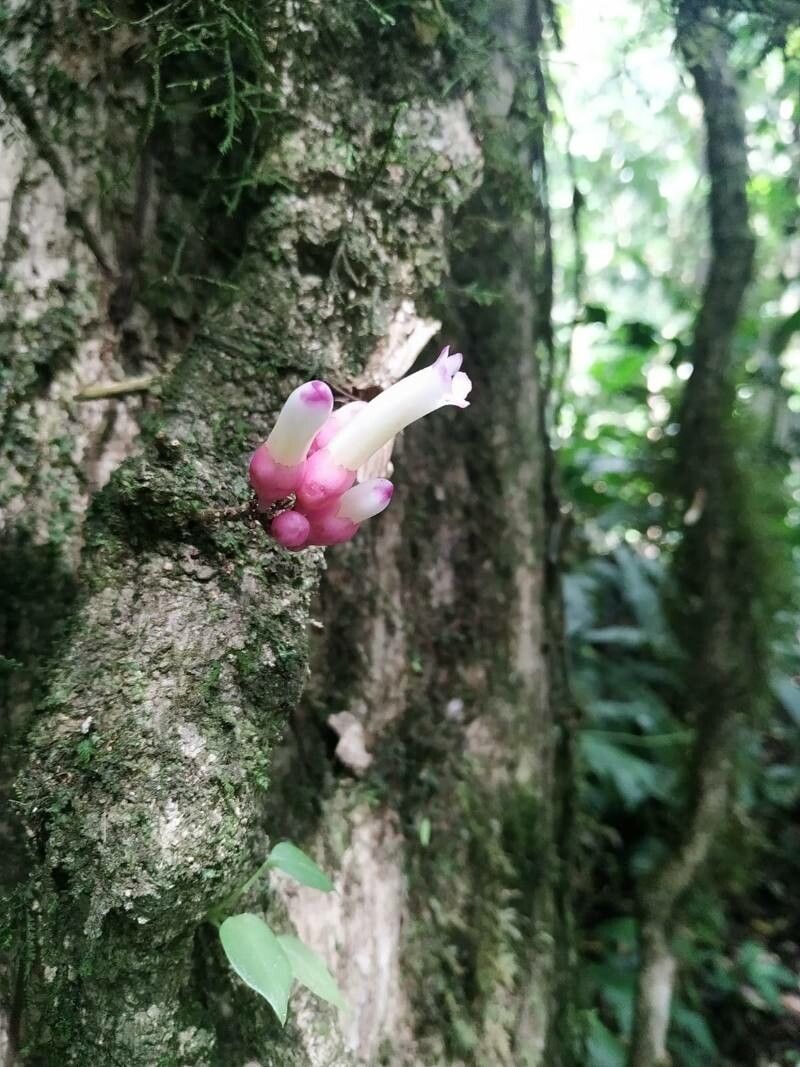
Oh, hello there! It sounds like you’ve fallen for the charms of Schlegelia fastigiata, haven’t you? I don’t blame you one bit. This vibrant beauty, with its cheerful blooms and handsome foliage, is such a wonderful addition to any garden. And the absolute best part? Learning to propagate it yourself! There’s a special kind of magic in nurturing a brand-new plant from a tiny cutting or division. It feels like you’ve unlocked a little garden secret.
Now, is Schlegelia fastigiata a cinch for absolute beginners? I’d say it’s moderately easy. It’s not quite as forgiving as, say, a pothos, but with a little attention and the right approach, you’ll be celebrating success. Anyone with a bit of patience and a willingness to get their hands dirty can absolutely do this.
The Best Time to Start
For Schlegelia fastigiata, I find the late spring to early summer is your golden window. This is when the plant is actively growing and has a good supply of energy. You’re looking for stems that are semi-hardwood – they’re not brand new and floppy, but they haven’t gotten overly woody and stiff either. Think of a pencil; it should have a little give but not bend too easily.
Supplies You’ll Need
Gathering your supplies before you begin is key. It makes the whole process much smoother!
- Sharp Pruning Shears or a Knife: Clean cuts are crucial for preventing disease.
- Rooting Hormone Powder or Gel: This really gives your cuttings a boost.
- Small Pots or Seedling Trays: With drainage holes, of course!
- A Well-Draining Potting Mix: I like to use a blend of perlite, peat moss, and vermiculite. A good seed-starting mix also works beautifully.
- Clear Plastic Bags or a Humidity Dome: To keep the cuttings moist.
- Watering Can or Spray Bottle: For gentle watering.
- Optional: Heat Mat: For bottom warmth, which can speed up rooting.
Propagation Methods
Let’s get our hands dirty! We’ll focus on the most reliable methods for Schlegelia fastigiata.
Stem Cuttings
This is my go-to method for this plant.
- Take Your Cuttings: Select healthy, semi-hardwood stems from your mature plant. Using your sharp pruning shears, snip a stem about 4-6 inches long. Make the cut just below a leaf node (where a leaf attaches to the stem).
- Prepare the Cuttings: Gently remove the lower leaves, leaving just a couple at the top. This prevents them from rotting in the soil. If your leaves are quite large, I’d even suggest cutting them in half to reduce water loss through transpiration.
- Apply Rooting Hormone: Dip the cut end of the stem into your rooting hormone. Tap off any excess.
- Planting: Fill your small pots with your well-draining potting mix. Make a small hole in the center with your finger or a pencil. Carefully insert the hormone-coated end of the cutting into the hole. Gently firm the soil around it. You can usually fit 2-3 cuttings per small pot, spacing them a few inches apart.
- Create a Humid Environment: Water the soil gently. Then, cover the pot with a clear plastic bag or a humidity dome. You can use stakes to keep the plastic from touching the leaves. This high humidity is vital!
Water Propagation (Use with Caution)
While possible, I find stem cuttings in soil are generally more successful long-term for Schlegelia fastigiata. If you want to try water propagation:
- Prepare Cuttings: Follow steps 1 and 2 for stem cuttings.
- Place in Water: Put the cuttings in a jar or vase filled with fresh water. Make sure the leaf nodes are submerged, but don’t let the leaves themselves touch the water. Leaves in the water will rot and can kill the cutting.
- Location: Place the jar in a bright spot, but out of direct sunlight.
- Change Water: Change the water every few days to keep it fresh and oxygenated.
The “Secret Sauce” (Pro Tips)
Here are a few little tricks I’ve learned over the years that can make a big difference:
- Bottom Heat is Your Friend: If you have a heat mat, place your pots on it. Schlegelia fastigiata just loves that gentle warmth coming up from below, and it really encourages those roots to get going.
- Don’t Overwater! This is probably the most common mistake. The soil should be consistently moist, but not waterlogged. Soggy soil is a fast track to rot. I often find myself gently pressing the soil to check for moisture rather than just relying on looks.
- Watch for Condensation: That condensation on your plastic bag or humidity dome? That’s a good sign! It means your cuttings are staying nice and humid. If you don’t see any, your environment might be too dry, and you may need to mist gently or adjust your covering.
Aftercare & Troubleshooting
Once you start seeing new leaf growth or feel resistance when gently tugging a cutting (a sign of roots!), it’s time for a little adjustment.
- Acclimate Slowly: Gradually remove the plastic bag or humidity dome over a few days. Start by taking it off for an hour or two, then increase the duration. This helps your new plant get used to the normal humidity levels.
- Transplant: Once your cuttings have a good root system, they’re ready to be moved to individual pots with your regular potting mix.
- Signs of Trouble: The most common issue is rot. If your cutting looks mushy, black, or smells bad, it’s likely rotted. This usually stems from overwatering or poor drainage. You might also see wilting that doesn’t recover – this can be a sign of dehydration, or sometimes, the cutting just didn’t take. Don’t be discouraged if a few don’t make it. It’s all part of the learning process!
So there you have it! Propagating Schlegelia fastigiata is a wonderfully rewarding journey. Be patient with yourself and the process. Enjoy the small victories, learn from any setbacks, and soon you’ll have a whole troop of your own beautiful Schlegelia plants to share or keep for yourself. Happy propagating!
Resource:
https://identify.plantnet.org/k-world-flora/species/Schlegelia%20fastigiata%20Schery/data