Hello, fellow garden lovers!
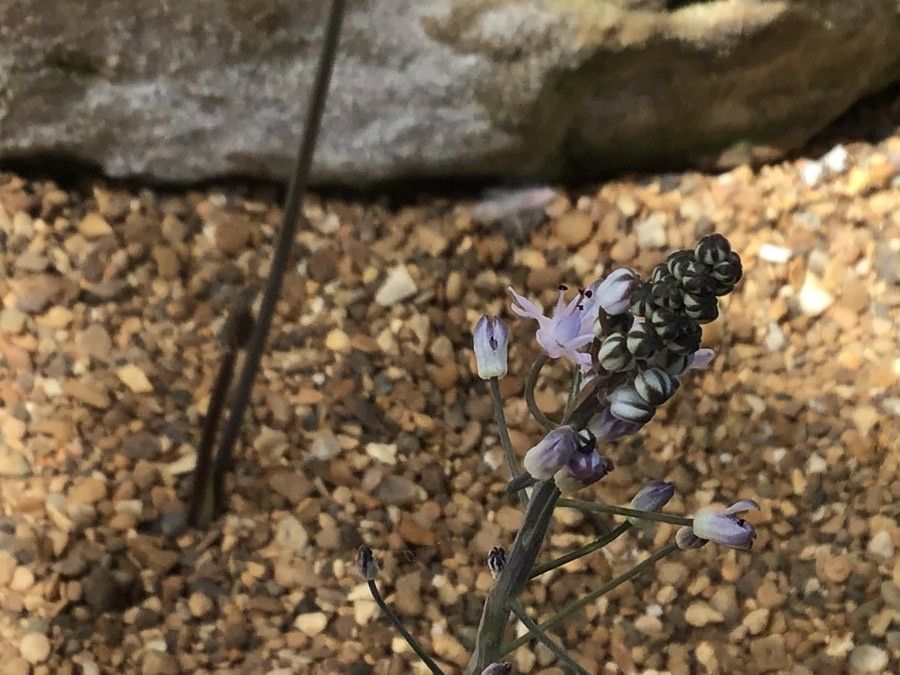
You know, there are some plants that just have that je ne sais quoi. Prospero talosii is one of them for me. With its intriguing foliage and surprisingly resilient nature, it’s a real showstopper in any collection. And the beauty of it? You can easily multiply this charm yourself! Propagating plants is a wonderfully rewarding experience. It’s a chance to understand a plant’s life cycle up close and personal, and honestly, who wouldn’t love to have more of this beauty in their life? For those just dipping their toes into plant parenthood, Prospero talosii is a fairly forgiving friend, making it an excellent candidate for your first propagation adventure.
The Best Time to Start
Timing is everything, right? For Prospero talosii, my favorite time to get propagating is during the active growing season. Think late spring through early summer. The plant is energized and ready to put out new growth, which means it’s also more inclined to develop roots. You’ll see the most vigor and the highest success rates when you take cuttings from healthy, actively growing stems.
Supplies You’ll Need
Gathering your tools is always the first exciting step. Here’s what I usually have on hand:
- A clean, sharp pruning shear or sterile knife. I can’t stress enough how important cleanliness is to prevent disease!
- Rooting hormone (optional, but I find it really boosts success, especially with trickier cuttings).
- A well-draining potting mix. A good blend for succulents or cacti works wonderfully, or I’ll mix my own with coco coir, perlite, and a bit of compost.
- Small pots or propagation trays. Terracotta pots are great because they breathe.
- A watering can with a fine rose or a spray bottle for gentle watering.
- Labels to mark your precious new babies!
Propagation Methods
Let’s get our hands dirty! My go-to method for Prospero talosii is taking stem cuttings. It’s straightforward and usually yields fantastic results.
- Select a Healthy Stem: Look for a healthy, firm stem that’s at least 4-6 inches long. Avoid anything that looks yellowed, wilted, or leggy.
- Make the Cut: Using your clean shears or knife, make a clean cut just below a leaf node. A leaf node is where leaves emerge from the stem. This is where the magic happens, where new roots will form.
- Prepare the Cutting: Gently remove the lower leaves from the cutting. This prevents them from rotting when they’re in the soil. You want to leave a few leaves at the top, which will help the cutting photosynthesize.
- Apply Rooting Hormone (Optional): If you’re using rooting hormone, dip the cut end of the stem into the powder or gel. Tap off any excess.
- Plant the Cutting: Fill your small pot or tray with your well-draining mix. Make a small hole in the center with your finger or a pencil.
- Insert the Cutting: Gently insert the cut end of the stem into the hole, ensuring at least one leaf node is buried beneath the soil. Firm the soil gently around the base of the cutting.
- Water Gently: Lightly water the soil to settle it around the cutting. Avoid waterlogging!
Water Propagation (Another Great Option):
If you prefer to watch the roots emerge, water propagation is also a beautiful way to go.
- Follow steps 1-3 above for preparing your cutting.
- Place the cutting in a jar or glass filled with clean, room-temperature water.
- Crucially, make sure no leaves are submerged in the water. Any leaves sitting in the water will rot and can take down your whole cutting.
- Place the jar in a bright spot, out of direct sunlight.
- Change the water every few days to keep it fresh and prevent bacterial growth. You’ll start to see tiny white roots forming within a few weeks. Once these roots are about an inch long, you can carefully transplant them into soil.
The “Secret Sauce” (Pro Tips)
After years of dabbling, I’ve picked up a few tricks that seem to make all the difference.
- Bottom Heat is Your Friend: If you can, place your pots on a seedling mat or a warm windowsill. A little bit of gentle warmth from below encourages root development like nothing else. It mimics the cozy conditions the plant loves.
- Don’t Overwater, Especially at First: This is a big one. New cuttings are susceptible to rot. I like to let the top inch of soil dry out completely before watering again. A gentle misting can also help keep humidity up without soaking the roots.
- Be Patient with Propagation: Sometimes, it feels like nothing is happening. Resist the urge to pull up your cuttings to check for roots! Wait at least 3-4 weeks before gently tugging to see if there’s resistance. A healthy cutting will feel firm.
Aftercare & Troubleshooting
Once you see signs of new growth or feel that lovely resistance when you tug – congratulations, you have roots!
- Gradually Acclimate: If you propagated in water, allow the roots to get a good size before planting in soil. If you propagated in soil, continue to water sparingly and avoid direct sun until the plant is established.
- Increase Light: As your new plant grows, you can gradually introduce it to brighter light conditions, similar to what the parent plant enjoys.
- Watch for Rot: The most common sign of failure is rot. This usually looks like a mushy, blackened stem. It’s often caused by overwatering or poor drainage. If you see this, unfortunately, the cutting is likely lost. You can try to salvage a healthy section if possible, but starting fresh is often best.
- Pests: Keep an eye out for common houseplant pests. Early detection is key.
A Little Encouragement to Finish
Propagating Prospero talosii is a journey, and like any good journey, it’s about the process as much as the destination. Don’t be discouraged if your first attempt isn’t picture-perfect. Every gardener has had their share of challenges! With a little patience and these tips, you’ll be creating your own beautiful plant family in no time. Enjoy the magic of growth!
Resource: