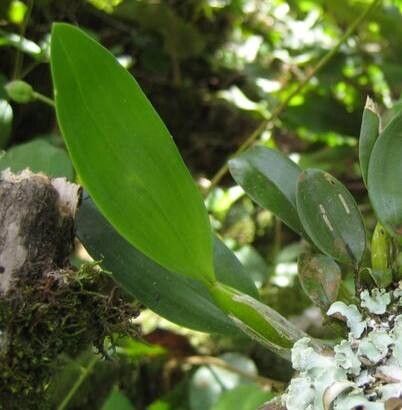
Hello fellow plant lovers! It’s wonderful to connect with you today. We’re going to dive into the delightful world of propagating Pleurothallis ruscifolia. If you’ve ever admired the delicate charm of this miniature orchid, with its lovely, leathery leaves and charming blooms that often look like tiny jewels, you’re in for a treat. Growing more of these beauties from cuttings is incredibly rewarding. Now, I’ll be honest, Pleurothallis can be a little fussier than some of your more robust houseplants, so for absolute beginners, it might present a small learning curve. But with a little patience and the right approach, you’ll be enjoying new little plants in no time.
The Best Time to Start
When it comes to Pleurothallis ruscifolia, the sweet spot for propagation aligns with its active growth period. Think spring or early summer here in the Northern Hemisphere. This is when the plant is naturally energized, putting out new shoots and leaves. Starting then gives your cuttings the best chance to establish themselves before the cooler, darker days of autumn and winter. You want to see new growth on your parent plant before you consider taking any cuttings.
Supplies You’ll Need
- Sharp, sterile pruning shears or a clean razor blade: Essential for making clean cuts.
- Sphagnum moss: Long-fibered is best for holding moisture without becoming waterlogged.
- Orchid bark mix: A fine-grade mix is usually ideal for these small orchids. You can also use a mix of coco coir and perlite.
- Small pots or trays: Clean containers for your new propagations.
- Rooting hormone (optional but recommended): A gentle rooting hormone can give your cuttings a boost.
- Clear plastic bags or a small propagation dome: To create a humid environment.
- Watering can with a fine rose: For gentle watering.
- Labels and a waterproof marker: To keep track of your projects!
Propagation Methods
For Pleurothallis ruscifolia, division is often the most successful and straightforward method. These orchids tend to form clumps, and you can gently separate them into smaller, viable pieces.
- Gently Remove from Pot: Carefully take your Pleurothallis out of its current pot. If it’s quite root-bound, you might need to gently loosen the edges with your fingers or a trowel.
- Identify Natural Divisions: Look for distinct fans or pseudobulbs that have started to grow away from the main clump. You should see healthy roots emerging from these sections.
- Careful Separation: Using your fingers or a sterile tool, gently tease apart the divisions. The goal is to ensure each new piece has at least two to three healthy pseudobulbs or growths and a good amount of root. It’s okay if a few roots break, but try to minimize damage.
- Prepare the New Pots: Fill your clean small pots with your chosen orchid mix, leaving enough space at the top for the plant.
- Plant the Divisions: Place each division into its pot, arranging the roots so they spread out a bit. The base of the pseudobulbs should be at or just slightly above the surface of the potting medium.
- Water Gently: Water thoroughly, but gently, to settle the potting medium around the roots.
- Place in Humidity: Immediately after potting, place the pots into a clear plastic bag or cover them with a propagation dome. This will create the high humidity they crave.
The “Secret Sauce” (Pro Tips)
Here are a couple of things I’ve learned over the years that really make a difference:
- Don’t Over-Pot: For divisions of small plants like Pleurothallis, using very small pots is key. If they are too large, the potting mix stays wet for too long, which can lead to rot. Think seedling-sized pots!
- Mimic Their Natural Environment: These orchids often grow on mossy trees, meaning they love consistent moisture but also good air circulation. When dividing, ensure your potting mix isn’t too dense. If you can, a little bit of living sphagnum moss on top can be a fantastic insulator and moisture retainer without suffocating the roots.
Aftercare & Troubleshooting
Once your divisions are potted, they need a bit of TLC.
- Humidity is King: Keep them in that humid environment – the plastic bag or dome. Mist them lightly every day or two, but avoid letting water sit in the crowns of the pseudobulbs for extended periods.
- Light: Place them in bright, indirect light. Too much direct sun will scorch the leaves.
- Patience: Resist the urge to repot or check for roots too soon. It can take several weeks, sometimes months, for new root growth to become noticeable. You’ll start to see new leaf growth as a good sign.
- Troubleshooting – Rot: The most common issue is rot. If you see leaves turning yellow and mushy, or the base of the pseudobulb looking dark and soft, it’s likely due to too much moisture and not enough air circulation. You might need to adjust your watering or ensure better drainage. If rot is advanced, the cutting may not be salvageable. If it’s caught early, you can try to trim away the affected part with a sterile blade and repot in fresh, drier medium.
A Little Encouragement
Taking cuttings can feel a bit daunting, but remember, nature has a way of surprising us. Be gentle, be observant, and enjoy the process of coaxing new life from your beloved orchids. Every successful new plant is a little victory, a testament to your care and the plant’s resilience. Happy growing!
Resource: