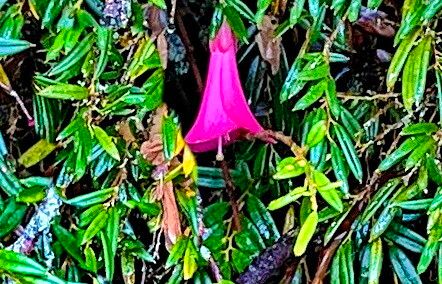
Hello, fellow plant lovers! Today, we’re diving into the wonderful world of propagating Philesia magellanica, a truly special shrub that brings a touch of the dramatic southern hemisphere right into our gardens. If you’ve ever admired its vibrant, tubular, waxy red flowers, you know they’re a sight for sore eyes. And the best part? You can create more of these beauties yourself!
Now, I won’t sugarcoat it – Philesia magellanica can be a little bit of a trickster to propagate. It’s not quite as straightforward as sticking a pothos cutting in water. However, with a bit of patience and the right approach, it’s absolutely achievable, and the rewards are immense. Seeing a tiny cutting transform into a thriving plant is a joy that never gets old.
The Best Time to Start
For the highest success rate with Philesia magellanica, I’ve found late spring to early summer to be your sweet spot. This is when the plant is actively growing, and the new stems have started to harden off just a bit – we call these “semi-ripe” cuttings. They have enough energy to root but aren’t so soft that they’ll easily rot.
Supplies You’ll Need
Before we get our hands dirty, let’s gather our tools:
- Sharp Pruning Shears or a Craft Knife: Cleanliness is key for preventing disease.
- Rooting Hormone: A good quality powder or gel is essential for encouraging root formation.
- A Well-Draining Potting Mix: I like a mix of equal parts peat moss, perlite, and coarse sand. Some growers also use a small amount of sphagnum moss.
- Small Pots or Seed Trays: Clean, with drainage holes, of course!
- Plastic Bags or a Propagator: To create a humid environment.
- Dibber or Pencil: To make holes for your cuttings.
- Watering Can or Misting Bottle: For gentle watering and misting.
Propagation Methods: Stem Cuttings
This is the most common and effective way to multiply your Philesia.
- Select Your Cuttings: Look for healthy, vigorous stems that are about 4-6 inches long. They should have developed a little bit, so they aren’t completely floppy.
- Prepare the Cuttings: Using your sharp pruning shears or knife, take cuttings just below a leaf node (where a leaf attaches to the stem). This is where the magic happens for rooting! Remove the lower leaves, leaving just a couple of sets at the top. You can even gently scrape a thin layer of bark off the bottom inch of the stem to expose more surface area for rooting.
- Apply Rooting Hormone: Dip the cut end of each stem into your rooting hormone, tapping off any excess. Make sure the end is well-coated.
- Plant Your Cuttings: Fill your small pots with your well-draining potting mix. Use your dibber or pencil to make a hole in the center deep enough to bury the leafless part of the stem. Gently insert the cutting and firm the soil around it.
- Water Gently: Water the soil thoroughly but gently, ensuring it’s moist but not waterlogged.
- Create Humidity: Cover the pots with plastic bags or place them in a propagator. Make sure the plastic doesn’t touch the leaves too much. You can prop it up with a few stakes if needed.
- Find a Spot: Place your pots in a bright location, but out of direct sunlight. A greenhouse or a bright windowsill is perfect.
The “Secret Sauce” (Pro Tips)
Here are a couple of little tricks I’ve learned over the years that really give your Philesia cuttings the best chance:
- Bottom Heat is Your Friend: Philesia roots much better when its roots are warm. Placing your pots on a gentle heated propagator mat can make a world of difference, especially if your ambient temperatures are cooler. Aim for around 70-75°F (21-24°C).
- Don’t Mist Too Much: While humidity is important, over-misting the leaves can encourage fungal diseases. It’s better to maintain consistent soil moisture and rely on the enclosed environment of the plastic bag or propagator for humidity. If you do mist, do it early in the day so the leaves can dry.
Aftercare & Troubleshooting
Once your cuttings are planted, the waiting game begins!
- Rooting Takes Time: Be patient. Philesia can take several weeks, sometimes even months, to develop a good root system. You can gently tug on a cutting to feel for resistance, or if you’re using clear pots, you might even see roots through the sides.
- Check for Rot: The most common problem you’ll encounter is rot. If you see a cutting turning black and mushy, it’s a sign of too much moisture and poor air circulation. Unfortunately, a rotted cutting is usually a goner. Remove it immediately to prevent it from spreading. You might need to slightly reduce watering or increase ventilation.
- When They’re Ready: Once you see new growth appearing on the tip of the cutting, that’s a good sign that roots have formed. You can then gradually acclimatize your new plants to less humid conditions by opening the plastic bag or propagator vents a little more each day.
- Potting Up: When the new plant is robust enough, carefully pot it up into a slightly larger pot with the same well-draining mix.
A Encouraging Closing
Propagating Philesia magellanica is a journey, not a race. There might be a few stumbles along the way, but don’t get discouraged! Each attempt is a learning experience, and the satisfaction of nurturing a new plant from a tiny piece of its parent is truly unparalleled. Enjoy the process, celebrate your successes, and before you know it, you’ll have more of these spectacular plants to share. Happy propagating!
Resource:
https://identify.plantnet.org/k-world-flora/species/Philesia%20magellanica%20J.F.Gmel./data