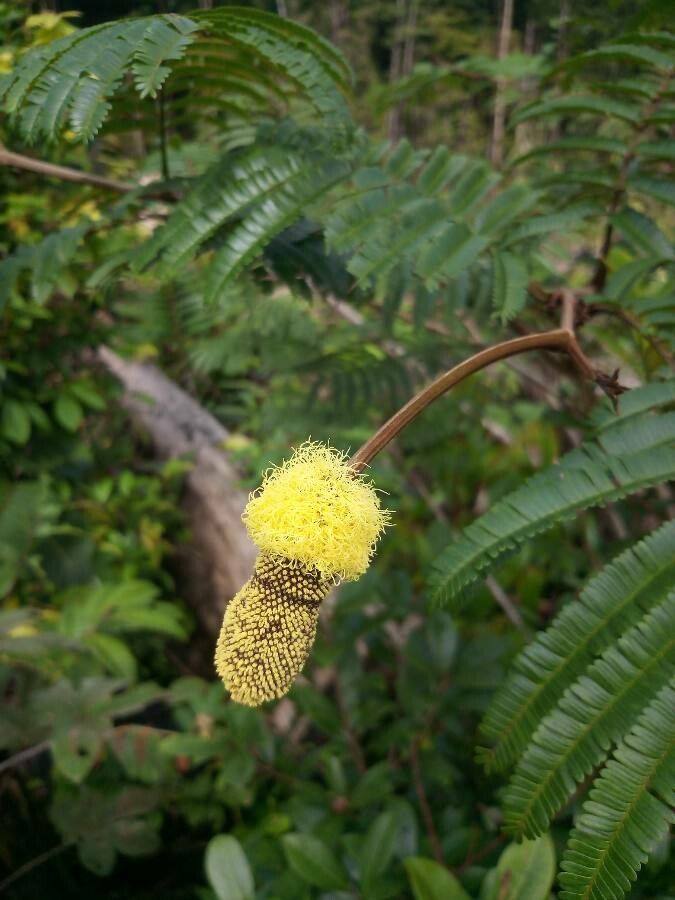
Oh, Parkia nitida! What a stunner. I’ve always been captivated by its elegant, feathery foliage and the promise of those intriguing blooms. If you’ve ever admired one, whether in a botanical garden or a particularly well-loved private collection, you know why you’re here. Growing another one from scratch? That’s a special kind of gardening magic. And while Parkia nitida might seem a bit exotic, I’ve found propagating it is a wonderfully rewarding experience, though it does lean towards the intermediate side. Don’t let that deter you; with a little care, you’ll be successful.
The Best Time to Start
For the absolute best chance of success with Parkia nitida, I always recommend starting in the spring or early summer. This is when the plant is in a vigorous growth phase, meaning it has plenty of energy to put into developing new roots. Look for new, healthy growth that hasn’t yet become woody. This tender, yet firm, material is your golden ticket.
Supplies You’ll Need
Gathering your tools beforehand makes the whole process smoother. Here’s what I like to have on hand:
- Sharp, clean pruning shears or a knife: You want to make a clean cut to prevent disease.
- Rooting hormone: This is a game-changer, especially for fussier plants. I prefer a powder form for cuttings.
- Well-draining potting mix: A blend of equal parts peat moss, perlite, and a bit of compost works beautifully. You can also find specialized seed-starting or succulent mixes that do the trick.
- Small pots or propagation trays: Clean ones are a must!
- Plastic bags or a clear propagation dome: This helps maintain humidity.
- Watering can with a fine rose: For gentle watering.
Propagation Methods
While Parkia nitida can be grown from seed, I find stem cuttings to be consistently more reliable and faster. Let’s focus on that.
Stem Cuttings:
- Take the Cutting: Select a healthy, non-flowering stem. Using your sharp shears, make a clean cut just below a leaf node (where the leaf attaches to the stem). Aim for cuttings that are about 4-6 inches long. Remove the lower leaves, leaving just the top few.
- Apply Rooting Hormone: Dip the cut end of the stem into your rooting hormone, tapping off any excess.
- Plant the Cutting: Make a small hole in your potting mix with your finger or a pencil. Gently insert the prepared cutting, ensuring the leaf nodes that were below the soil line are covered. Firm the soil gently around the base of the cutting.
- Water Gently: Water the soil thoroughly but gently. You don’t want to dislodge the cutting.
- Create a Humid Environment: Place the potted cutting inside a plastic bag, leaving it slightly open at the top, or cover it with a clear propagation dome. This traps the moisture, creating a mini-greenhouse effect.
- Provide Light: Place the pot in a bright spot that receives indirect sunlight. Avoid direct sun, which can scorch the delicate cutting.
The “Secret Sauce” (Pro Tips)
Now for a couple of tricks I’ve learned along the way:
- Bottom Heat is Your Friend: While not strictly essential, placing your pots on a gentle heated propagation mat can significantly speed up root development. It mimics the warmth of spring soil and gives the cutting that extra boost.
- Don’t Over-Water the Leaves: When you water, aim to keep the soil moist but not waterlogged. If using a plastic bag, condensation is good, but if you see large water droplets pooling on the leaves, gently wipe them off. Too much moisture on the foliage can encourage fungal issues.
Aftercare & Troubleshooting
Once you see signs of life – new leaf growth emerging from the top – it’s a strong indication that roots are forming! This is wonderful news!
Continue to keep the soil moist and the humidity high for another few weeks. You can gradually start to acclimate your new plant to normal household humidity by opening the plastic bag or dome a little more each day. Once it looks robust, you can remove the covering entirely.
The most common issue you might encounter is rot. If your cutting starts to look mushy or turns black at the base, it’s usually a sign of too much moisture. Unfortunately, once rot sets in, it’s very difficult to save. At that point, it’s best to discard the affected cutting and try again, focusing on that well-draining soil and careful watering.
A Encouraging Closing
Growing a new Parkia nitida from a cutting is a journey. Be patient with yourself and your plant. Sometimes it takes a few tries, and that’s perfectly okay! Enjoy the process, marvel at the tiny wonders unfolding, and soon you’ll have another beautiful specimen to cherish. Happy growing!
Resource:
https://identify.plantnet.org/k-world-flora/species/Parkia%20nitida%20Miq./data