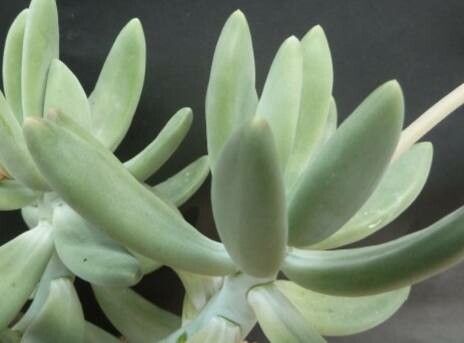
Oh, these Pachyphytum fittkaui! Aren’t they just the prettiest things? With their plump, silvery leaves, they look like little frosted jewels in the garden or on a windowsill. Growing more of them from your existing plants is one of the most satisfying parts of gardening, and trust me, it’s a joy to see those tiny new babies sprout up. This particular succulent, I find, is quite forgiving, making it a wonderful plant to try propagating, even if you’re just dipping your toes into the world of plant babies.
The Best Time to Start
When it comes to bringing new Pachyphytum fittkaui into the world, spring and early summer are your best friends. This is when the plant is actively growing, meaning it has the energy to put towards developing roots and new leaves. Starting during this vigorous period really gives your cuttings the best chance to take off.
Supplies You’ll Need
Gathering your tools beforehand makes the whole process smoother. Here’s what I usually have on hand:
- Well-draining potting mix: A cactus and succulent mix is ideal. You can also make your own by combining potting soil with perlite or pumice about 1:1.
- Sharp, clean pruning shears or a knife: Make sure they’re sterilized to prevent introducing any nasty bacteria.
- Rooting hormone (optional but helpful): This can give your cuttings a little boost.
- Small pots or trays: Terra cotta pots are great because they breathe and help keep the soil from getting too wet.
- Watering can or spray bottle: For gentle watering.
- A bright, indirect light location: Away from harsh, direct sun, especially for new cuttings.
Propagation Methods
There are a couple of ways to get more Pachyphytum fittkaui, and both are wonderfully effective.
1. Leaf Cuttings: The Magic of a Single Leaf
This is my favorite method for Pachyphytum fittkaui. Seriously, it feels like magic.
- Select a healthy leaf: Look for plump, firm leaves that aren’t too old or too young.
- Gently twist or cut the leaf off: The key here is to get a clean break right at the stem. Sometimes, it’s best to gently wiggle the leaf until it detaches, ensuring you get the very base of the leaf where it connects to the stem.
- Allow the cut end to callous: This is crucial! Leave the leaf somewhere dry and out of direct sun for a day or two, or until the cut end looks dry and sealed. This prevents rot.
- Lay the leaf on top of your soil: You can lightly press the calloused end into the surface of your well-draining mix. Don’t bury it deep.
- Wait and watch: Mist the soil lightly every few days. Soon, you should see a tiny pink root emerge from the cut end, followed by a miniature plantlet.
2. Stem Cuttings: For When You Want a Bigger Start
This method is great if you have a lanky plant or want to propagate a bit faster.
- Choose a healthy stem: Look for a section of the stem with a few healthy leaves.
- Cut the stem: Using your sterilized shears, cut about 2-4 inches off the stem. Make a clean cut just below a leaf node.
- Remove lower leaves: Gently pull off the leaves from the bottom inch or so of the cutting.
- Let it dry: Just like with leaf cuttings, you need to let the cut end callous over for a few days until it’s dry and sealed.
- Plant the cutting: You can either stick the calloused end directly into your succulent potting mix, planting it deep enough to stand on its own, or you can try water propagation.
- For soil: Plant the cutting deeply enough so it’s stable. Water very sparingly initially, waiting until the soil is dry before watering again.
- For water (with a caveat): If you choose water propagation, never let the leaves touch the water. Place the cutting in a jar or glass so that only the cut stem touches the water. Change the water every few days to keep it fresh. As soon as you see roots forming, it’s best to transfer it to soil to prevent root rot.
The “Secret Sauce” (Pro Tips)
Here are a few things I’ve learned that make a big difference:
- Don’t overwater the mother plant beforehand. A slightly dehydrated leaf or stem will be more inclined to break cleanly and callus better. Plus, you want the cutting to rely on the moisture stored in the leaf itself for a while.
- Bottom heat can be a game-changer. If you’re propagating in a cooler environment, placing your pots or trays on a seedling heat mat can significantly speed up root development. Just make sure the heat isn’t too intense; you don’t want to cook those new roots!
- Be patient with leaf cuttings. Sometimes, leaves can look a bit sad and shriveled for weeks. Don’t give up! As long as there’s no mushy rot, there’s still hope for that magical little plantlet to appear.
Aftercare & Troubleshooting
Once you see those tiny roots and new plantlets forming, you’re almost there!
- Gentle watering: Continue to mist or water very lightly. The goal is to keep the soil slightly moist, not soggy. Let the soil dry out between waterings.
- Gradual light transition: As your new plant grows, you can slowly introduce it to brighter, indirect light. Avoid direct sun, which can scorch delicate new growth.
- Signs of failure: The most common issue is rot. If a leaf cutting goes mushy and black, or if a stem cutting wilts and turns black at the base, it’s usually a sign of too much moisture and not enough air circulation. Discard affected cuttings promptly to prevent it from spreading. If a leaf shrivels completely and no plantlet appears, it might have just been a dud. Doesn’t always work, but that’s part of the fun!
A Little Patience Goes a Long Way
Propagating succulents like Pachyphytum fittkaui is a rewarding journey. It teaches you about patience and the incredible resilience of plants. Enjoy the process, celebrate every tiny success, and before you know it, you’ll have a whole collection of these beautiful little plants. Happy propagating!
Resource:
https://identify.plantnet.org/k-world-flora/species/Pachyphytum%20fittkaui%20Moran/data