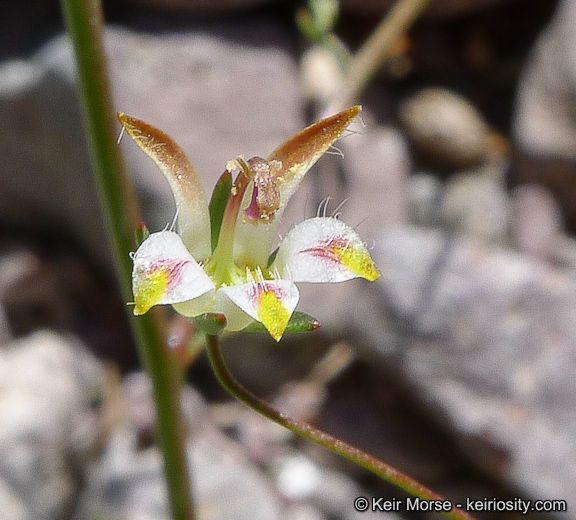
Hey there, fellow plant lovers! Today, we’re diving into something truly special: Nemacladus tenuis. If you haven’t met this little gem yet, imagine delicate, wispy foliage with the most charming, tiny blooms that bring such a unique texture to any garden. Propagating it feels like a little victory, a way to share its magic and fill your space with even more of its subtle beauty. Now, I’ll be honest, Nemacladus tenuis can be a bit of a diva when it comes to propagation. It’s not something I’d recommend for your very first propagation project, but with a little TLC and these tips, you’ll be well on your way to success!
The Best Time to Start
For Nemacladus tenuis, spring is absolutely king. I find that starting your propagation efforts right as the plant is waking up from its winter rest gives you the best chance. Think late March or April in most temperate climates. You’re looking for actively growing, healthy stems that aren’t yet flowering. This energetic growth phase means the plant has plenty of resources to put into forming new roots.
Supplies You’ll Need
Before we get our hands dirty, let’s gather our tools:
- Sharp, clean pruning shears or a sharp knife: Essential for making clean cuts.
- Well-draining potting mix: I like a blend of equal parts seed-starting mix and perlite or coarse sand. Some growers swear by a succulent or cactus mix, which works wonderfully too.
- Small pots or seed trays with drainage holes: Nothing fancy, but they need to drain well.
- Rooting hormone (optional, but recommended): A powder or gel can significantly boost your success rate.
- Plastic bags or a propagation dome: To create a humid environment.
- Spray bottle: For gentle misting.
- Labels and a marker: So you don’t forget what you planted where!
- Small rocks or pebbles (for water propagation): To help hold cuttings upright.
Propagation Methods
While there are a few ways to go about this, stem cuttings are my go-to for Nemacladus tenuis.
- Taking the Cuttings: Choose a healthy, non-flowering stem and make a clean cut about 3-4 inches from the tip. Aim for a cutting that has at least two sets of leaves.
- Preparing the Cuttings: Gently remove the lower leaves, leaving just one or two sets at the top. This prevents them from rotting in the soil and encourages the plant to send energy to root formation. If the leaves are large, you can even cut them in half horizontally to reduce transpiration.
- Applying Rooting Hormone: If you’re using rooting hormone, dip the cut end of the stem into the powder or gel. Tap off any excess.
- Planting the Cuttings: Fill your pots or trays with your prepared, moistened potting mix. Make a small hole with your finger or a pencil and insert the cutting, ensuring the cut end is well-covered by soil. Gently firm the soil around the base.
- Creating Humidity: Water the soil lightly so it’s evenly moist but not waterlogged. Then, cover the pots with a clear plastic bag or propagation dome. This traps humidity, which is crucial for Nemacladus tenuis.
The “Secret Sauce” (Pro Tips)
Here are a few things I’ve learned over the years that often make a big difference:
- Bottom Heat is Your Friend: If you have a heat mat designed for seedlings, placing your pots on it can really speed up root development. It provides gentle warmth that mimics ideal soil temperatures without scorching the delicate cuttings.
- Don’t Drown Them: While humidity is key, the soil should never be soggy. Water sparingly, only when the top inch of soil feels dry. Overwatering is the fastest way to invite rot, and we want to avoid that at all costs!
- Indirect Light is Best: Get your cuttings through the initial shock with bright, indirect light. Direct sun will quickly scorch those tender leaves and dry out the whole setup. A north-facing window or a spot a few feet away from a brighter one is perfect.
Aftercare & Troubleshooting
Once your cuttings are planted, the waiting game begins! Keep them in that humid environment and check the soil moisture regularly. Be patient; roots can take anywhere from two to six weeks to appear. You’ll know they’re rooting when you feel a slight resistance when you gently tug on the cutting, or when you see new growth emerging from the top.
The biggest issue you might encounter is rot. If you see brown, mushy stems, it’s usually a sign of too much moisture and poor air circulation. Remove any affected cuttings immediately and try to let the remaining soil dry out a bit more. If your cuttings shrivel and dry up completely, it’s likely they didn’t get enough humidity or perhaps were in too much direct sun.
A Encouraging Closing
Propagating plants is a journey, and Nemacladus tenuis is a delightful one to embark on. Don’t be discouraged if your first few attempts aren’t perfect. Every gardener has had their share of failures – it’s part of the learning process! Just keep observing your plants, adjust your methods as needed, and most importantly, enjoy the satisfaction of nurturing new life. Happy propagating!
Resource:
https://identify.plantnet.org/k-world-flora/species/Nemacladus%20tenuis%20(McVaugh)%20Morin/data