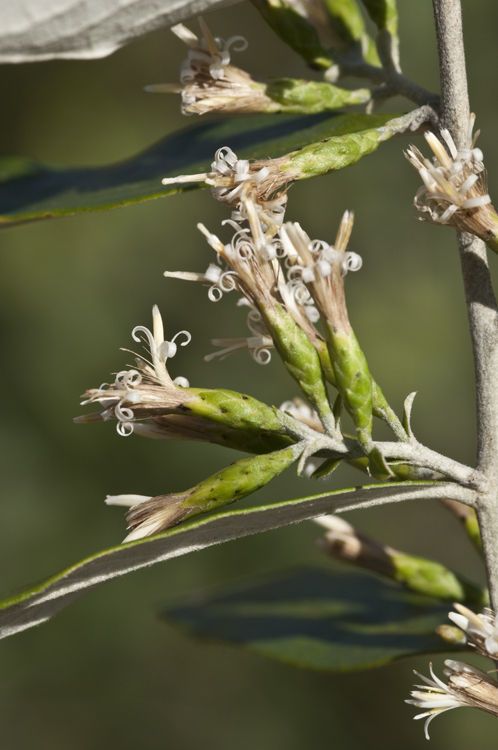
Oh, hello there! Pull up a chair, let’s chat about Nahuatlea hypoleuca. If you’ve ever admired that lush foliage, those delicate blooms, and that wonderful air of tropical charm, you’re not alone. This beauty, a favorite of mine for years, brings such a special touch to any space. And guess what? Reproducing it yourself is not just possible; it’s incredibly satisfying.
Why Propagate Nahuatlea hypoleuca?
There’s something truly magical about taking a tiny piece of a plant you love and watching it grow into something entirely new. It’s like a little bit of green magic in your hands! Nahuatlea hypoleuca, while lovely, can sometimes be a tad selective. If you’re just starting out with propagation, you might find it a bit of a learning curve, but don’t let that deter you! I promise, with a little patience and the right approach, you’ll be sharing your own Nahuatlea babies in no time.
The Best Time to Start
For the highest chances of success with Nahuatlea hypoleuca, aim for late spring through early summer. This is when the plant is actively growing, and its tissues are most receptive to rooting. You’ll want to take cuttings from healthy, non-flowering stems that are firm but not woody. Think of it as capturing that vibrant, energetic phase of the plant’s life.
Supplies You’ll Need
Here’s what you’ll want to have on hand before you begin:
- Sharp Pruning Shears or a Clean Knife: For making clean cuts.
- Rooting Hormone (Optional but Recommended): A powder or gel to encourage root development.
- Sterile Potting Mix: A well-draining blend. I like a mix of equal parts peat moss or coco coir and perlite.
- Small Pots or Seedling Trays: With drainage holes, of course!
- Plastic Bags or a Clear Dome: To create a humid microclimate.
- Watering Can or Spray Bottle: For gentle watering.
- Small Pebbles or Perlite (for water propagation): If you choose that method.
Propagation Methods
Let’s get our hands dirty! I find stem cuttings to be the most reliable method for Nahuatlea hypoleuca.
Stem Cuttings:
- Select Your Cutting: Find a healthy, upright stem that isn’t flowering yet. It should be about 4-6 inches long. Using your sharp shears or knife, make a clean cut just below a leaf node (where a leaf attaches to the stem).
- Prepare the Cutting: Gently remove the lower leaves, leaving just a few at the top. This helps the plant conserve energy and prevents leaves from rotting in the soil.
- Apply Rooting Hormone (Optional but Recommended): Dip the cut end of the stem into your rooting hormone powder or gel. Tap off any excess. This step really gives your cutting a boost!
- Plant Your Cutting: Fill your small pots or trays with your moistened, sterile potting mix. Make a small hole with your finger or a pencil deep enough for the cut end of your stem. Insert the cutting and gently firm the soil around it.
- Create a Humid Environment: Water the soil gently. Then, cover the pot with a clear plastic bag or place it under a clear dome. This traps humidity, which is crucial for cuttings. Make sure the plastic bag doesn’t directly touch the leaves.
Water Propagation (An Alternative):
If you prefer to see the roots form, you can try water propagation. Take your prepared cutting (steps 1 & 2 above) and place it in a jar or vase of clean water. Ensure that no leaves are submerged – they’ll rot quickly in water! Place the jar in bright, indirect light and change the water every few days. You should see tiny roots emerge in a few weeks.
The “Secret Sauce” (Pro Tips)
You want your little Nahuatlea to thrive, right? Here are a few of my tried-and-true tricks:
- Bottom Heat is Your Friend: If you have the space, placing your pots on a seedling heat mat can significantly speed up root formation. The gentle warmth encourages root cell activity.
- Don’t Overwater: This is probably the most common mistake. Cuttings sitting in soggy soil are prime candidates for root rot. The soil should be consistently moist, not drenched. Stick your finger about an inch deep; if it feels dry, it’s time to water gently.
- Air Circulation Matters: While humidity is key, you don’t want stagnant, damp air. Gently lift the plastic bag or open the dome for a few minutes each day to allow for some air exchange. This helps prevent fungal issues.
Aftercare & Troubleshooting
Once you spot new leaf growth, that’s a fantastic sign that your cutting has rooted! You can gently tug on the cutting; if there’s resistance, roots are forming.
Care for your new baby as you would a mature Nahuatlea, but be more gentle. Continue to keep the soil moist but not waterlogged. Gradually acclimate it to less humidity by slowly opening the dome or removing the plastic bag over a week or two. Once it’s out of its humid cradle, you can begin a very light feeding with a diluted liquid fertilizer.
The most common issue you’ll face is rot. If your cutting turns black or mushy, it’s usually a sign of overwatering or poor air circulation. Unfortunately, rotted cuttings can’t be saved. The key is prevention: clean tools, sterile mix, and careful watering.
Keep Growing!
Propagating Nahuatlea hypoleuca is a journey of patience and observation. Don’t be discouraged if your first attempt isn’t a runaway success. Each cutting teaches you something new. Enjoy the process of nurturing these tiny bits of life, and soon you’ll have a whole collection of your own beautiful Nahuatlea plants! Happy gardening!
Resource:
https://identify.plantnet.org/k-world-flora/species/Nahuatlea%20hypoleuca%20(DC.)%20V.A.Funk/data